Physical Products
-

SparkFun SparkFun Servo pHAT for Raspberry Pi
Thanks to its I²C capabilities, this PWM HAT saves the Raspberry Pi's GPIO pins, allowing you to use them for other purposes. The Servo pHAT also adds a serial terminal connection, which will allow you to bring up a Raspberry Pi without having to hook it up to a monitor and keyboard. We have provided a Qwiic connector for easy interfacing with the I²C bus using the Qwiic system and a 4-pin header to connect to the Sphero RVR. Power to the SparkFun Servo pHAT can be supplied through a USB-C connector. This will power either the servo motors only or power the servo motors and the Raspberry Pi that is connected to the HAT. We switched to USB-C to allow you to bring more current to your servos than ever before. This USB-C connector can also hook up the Pi via serial port connection to avoid having to use a monitor and keyboard for setting up the Pi. To supply power only to the servo power rail (and not the Pi's 5V power rail), you need to cut a small trace on the isolation jumper. Doing this allows you to drive heavier loads coming from multiple or larger servos. We've even added power protection circuits to the design to avoid damage to power sources. Each of this pHAT's 16 servo motor pin headers has been spaced out to the standard 3-pin servo pinout (ground, 5V, signal) to make it easier to attach your servo motors. The Servo pHAT is the same size and form factor as a Raspberry Pi Zero and Zero W, but it can also operate with a regular Raspberry Pi. Features 16 PWM channels, controllable over I²C Qwiic connector 4-pin RVR header for connection to Sphero RVR USB-C connector 40-pin GPIO header for connection to Raspberry Pi CH340C USB Serial SOIC16 Updated logic level conversion circuitry Power protection circuits
€ 10,95
Members € 9,86
-

Taylor & Francis Designing Audio Power Amplifiers (2nd Edition)
This comprehensive book on audio power amplifier design will appeal to members of the professional audio engineering community as well as the student and enthusiast. Designing Audio Power Amplifiers begins with power amplifier design basics that a novice can understand and moves all the way through to in-depth design techniques for very sophisticated audiophiles and professional audio power amplifiers. This book is the single best source of knowledge for anyone who wishes to design audio power amplifiers. It also provides a detailed introduction to nearly all aspects of analog circuit design, making it an effective educational text. Develop and hone your audio amplifier design skills with in-depth coverage of these and other topics: Basic and advanced audio power amplifier design Low-noise amplifier design Static and dynamic crossover distortion demystified Understanding negative feedback and the controversy surrounding it Advanced NFB compensation techniques, including TPC and TMC Sophisticated DC servo design MOSFET power amplifiers and error correction Audio measurements and instrumentation Overlooked sources of distortion SPICE simulation for audio amplifiers, including a tutorial on LTspice SPICE transistor modeling, including the VDMOS model for power MOSFETs Thermal design and the use of ThermalTrak transistors Four chapters on class D amplifiers, including measurement techniques Professional power amplifiers Switch-mode power supplies (SMPS)
-
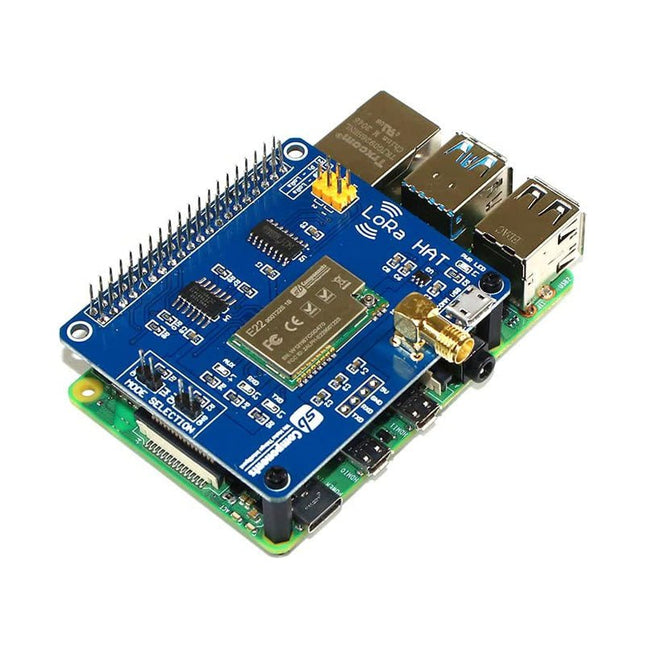
SB Components SB Components LoRa HAT for Raspberry Pi (EU868)
LoRa HAT, a low-power consumption data transmission module, comes with an onboard CH340 USB to UART converter, Voltage Level Translator (74HC125V), E22-900T22S and E22-400T22S SMA antenna connector, IPEX antenna connector, LoRa Spread Spectrum Modulation technology with auto multi-level repeating. Features Onboard 1.14' LCD Voltage Level Translator (74HC125V) Communication range up to 5 km Supports auto repeating to transmit longer Low Power Consumption Highly Secured For Evaluating signal quality with the RSSI or 'Received Signal Strength Indicator' Wireless parameter configuration support Fixed-point transmission support SMA and IPEX Antenna Connector USB to LoRa and Pico to LoRa Communication via UART Comes with development resources and manual LED Indicators: RXD/TXD: UART RX/TX indicator AUX: auxiliary indicator PWR: power indicator Serial/USB selection jumpers: A: USB TO UART to control the LoRa module through USB B: control the LoRa module through Raspberry Pi Pico Data/Command mode selection jumpers: Short M0, short M1: Transmission mode Short M0, open M1: Configuration mode Open M0, short M1: WOR mode Open M0, open M1: Deep sleep mode Specifications Frequency: 850.125~930.125 MHz / 410~493 MHz (Programmable Range) Power: 22dBm Distance: Up to 5 km Interface: UART Communication Serial Port Module: E22-900T22S1B / E22-400T22S Voltage Level Translator: 74HC125V Included 1x LoRa Module 1x Antenna Note: Raspberry Pi Board is not included. Downloads GitHub Wiki
-

Pimoroni Pimoroni Raspberry Pi Pico Wireless Pack
Raspberry Pi Pico Wireless Pack attaches to the back of your Pico and uses an ESP32 chip to let your Pico connect to 2.4 GHz wireless networks and transfer data. There's a microSD card slot for if you want to store lots of data locally as well as a RGB LED (for status updates) and a button (useful for things like enabling/disabling Wi-Fi).Great for quickly adapting an existing Pico project to have wireless functionality, Raspberry Pi Pico Wireless Pack would come in handy for sending sensor data into home automation systems or dashboards, for hosting a web page from a matchbox or for letting your Pico interact with online APIs.Features ESP32-WROOM-32E module for wireless connectivity (connected via SPI) (datasheet) 1x tactile button RGB LED Micro-SD card slot Pre-soldered female headers for attaching your Raspberry Pi Pico Fully assembled No soldering required (as long as your Pico has header pins attached) Compatible with Raspberry Pi Pico Dimensions: approx 53 x 25 x 11 mm (L x W x H, including headers and components) C++ and MicroPython libraries
€ 17,95
Members € 16,16
-

McGraw Hill Education Programming the Raspberry Pi (3rd Edition)
Getting Started with Python This fully updated guide shows how to create inventive programs and fun games on your powerful Raspberry Pi--with no programming experience required. Programming the Raspberry Pi, Third Edition addresses physical changes and new setup procedures as well as OS updates to the current version 4. You will discover how to configure hardware and software, write Python scripts, create user-friendly GUIs, and control external electronics. Step-by-step projects include a digital clock prototype and a fully functioning Raspberry Pi robot. Configure your Raspberry Pi and explore its features Start writing and debugging Python programs Use strings, lists, functions, and dictionaries Work with modules, classes, and methods Apply object-oriented development methods Create user-friendly games using Pygame Build intuitive user interfaces with guizero Interface with hardware using the gpiozero library Attach external electronics through the GPIO port Add powerful Web features to your projects
-

LILYGO LILYGO T-Display-GD32 RISC-V Development Board
The LILYGO TTGO T-Display-GD32 is a compact and minimalist development board featuring a powerful GD32VF103CBT6 RISC-V microcontroller. Ideal for IoT applications, wearables, and rapid prototyping, it provides versatile connectivity options like GPIO, SPI, UART, and I²C interfaces. Thanks to its efficient RISC-V architecture and clear, high-quality screen, this board is perfect for small projects requiring graphical interfaces or data visualization in a space-saving form factor. Specifications Chipset GD32VF103CBT6 FLASH 128 kB SRAM 32 kB On-board clock 108 MHz crystal oscillator Working Voltage 2.7-3.6 V Button BOOT - RESET LCD ST7789 1.14" IPS 240 x 135 USB to TTL CP2104 Modular interface TIMER, UART, SPI, I²C, PWM, ADC, DAC, CAN, USBOTG Working Temperature Range −40~85°C Peripheral Button, RGB LED, SD slot, LCD Power Supply Input USB 5 V @ 1 A Charging Current 500 mA Battery Input 3.7-4.2 V USB USB-C Dimensions 51.49 x 25.2 x 10 mm Weight 10 g Downloads GitHub
-
Raspberry Pi Foundation Raspberry Pi 500 Kit (EU)
The Raspberry Pi 500 (based on the Raspberry Pi 5) features a quad-core 64-bit Arm processor, RP1 I/O controller, 8 GB RAM, wireless networking, dual-display output, 4K video playback, and a 40-pin GPIO header. It's a powerful, compact all-in-one computer built into a portable keyboard. The built-in aluminum heatsink provides improved thermal performance, allowing the Raspberry Pi 500 to run quickly and smoothly even under heavy load. Specifications SoC Broadcom BCM2712 CPU ARM Cortex-A76 (ARM v8) 64-bit Clock rate 4x 2.4 GHz GPU VideoCore VII (800 MHz) RAM 8 GB LPDDR4X (4267 MHz) WiFi IEEE 802.11b/g/n/ac (2.4 GHz/5 GHz) Bluetooth Bluetooth 5.0, BLE Ethernet Gigabit Ethernet (with PoE+ support) USB 2x USB-A 3.0 (5 GBit/s)1x USB-A 2.01x USB-C (for power supply) PCI Express 1x PCIe 2.0 GPIO Standard 40-pin GPIO header Video 2x micro-HDMI ports (4K60) Multimedia H.265 (4K60 decode)OpenGL ES 3.1, Vulkan 1.2 SD card microSD Power supply 5 V DC (via USB-C) Keyboard layout US (QWERTY) Dimensions 286 x 122 x 23 mm Included Raspberry Pi 500 (US keyboard layout, QWERTY) Official 27 W Power Supply for Raspberry Pi (EU, white) Official Raspberry Pi Mouse (white) Official Raspberry Pi HDMI Cable (white, 2 m) 32 GB microSD Card with pre-installed Raspberry Pi OS The Official Raspberry Pi Beginner's Guide (5th Edition) Downloads Datasheet
€ 144,95€ 134,95
Members identical
-

Pimoroni Pimoroni Maker Essentials - Mini Breadboards & Jumper Jerky
The breadboards can hold your components and circuits and connect them with your circuit board. Includes: 2x mini breadboards 10x short female to female jumper jerky 10x short female to male jumper jerky 10x short male to male jumper jerky 10x long female to female jumper jerky 10x long female to male jumper jerky 10x long male to male jumper jerky
-

JOY-iT JOY-iT Nano V3
The Arduino Nano is a complete Arduino-compatible single board computer that can be plugged directly into a 32-pin socket, a breadboard or a corresponding carrier board. It offers the complete Arduino functionality in very compact dimensions. Via the micro-USB socket, you can supply the board and circuit with power as well as conveniently transfer new programs to the controller. Technical details Pin headers for direct use on the pinboard Ideal for prototyping Programmable via free Arduino IDE Connection via mini USB socket Chipset CH340G Interfaces: I²C, UART, SPI Size: 45 x 18 mm Microcontroller ATmega328P-AU Operating Voltage 5 V Flash Memory 32 KB (2 KB used for Bootloader) SRAM 2 KB EEPROM 1 KB Digital Pins 22 (6 with PWM) Analog Pins 8 DC Current per I/O Pin 40 mA Input Voltage 7-12 V Downloads Datasheet User Guide
-

Elektor Labs Elektor Sand Clock for Raspberry Pi Pico (incl. Laser Head Upgrade)
This bundle contains the popular Elektor Sand Clock for Raspberry Pi Pico and the new Elektor Laser Head Upgrade, offering even more options for displaying the time. Not only can you "engrave" the current time in sand, you can now alternatively write it on a glow-in-the-dark foil or create green drawings. Contents of the bundle Elektor Sand Clock for Raspberry Pi Pico (normal price: €50) NEW: Elektor Laser Head Upgrade for Sand Clock (normal price: €35) Elektor Sand Clock for Raspberry Pi (Raspberry Pi-based Eye Catcher) A standard sand clock just shows how time passes. In contrast, this Raspberry Pi Pico-controlled sand clock shows the exact time by "engraving" the four digits for hour and minute into the layer of sand. After an adjustable time the sand is flattened out by two vibration motors and everything begins all over again. At the heart of the sand clock are two servo motors driving a writing pen through a pantograph mechanism. A third servo motor lifts the pen up and down. The sand container is equipped with two vibration motors to flatten the sand. The electronic part of the sand clock consists of a Raspberry Pi Pico and an RTC/driver board with a real-time clock, plus driver circuits for the servo motors. A detailed construction manual is available for downloading. Features Dimensions: 135 x 110 x 80 mm Build time: approx. 1.5 to 2 hours Included 3x Precut acrylic sheets with all mechanical parts 3x Mini servo motors 2x Vibration motors 1x Raspberry Pi Pico 1x RTC/driver board with assembled parts Nuts, bolts, spacers, and wires for the assembly Fine-grained white sand Elektor Laser Head Upgrade for Sand Clock The new Elektor Laser Head transforms the Sand Clock into a clock that writes the time on glow-in-the-dark film instead of sand. In addition to displaying the time, it can also be used to create ephemeral drawings. The 5 mW laser pointer, with a wavelength of 405 nm, produces bright green drawings on the glow-in-the-dark film. For best results, use the kit in a dimly lit room. Warning: Never look directly into the laser beam! The kit includes all the necessary components, but soldering three wires is required. Note: This kit is also compatible with the original Arduino-based Sand Clock from 2017. For more details, see Elektor Magazine 1-2/2017 and Elektor Magazine 1-2/2018.
-
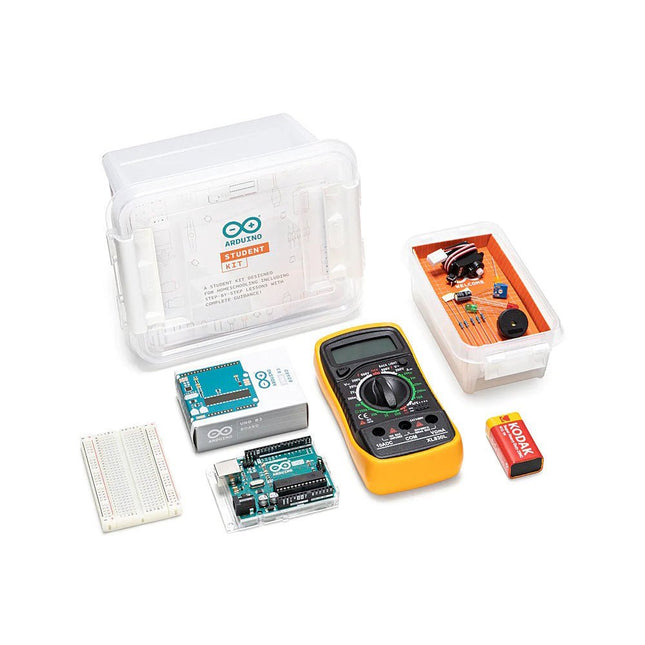
Arduino Arduino Student Kit
The Arduino Student Kit is a hands-on, step-by-step remote learning tool for ages 11+: get started with the basics of electronics, programming, and coding at home. No prior knowledge or experience is necessary as the kit guides you through step by step. Educators can teach their class remotely using the kits, and parents can use the kit as a homeschool tool for their child to learn at their own pace. Everyone will gain confidence in programming and electronics with guided lessons and open experimentation. Learn the basics of programming, coding and electronics including current, voltage, and digital logic. No prior knowledge or experience is necessary as the kit guides you through step by step. You’ll get all the hardware and software you need for one person, making it ideal to use for remote teaching, homeschooling, and for self-learning. There are step-by-step lessons, exercises, and for a complete and in-depth experience, there’s also extra content including invention spotlights, concepts, and interesting facts about electronics, technology, and programming. Lessons and projects can be paced according to individual abilities, allowing them to learn from home at their own level. The kit can also be integrated into different subjects such as physics, chemistry, and even history. In fact, there’s enough content for an entire semester. How educators can use the kit for remote teaching The online platform contains all the content you need to teach remotely: exclusive learning guidance content, tips for remote learning, nine 90-minute lessons, and two open-ended projects. Each lesson builds off the previous one, providing a further opportunity to apply the skills and concepts students have already learned. They also get a logbook to complete as they work through the lessons. The beginning of each lesson provides an overview, estimated completion times, and learning objectives. Throughout each lesson, there are tips and information that will help to make the learning experience easier. Key answers and extension ideas are also provided. How the kit helps parents homeschool their children This is your hands-on, step-by-step remote learning tool that will help your child learn the basics of programming, coding, and electronics at home. As a parent, you don’t need any prior knowledge or experience as you are guided through step-by-step. The kit is linked directly into the curriculum so you can be confident that your children are learning what they should be, and it provides the opportunity for them to become confident in programming and electronics. You’ll also be helping them learn vital skills such as critical thinking and problem-solving. Self-learning with the Arduino Student Kit Students can use this kit to teach themselves the basics of electronics, programming, and coding. As all the lessons follow step-by-step instructions, it’s easy for them to work their way through and learn on their own. They can work at their own pace, have fun with all the real-world projects, and increase their confidence as they go. They don’t need any previous knowledge as everything is clearly explained, coding is pre-written, and there’s a vocabulary of concepts to refer to. The Arduino Student Kit comes with several parts and components that will be used to build circuits while completing the lessons and projects throughout the course. Included in the kit Access code to exclusive online content including learning guidance notes, step-by-step lessons and extra materials such as resources, invention spotlights and a digital logbook with solutions. 1x Arduino Uno 1x USB cable 1x Board mounting base 1x Multimeter 1x 9 V battery snap 1x 9 V battery 20x LEDs (5x red, 5x green, 5x yellow & 5x blue ) 5x Resistors 560 Ω 5x Resistors 220 Ω 1x Breadboard 400 points 1x Resistor 1 kΩ 1x Resistor 10 kΩ 1x Small Servo motor 2x Potentiometers 10 kΩ 2x Knob potentiometers 2x Capacitors 100 uF Solid core jumper wires 5x Pushbuttons 1x Phototransistor 2x Resistors 4.7 kΩ 1x Jumper wire black 1x Jumper wire red 1x Temperature sensor 1x Piezo 1x Jumper wire female to male red 1x Jumper wire female to male black 3x Nuts and Bolts
€ 79,95€ 59,95
Members identical
-
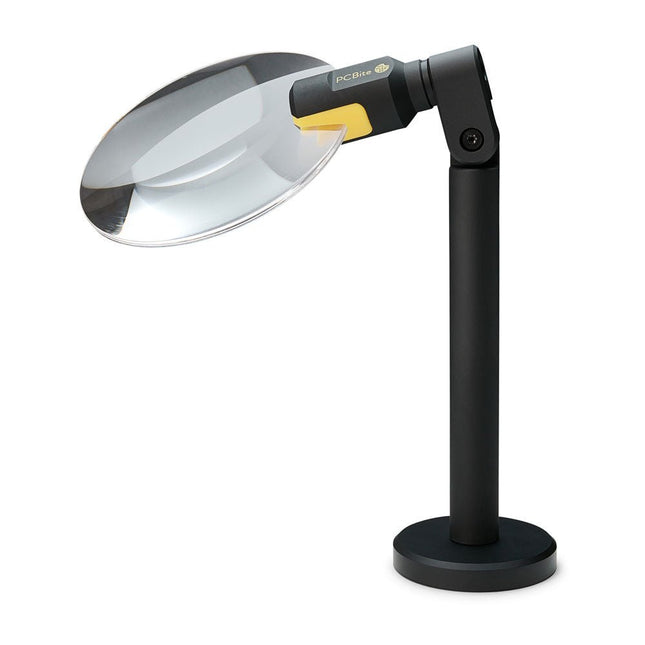
Sensepeek Sensepeek 4020 PCBite 3x Magnifier
The PCBite Magnifier (premium build quality made from CNC machined aluminum) enlarges your target and makes it easier to see during soldering, inspection and measurements. Especially useful when placing PCBite hands free probes on fine pitch SMD components during measurements. 3x magnification edgeless lens for increased visibility of the work surface and AR coating (anti-reflection) to reduce reflections from nearby light sources. Optimized design, magnification and focal point for use together with the PCBite PCB holders and baseplates included in all PCBite kits. Can also be used handheld but not standalone without a metal surface as base. At the bottom of the magnifier foot there is a strong magnet perfectly balanced in strength. A low friction bottom cap protects the magnet and the baseplate to make the magnifier easy to slide when repositioning or removing the magnifier from the baseplate. Friction based adjustment of lens tilt and rotate positions takes away the need for annoying and complicated set screws.
-

Raspberry Pi Foundation Official Raspberry Pi 5 Desktop Kit (EU)
This all-in-one Raspberry Pi 5 Desktop Kit contains all official parts and allows you to get started with the Raspberry Pi 5 quickly and easily. Included Official 27 W Power Supply for Raspberry Pi 5 (EU, white) Official Case for Raspberry Pi 5 (white/red) Official Raspberry Pi Keyboard (US) Official Raspberry Pi Mouse 2x micro HDMI to Standard HDMI cable (A/M) 1 m microSD Card pre-installed with Raspberry Pi OS (32 GB) The Official Raspberry Pi Beginner's Guide (5th Edition) Not included Raspberry Pi 5
-

OWON OWON XDM1241 True RMS Multimeter
The OWON XDM1241 is a fast, high-precision digital True RMS benchtop multimeter with a high-resolution 3.5-inch LCD and 50,000 counts. Its DC voltage accuracy is up to 0.05% and it can measure up to 65 values per second. Features 3.5' high-resolution LCD (480x320 pixels) 55000 counts, DC voltage accuracy up to 0.05% Up to 65 readings per second Dual line display supported Trend analysis accessible in chart mode AC True RMS measurements (bandwidth: 20 Hz – 1 kHz) SCPI support: Remote control the multimeter through PC software via USB port Data record function, you can record the measured data into internal memory, and then read and process the recorded data with your computer. Specifications Measurement Range Resolution Accuracy DC Voltage 50.000 mV 0.001 mV 0.1% +10 500.00 mV 0.01 mV 0.05% +5 5.0000 V 0.0001 V 0.05% +5 50.000 V 0.001 V 0.05% +5 500.00 V 0.01 V 0.1% +5 1000.0 V 0.1 V 0.1% +10 AC Voltage 500 mV~750 V 20 Hz~45 Hz 1% +30 45 Hz~65 Hz 0.5% +30 65 Hz~1 KHz 0.7% +30 DC Current 500 uA 0.01 uA 0.15% +20 5000 uA 0.1 uA 0.15% +10 50 mA 0.001 mA 0.15% +20 500 mA 0.01 mA 0.15% +10 5 A 0.0001 A 0.5% +10 10 A 0.001 A 0.5% +10 AC Current 500 uA~500 mA 20 Hz~1 KHz 0.5% +20 5 A-10 A 1.5% +20 Resistance 500 Ω 0.01 Ω 0.15% +10 5 KΩ 0.0001 KΩ 0.15% +5 50 KΩ 0.001 KΩ 0.15% +5 500 KΩ 0.01 KΩ 0.15% +5 5 MΩ 0.0001 MΩ 0.3% +5 50 MΩ 0.001 MΩ 1% +10 Frequency 10.000 Hz~60 MHz / ±(0.2% +10) Capacitance 50 nF~500 uF / 2.5% +10 5 mF~50 mF 5% +10 Diode 3.0000 V 0.0001 V / Continuity 1000 Ω 0.1 Ω Adjustable threshold Temperature K type, PT100 Max Display 55,000 counts Data-logging Function Logging Duration 15ms~9999.999s Logging Length 1,000 points Display 3.5' TFT LCD (480x320 pixels) Power supply Lithium battery via USB-C or 5 V DC input Dimensions 235 x 88 x 65 mm Weight approx. 0.5 kg Included 1x OWON XDM1241 Multimeter 2x Test leads 1x USB cable 1x USB to DC cord 1x Manual Downloads Programming Manual PC Software
-
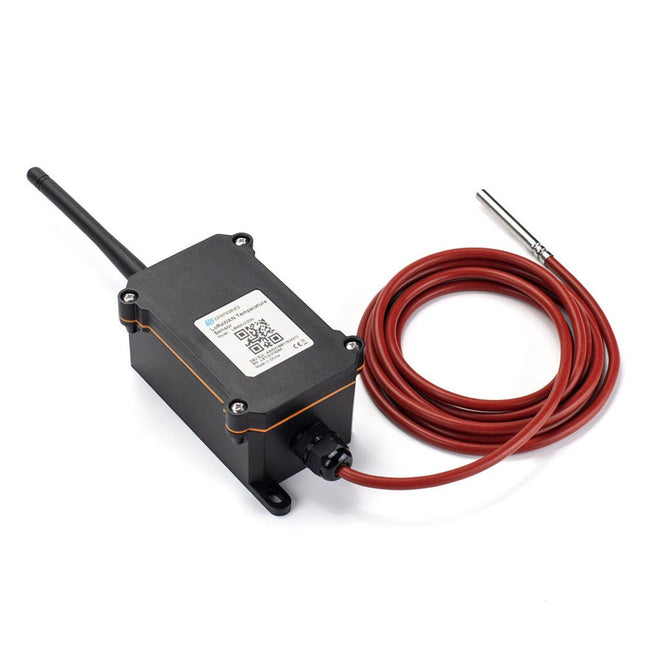
Dragino Dragino LSN50v2-D20 LoRaWAN Waterproof Outdoor Temperature Sensor (EU868)
The temperature sensor used in LSN50v2-D20 is DS18B20, which can measure -55°C~125°C with accuracy ±0.5°C (max ±2.0°C). The sensor cable is made by Silica Gel, and the connection between the metal probe and cable is double compressed for waterproof, moisture-proof, and anti-rust for long-term usage. The LSN50v2-D20 supports a temperature alarm feature, the user can set a temperature alarm for instant notice. It is powered by an 8500 mAh Li-SOCI2 battery, It is designed for long-term use up to 10 years. Each LSN50v2-D20 is pre-load with a set of unique keys for LoRaWAN registration, register these keys to the local LoRaWAN server and it will auto-connect after power on. Features LoRaWAN v1.0.3 Class A Ultra-low power consumption External DS18B20 Probe (default 2meters) Measure range -55°C~125°C Temperature alarm AT Commands to change parameters Uplink on periodically or Interrupt Downlink to change configure Applications Wireless Alarm and Security Systems Home and Building Automation Automated Meter Reading Industrial Monitoring and Control Long-range Irrigation Systems
-
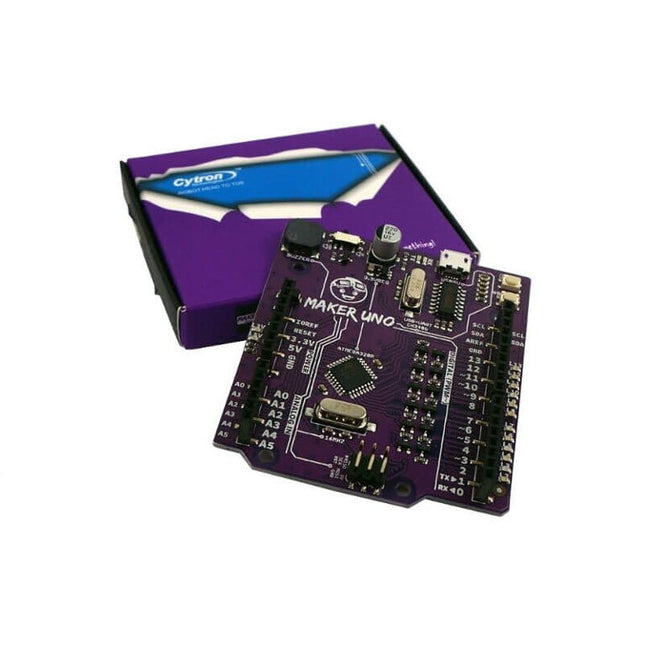
Cytron Cytron Maker Uno
Features Piezo Buzzer: Acts as a simple audio output Micro USB Port Programmable Button 12 x LED: Provides visual output on board Specifications Microcontroller ATmega328P Programming IDE Arduino IDE Operating Voltage 5 V Digital I/O 20 PWM 6 Analog Input 6 (10-bit) UART 1 SPI 1 I2C 1 External Interrupt 2 Flash Memory 32 KB SRAM 2 KB EEPROM / Data Flash 1 KB Clock Speed 16 MHz DC Current I/O Pin 20 mA Power Supply USB only DC Current for 5 V USB Source DC Current for 3.3 V 500 mA USB to Serial Chip CH340G Programmable LED 12 at digital Pin 2 to 13 Programmable Push Button 1 at digital Pin 2 Piezo Buzzer 1 at digital Pin 8 Arduino vs Maker Uno
€ 14,95
Members € 13,46
-

Adafruit Adafruit Zero Spy Camera for Raspberry Pi Zero (160 Degree Focal Angle)
Is your house haunted? Or, rather, are you convinced that your house is haunted but have never been able to prove it since you've never had a camera that integrated with your Raspberry Pi Zero but was still small enough that the ghosts wouldn't notice it? Luckily, the spy camera for Raspberry Pi Zero is smaller than a thumbnail with a high enough resolution to see people, ghosts, or whatever it is you're looking for. It's about the size of a cell phone camera – the module being just 8.6 x 8.6 mm – with only a 2' cable, so you can create an extra compact and sneaky little spy cam. It has a 160-degree focal angle for a very wide/distorted fisheye effect that's great for security systems or watching a big swath of the living room or roadway. Like the Raspberry Pi camera board, it attaches to your Raspberry Pi Zero v1.3 or Zero W by way of the small socket on the board's edge closest to the 'PWR in' port. This interface uses the dedicated CSI interface, which was designed especially for interfacing to cameras. The CSI bus is capable of extremely high data rates, and it exclusively carries pixel data. The camera is connected to the BCM2835 processor on the RPi via the CSI bus, a higher bandwidth link which carries pixel data from the camera back to the processor. This bus travels along the ribbon cable that attaches the camera board to the Pi. The ribbon cables are compatible with both the RPi Zero v1.3 and RPi Zero W. The sensor itself has a native resolution of 5 megapixels and has a fixed focus lens onboard. It has similar specs as the original RPi camera, but is not as high-res as the new RPi camera v2! Specifications Camera Module Dimensions: 8.6 x 8.6 mm Lens Diameter: 10 mm Total Length: 60 mm Lens Focal Angle: 160 degrees Weight: 1.9 g
€ 34,95
Members € 31,46
-
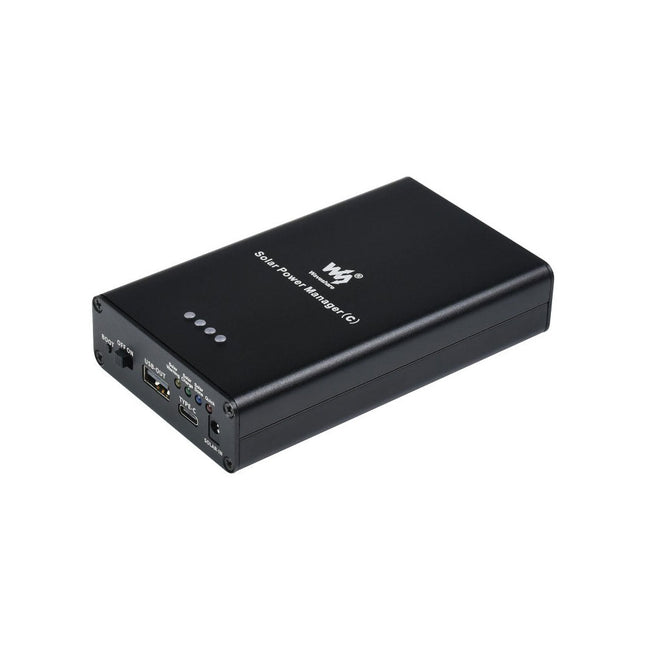
Waveshare Waveshare Solar Power Manager (C)
The Solar Power Manager is compatible with general 6~24 V solar panels. It can recharge the 18650 rechargeable Li-ion batteries through solar panel or USB TYPE-C connection, and provides 5 V/3 A regulated output (with multi protocols support including PD/QC/FCP/PE/SFCP). The module features MPPT (Maximum Power Point Tracking) function and multi protection circuits, therefore, it is able to keep operating with high-efficiency, stability, and safety. It is suitable for solar powered, low-power IoT, and other environmental protection projects. Features Supports MPPT (Maximum Power Point Tracking) function, maximizing the efficiency of the solar panel Flexible battery recharging: from solar panel or USB-C power adapter Compatible with 6~24 V solar panels, DC-002 jack input or screw terminal input Onboard MPPT SET switch, select the level closed to input level to improve recharging efficiency Onboard aluminum electrolytic capacitor and SMD ceramic capacitor, reducing the ripple, stable performance Embedded battery holder, supports 3x 18650 rechargeable Li-ion batteries Several LED indicators, for monitoring the status of solar panel and battery Multi protection circuits: over charge / over discharge / reverse-proof / over heat / over current, stable and safe to use Specifications Solar In 6~24 V (1 V by default) Recharging USB Battery 3x 18650 Li-ion battery (NOT included) USB input 5 V (USB-C, with PD quick charge support) 5 V output 5 V/3 A (USB-OUT, USB-C) Recharging cutoff voltage 4.2 V ±1% Over discharging protection voltage 3.0 V ±1% Solar panel recharging efficiency ~78% USB recharging efficiency ~93% Batteries boost outout efficiency ~90% Quiescent current (max) <2 mA Case Metal case Operating temperature -40°C ~ 85°C Dimensions 119.0 x 71.0 x 25.2 mm Included 1x Solar Power Manager (C) 1x Adapter Downloads Wiki
-
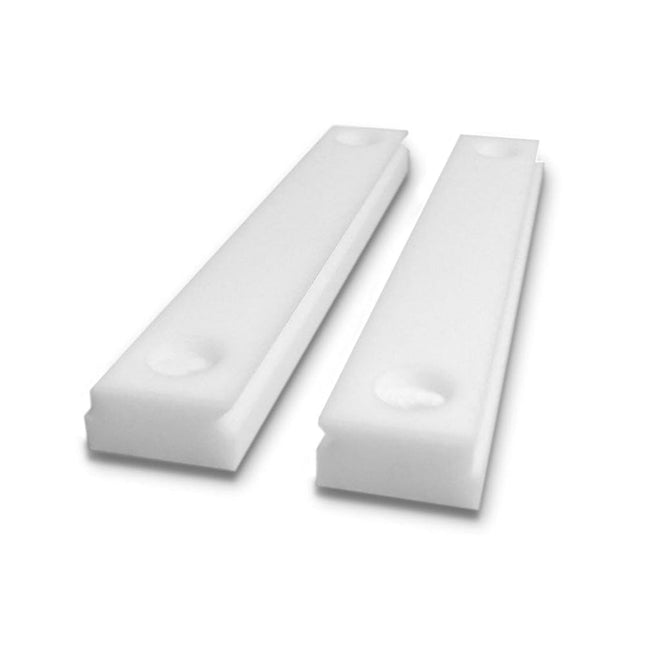
Stickvise Stickvise High Temperature PTFE Jaw (Pack of 2)
An upgraded jaw set that withstands direct contact with a soldering iron Stickvise High Temperature PTFE Vise Jaws will withstand accidental contact with a soldering iron and will not melt. These are a great upgrade for your Stickvise. Features Made from PTFE with extremely high melting point Withstands incidental contact with a soldering iron This is the jaw plates only, does not include a Stickvise Specifications Material Aluminum Dimensions 73 x 53 x 3 mm Weight 21 g
€ 19,95
Members € 17,96
-
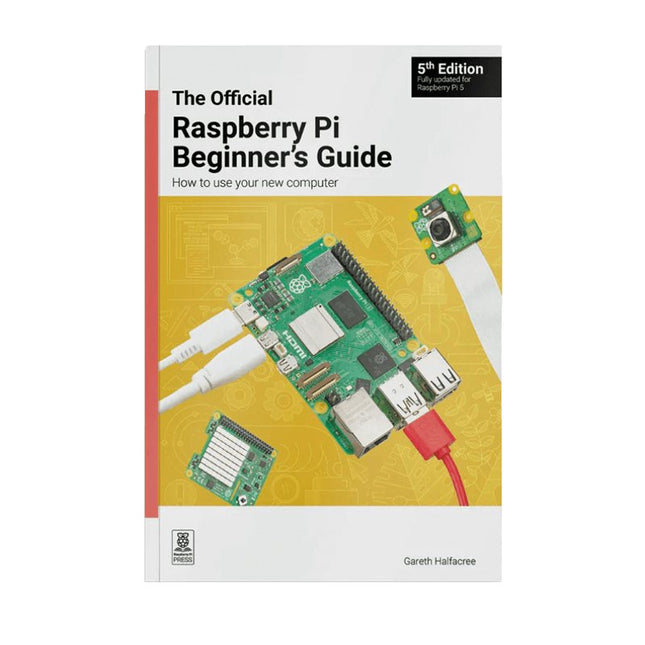
Raspberry Pi Foundation The Official Raspberry Pi Beginner's Guide (5th Edition)
Fully updated for Raspberry Pi 5 Raspberry Pi is a small, clever, British-built computer that's packed with potential. Made using a desktop-class, energy-efficient processor, Raspberry Pi is designed to help you learn coding, discover how computers work, and build your own amazing things. This book was written to show you just how easy it is to get started. Learn how to: Set up your Raspberry Pi, install its operating system, and start using this fully functional computer. Start coding projects, with step-by-step guides using the Scratch 3, Python, and MicroPython programming languages. Experiment with connecting electronic components, and have fun creating amazing projects. New in the 5th edition: Updated for the latest Raspberry Pi computers: Raspberry Pi 5 and Raspberry Pi Zero 2 W. Covers the latest Raspberry Pi OS. Includes a new chapter on the Raspberry Pi Pico. Downloads GitHub
€ 24,95
Members identical
-
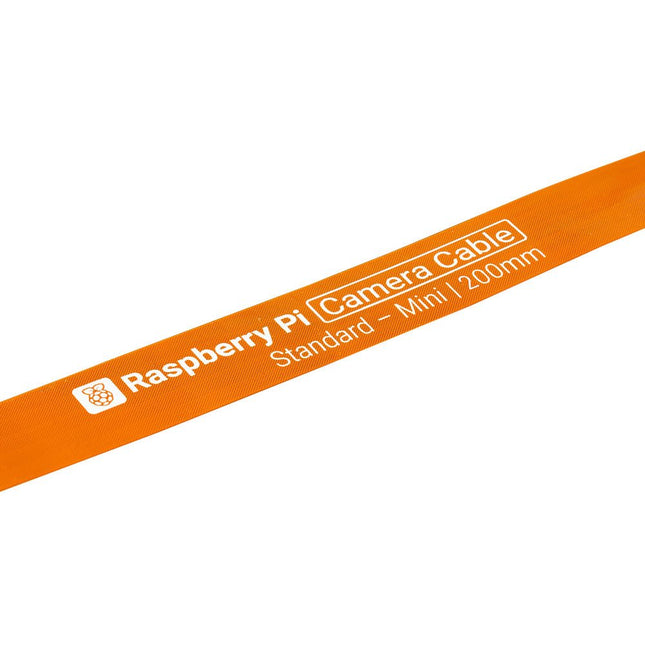
Raspberry Pi Foundation FPC Camera Cable for Raspberry Pi 5 (200 mm)
Raspberry Pi 5 provides two four-lane MIPI connectors, each of which can support either a camera or a display. These connectors use the same 22-way, 0.5 mm-pitch “mini” FPC format as the Compute Module Development Kit, and require adapter cables to connect to the 15-way, 1 mm-pitch “standard” format connectors on current Raspbery Pi camera and display products.These mini-to-standard adapter cables for cameras and displays (note that a camera cable should not be used with a display, and vice versa) are available in 200 mm, 300 mm and 500 mm lengths.
€ 1,95
Members identical
-

Makerfabs Makerfabs 4G LTE Hat for Raspberry Pi
Use your Raspberry Pi with LTE Cat-4 4G/3G/2G Communication & GNSS Positioning, for remote data transmission/phone/SMS, suitable for remote area monitoring/alarming. This 4G hat is based on the Maduino Zero 4G LTE, but without any controller. It needs to work with Raspberry Pi (2x20 connector and USB). The Raspberry communicate with this HAT with simple AT commands (via the TX/RX Pins in the 2X20 connector) for simple controls, such as SMS/Phone/GNSS; with the USB connecting and proper Linux driver installed, the 4G hat act as a 4G network adapter, that can access to the Internet and transmit data with 4G protocol. Compares to normal USB 4G dongle, this Raspberry Pi 4G Hat has the following advantages: Onboard Audio codec, that you can have a call directly with your RPI, or auto broadcasting with a loudspeaker; Hardware UART communication, hardware controlling of Power(by 2s pulse of PI GPIO or POWERKEY button), hardware controlling of flight mode; Dual LTE 4G antenna, plus GPS antenna Features LTE Cat-4, with uplink rate 50 Mbps and downlink rate 150 Mbps GNSS Positioning Audio Driver NAU8810 Supports dial-up, phone, SMS, TCP, UDP, DTMF, HTTP, FTP, and so on Supports GPS, BeiDou, Glonass, LBS base station positioning SIM card slot, supports 1.8V/3V SIM card Onboard audio jack and audio decoder for making a telephone call 2x LED indicators, easy to monitor the working status Supports SIM application toolkit: SAT Class 3, GSM 11.14 Release 99, USAT Included 1x 4G LTE Hat For Raspberry Pi 1x GPS antenna 2x 4G LTE antenna 2x Standoff Downloads GitHub
€ 99,95
Members € 89,96
-
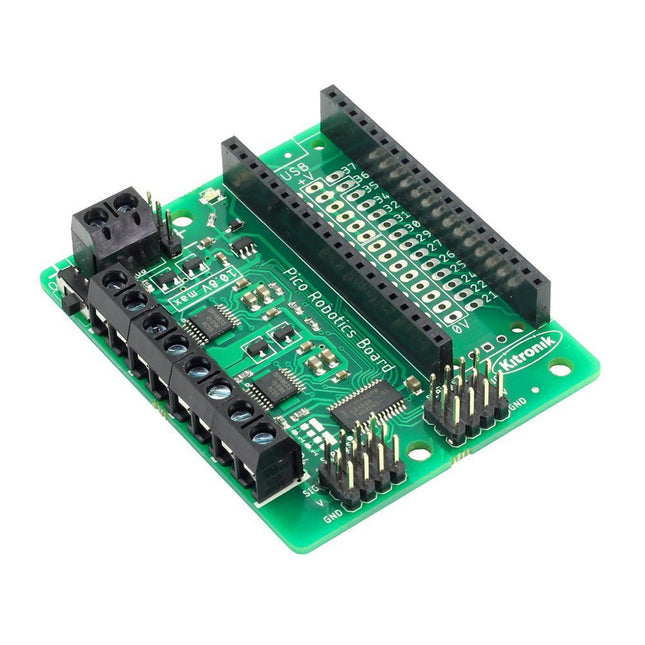
Kitronik Kitronik Robotics Board for Raspberry Pi Pico
The Robotics Board features 2 Dual H Bridge Motor Driver ICs. These are capable of driving 2 standard motors or 1 stepper motor each, with full forward, reverse, and stop control. There are also 8 servo outputs, capable of driving standard and continuous rotation servos. They can all be controlled by the Pico using the I²C protocol, via a 16 channel driver IC. The IO break out provides connections to all the unused pins on the Pico. The 27 available I/O pins allow other devices, such as sensors or ZIP LEDs, to be added to the board. Power is provided via either a terminal block or servo style connector. The supply is then controlled by an on/off power switch to the board and there is also a green LED to indicate when the board has power. The board then produces a regulated 3.3V supply which is fed into the 3 V and GND connections to power the connected Pico. This removes the need to power the Pico separately. The 3 V and GND pins are also broken out on the header, which means external devices can also be powered. To use the robotics board, the Pico should be firmly inserted into the dual row pin socket on the board. Ensure the Pico is inserted with the USB connector at the same end as the power connectors on the robotics board. This will allow access to all of the board functions and each pin is broken out. Features A compact yet feature-packed board designed to sit at the heart of your Raspberry Pi Pico robotics projects. The board can drive 4 motors (or 2 stepper motors) and 8 servos, with full forward, reverse, and stop control. It also features 27 other I/O expansion points and Power and Ground connections. The I²C communication lines are also broken out allowing other I²C compatible devices to be controlled. This board also features an on/off switch and power status LED. Power the board via either a terminal block or servo style connector. The 3V and GND pins are also broken out on the Link header, allowing external devices to be powered. Code it with MicroPython or via an editor such as the Thonny editor. 1 x Kitronik Compact Robotics Board for Raspberry Pi Pico Dimensions: 68 x 56 x 10 mm Requires Raspberry Pi Pico board
€ 24,95
Members € 22,46
-

Elektor Labs Standard 2x16 Character back-lit LCD
Standard 2x16 LCD (see Elektor Labs Preferred Parts - ELPP) with the following specifications: 2 rows, 16 characters wide 5 x 7 dots font and cursor Yellow-green LCD with yellow-green LED backlight HD44780 equivalent LCD controller High contrast Readable in sunlight 16 pin Connection port is 2.54 mm (0.1') pitch, single row for easy breadboarding and wiring pinning (left-to-right): 1-14,A,K Single LED backlight included; Easily dimmed with a resistor or via PWM; Uses much less power than electroluminescent backlights Can be fully controlled with only 6 digital lines(in 4-bit bus mode) 5V DC operating voltage Module dimension: 80 x 36 x 10 mm Viewing area size: 64.5x 15 mm


