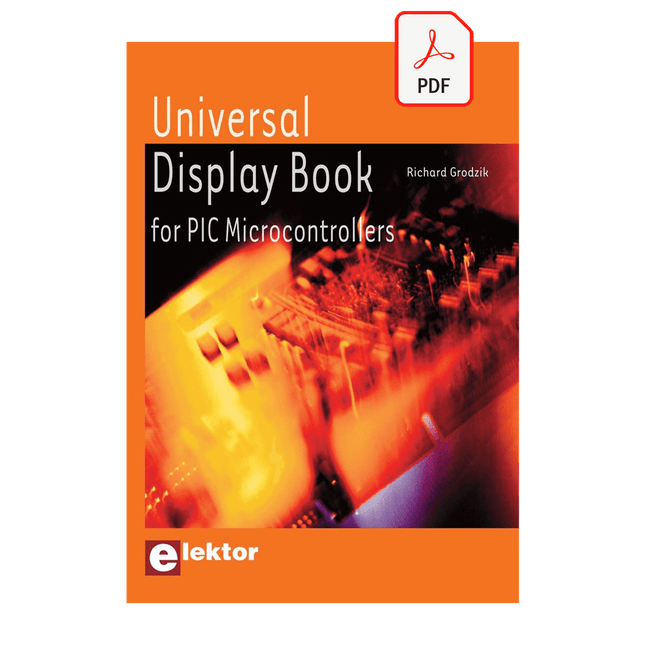
The newcomer to Microchip’s PIC microcontrollers invariably gets an LED to flash as their first attempt to master this technology. You can use just a simple LED indicator in order to show that your initial attempt is working, which will give you confidence to move forward. This is how the book begins — simple programs to flash LEDs, and eventually by stages to use other display indicators such as the 7-segment display, alphanumeric liquid crystal displays and eventually a colour graphic LCD.
As the reader progresses through the book, bigger and upgraded PIC chips are introduced, with full circuit diagrams and source code, both in assembler and C.
In addition, a small tutorial is included using the MPLAB programming environment, together with the EAGLE schematic and PCB design package to enable readers to create their own designs using the book’s many case studies as working examples to work from.
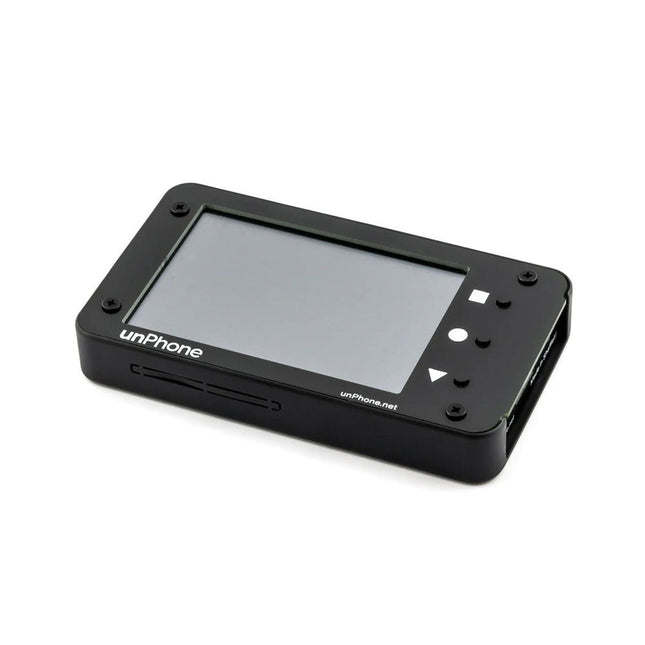
The unPhone is an open-source IoT development platform powered by the ESP32S3 microcontroller. It features integrated LoRa, Wi-Fi, and Bluetooth connectivity, a touchscreen, and a LiPo battery, offering a robust and versatile solution for IoT development. Its compatibility with Adafruit's FeatherWing standard enables easy expansion, making it an ideal choice for educators, makers, and developers seeking a flexible and user-friendly platform.
Features
ESP32S3 microcontroller (with 8 MB flash and 8 MB PSRAM)
LoRaWAN licence-free radio communication (plus the ESP32's excellent wifi and bluetooth support)
3.5" (320 x 480) LCD capacitive touchscreen for easy debugging and UI creation
IR LEDs for surreptitiously switching the cafe TV off
1200 mAh LiPo battery with USB-C charging
Vibration motor for notifications
Compass/Accelorometer
A robust case
SD card slot
Power and reset buttons
Programmable in C++ or CircuitPython
Expander board that supports two Featherwing sockets and a prototyping area
Open source firmware compatible with the Arduino IDE, PlatformIO and Espressif's IDF development framework
Included
unPhone (assembled)
Expander board
FPC cable (to link the expander board to unPhone)
Self adhesive mounts for the expander board
Code Examples
C++ library
Kick the tyres on everything in the box
The main LVGL demo
CircuitPython
Support forum
Textbook (especially chapter 11)
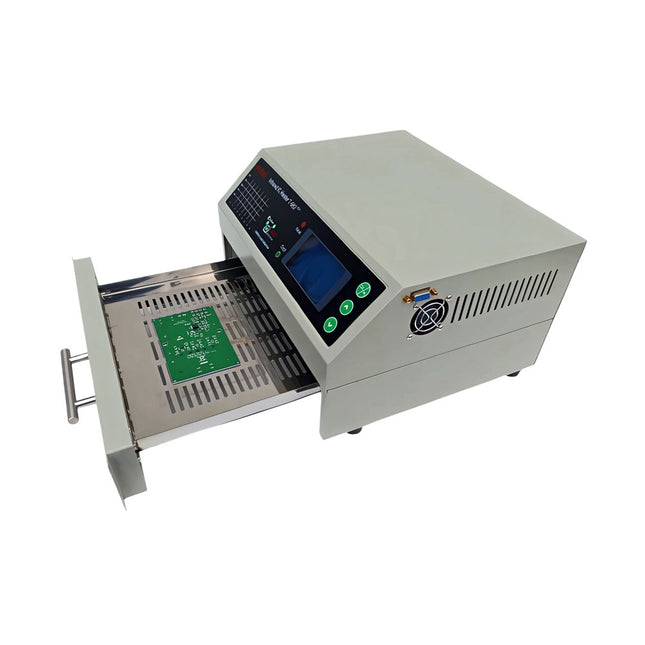
This upgraded version 2.0 (available exclusively from Elektor) contains the following improvements:
Enhanced protective earthing (PE) for furnace chassis
Extra thermal insulation layer around furnace to reduce odors
Connection to a computer, allowing curve editing on a PC
Features such as constant temperature control and timing functions
The infrared IC heater T-962 v2.0 is a microprocessor-controlled reflow oven that you can use for effectively soldering various SMD and BGA components. The whole soldering process can be completed automatically and it is very easy to use. This machine uses a powerful infrared emission and circulation of the hot air flow, so the temperature is being kept very accurate and evenly distributed.
A windowed drawer is designed to hold the work-piece, and allows safe soldering techniques and the manipulation of SMDBGA and other small electronic parts mounted on a PCB assembly. The T-962 v2.0 may be used to automatically rework solder to correct bad solder joints, remove/replace bad components and complete small engineering models or prototypes.
Features
Large infrared soldering area
Effective soldering area: 180 x 235 mm; this increases the usage range of this machine drastically and makes it an economical investment.
Choice of different soldering cycles
Parameters of eight soldering cycles are pre defined and the entire soldering process can completed automatically from Preheat, Soak and Reflow through to cool down.
Special heat up and temperature equalization with all designs
Uses up to 800 Watts of energy efficient Infrared heating and air circulation to re-flow solder.
Ergonomic design, practical and easily operated
Good build quality but at the same time light weight and a small footprint allows the T-962 v2.0 to be easily bench positioned transported or stored.
Large number of available functions
The T-962 v2.0 can solder most small parts of PCB boards, for example CHIP, SOP, PLCC, QFP, BGA etc. It is the ideal rework solution from single runs to on-demand small batch production.
Specifications
Soldering area (max)
180 x 235 mm (7.1 x 9.3")
Power (max)
800 W
Temperature range
0-280°C (32-536°F)
Heating method
Infrared
Processing time
1~8 minutes
Power supply
220 V AC/50 Hz
Display
LCD with Backlight
Control mode
8 intelligent temperature curves
Dimensions
310 x 290 x 170 mm (12.2 x 11.4 x 6.7")
Weight
6.2 kg
Included
1x T-962 v2.0 Reflow Soldering Oven (Elektor Version)
1x USB Stick (with Manual and Software)
2x Fuses
1x Power cord (EU)
Downloads
Manual
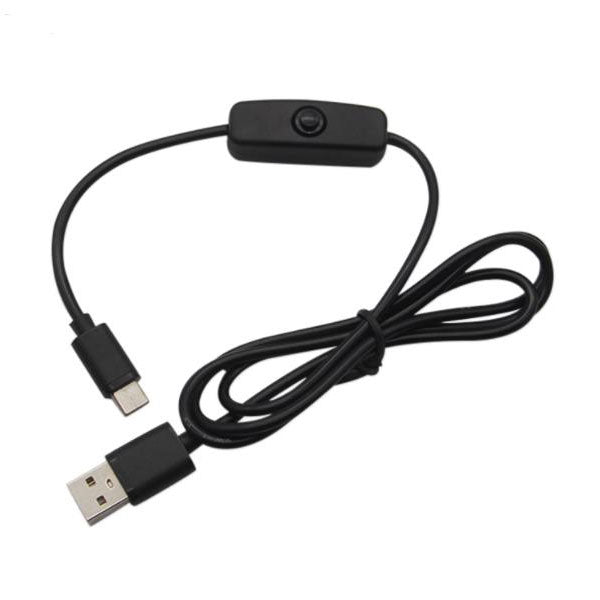
Features Type C cable USB type C is suitable for new version Raspberry Pi 4 No need to pull the cable to restart or reboot your Pi, just press the button to turn your Pi on and off Can be used as power supply for the Pi up to 2 Amp Help prevent the Pi's USB connector from wear and tear due to frequently pulling and inserting the USB cable Specifications Interface: USB Type C Current: 3 A Length: 1.5 m Use for: Raspberry Pi 4 Model B Packing List: 1x USB Type C power cable
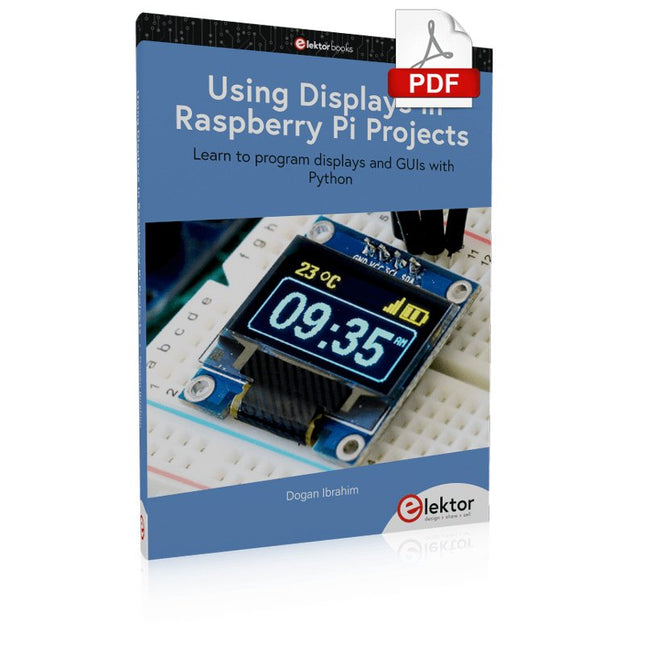
Learn to program displays and GUIs with Python
This book is about Raspberry Pi 4 display projects. The book starts by explaining how to install the latest Raspbian operating system on an SD card, and how to configure and use the GPIO ports.
The core of the book explains the following topics in simple terms with fully tested and working example projects:
Simple LED projects
Bar graph LED projects
Matrix LED projects
Bitmap LED projects
LED strips
LCDs
OLED displays
E-paper displays
TFT displays
7-inch touch screen
GUI Programming with Tkinder
One unique feature of this book is that it covers almost all types of display that readers will need to use in their Raspberry Pi based projects. The operation of each project is fully given, including block diagrams, circuit diagrams, and commented full program listings. It is therefore an easy task to convert the given projects to run on other popular platforms, such as Arduino or PIC microcontrollers.
Python program listings of all Raspberry Pi projects developed in this book are available for download at Elektor.com. Readers can use these programs in their projects. Alternatively, they can modify the programs to suit their applications.
Menno van der Veen is well known for his research publications on tube amplifiers used in audio systems.
In this book he describes one of his research projects which focuses on the question of whether full compensation for distortion in tubes and output transformers is possible.
In the past, a variety of techniques have been developed. One of them has largely been forgotten: trans-conductance, which means converting current into voltage or voltage into current. Menno van der Veen has breathed new life into this technique with his research project titled “Trans”. This book discusses all aspects of this method and discusses its pitfalls. These pitfalls are addressed one by one. The end result is a set of stringent requirements for Trans amplifiers.
Armed with these requirements, Menno then develops new Trans amplifiers, starting with Transie 1 and Transie 2. These DC-coupled, single-ended tube amplifiers have unusually good characteristics and are suitable for hobbyist construction. Next the Trans principle is applied to amplifiers with higher output power.
A trial-and-error process ultimately leads to the Vanderveen Trans 30 amplifier, which optimizes the features of Trans. The characteristics of this amplifier are so special and unique that Menno believes he has struck gold. To ensure that variations in tube characteristics cannot interfere with optimal Trans behavior, Menno makes use of simulations and comparison with other amplifier types. This book reads like an adventure story, but it is much more – it is an account of solid research into new ways to achieve optimal audio reproduction.
The ATmega328 Uno Development Board (Arduino Uno compatible) is a microcontroller board based on the ATmega328.
It has 14 digital input/output pins (of which 6 can be used as PWM outputs), 6 analogue inputs, a 16 MHz ceramic resonator, a USB connection, a power jack, an ICSP header and a reset button.
It contains everything needed to support the microcontroller; connect it to a computer with a USB cable or power it with a AC-to-DC adapter or battery to get started.
Specifications
Microcontroller
ATmega328
Operating voltage
5 V DC
Input voltage (recommended)
7-12 V DC
Input voltage (limits)
6-20 V DC
Digital I/O pins
14 (of which 6 provide PWM output)
Analogue input pins
6
SRAM
2 kB (ATmega328)
EEPROM
1 kB (ATmega328)
Flash memory
32 kB (ATmega328) of which 0.5 kB used by bootloader
Clock speed
16 MHz
Downloads
Manual
Specifications Lens diameter: 90 mm / 3.54' Dioptre: lens Ø 90 mm: dioptre 3 – magnification: 1.75 Power supply: 3 x 1.5 V AAA battery Dimensions: 210 x 170 x 110 mm / 8.3 x 6.7 x 4.3' Weight: 615 g Material: Stand: stainless steel Lens: glass Connecting parts: copper
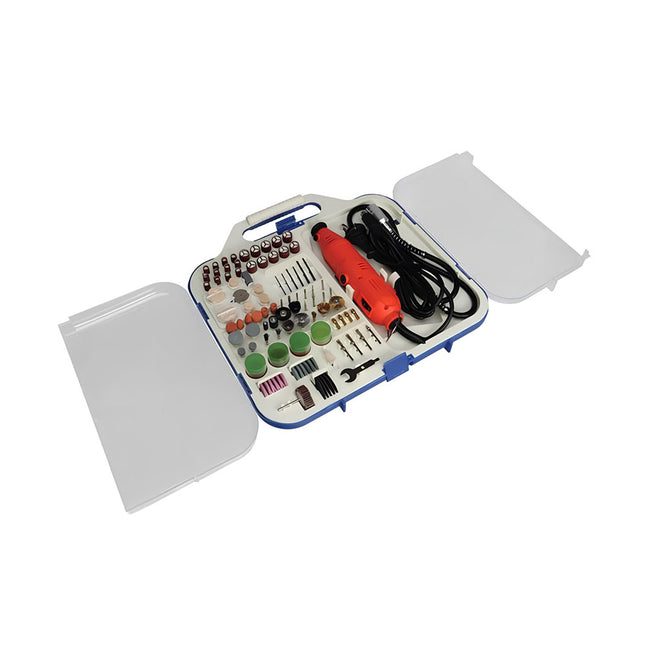
Bring your projects to life with this multifunctional precision drill, engineered for a wide range of applications including cutting, drilling, engraving, polishing, and more. Powered by a robust 135 W motor, it offers variable speed control with an impressive range of 10,000 to 32,000 rpm – ensuring precise and consistent performance across various materials and tasks.
The drill comes in a convenient carry case with a comprehensive 162-piece accessory set, providing the right tool for every job and enabling seamless transitions between different applications. Whether you're a hobbyist or a professional, this versatile tool delivers the power, control, and reliability you need for high-quality craftsmanship.
Multifunctional Versatility
This all-in-one precision drill comes with 162 accessories, making it perfect for a wide range of applications – from cutting and drilling to engraving and polishing. Effortlessly switch between projects and stay prepared for any task.
Powerful Performance
Featuring a 135 W motor and a variable speed range from 10,000 to 32,000 rpm, this drill delivers consistent, high-performance output. It ensures accuracy and efficiency, even for the most demanding jobs.
Comprehensive Accessory Set
Whether you're a dedicated hobbyist or a professional, the included accessories provide everything you need to get the job done right. Enjoy maximum flexibility and convenience in one complete package.
Ergonomic, User-Friendly Design
Designed for comfort and ease of use, the drill features intuitive controls and an ergonomic grip. It fits comfortably in your hand, allowing for precise work—even during extended use.
Built to Last
Crafted from high-quality materials, this precision drill is built for durability and long-term reliability. Whether you're just starting out or are an experienced maker, this tool is made to deliver outstanding results again and again. Let me know if you'd like a more technical, casual, or sales-focused version too!
Included
1x Electric drill (10000-32000 rpm with on/off switch)
1x Flexible shaft (ideal attachment for precise, detailed work or hard to reach places)
1x Collet nut
4x Collets
10x Diamond wheel points
5x Fiberglass cutting disc
62x Cut-off wheels
1x Rubber polishing disc
2x Sanding drums
22x Sanding bands
1x Sanding flap wheel
12x Polishing stones
9x Wire brushes
7x Polishing felts
1x Silicon carbide grindstone
10x Grinding discs
4x Mandrels
2x Polishing compound
6x Drills (2x 1.5 mm, 2x 2.3 mm, 2x 3.1 mm)
1x Tool
Downloads
Manual
Resonances From Aether Days
A Pictorial and Technical Analysis from WWII to the Internet Age
From the birth of radio to the late 1980s, much of real life unfolded through shortwave communication. World War II demonstrated—beyond a shadow of a doubt—that effective communications equipment was a vital prerequisite for military success. In the postwar years, shortwave became the backbone on which many of the world's most critical services depended every day.
All the radio equipment—through whose cathodes, grids, plates, and transistors so much of human history has flowed—is an exceptional subject of study and enjoyment for those of us who are passionate about vintage electronics. In this book, which begins in the aftermath of World War II, you’ll find a rich collection of information: descriptions, tips, technical notes, photos, and schematics that will be valuable for anyone interested in restoring—or simply learning about—these extraordinary witnesses to one of the most remarkable eras in technological history.
My hope is that these pages will help preserve this vast treasure of knowledge, innovation, and history—a heritage that far transcends the purely technical.
The PC has long-time outgrown its function as a pure computer and has become an all-purpose machine. This book is targeted towards those people that want to control existing or self-built hardware from their computer.
Using Visual Basic as Rapid Application Development tool we will take you on a journey to unlock the world beyond the connectors of the PC.
After familiarising yourself with Visual Basic, its development environment and the toolset it offers, items such as serial communications, printer ports, bit-banging, protocol emulation, ISA, USB and Ethernet interfacing and the remote control of test-equipment over the GPIB bus, are covered in extent. Each topic is accompanied by clear, ready to run code, and where necessary, schematics are provided that will get your projects up to speed in no time.
This book will show you advanced things like: using tools like Debug to find hardware addresses, setting up remote communication using TCP/IP and UDP sockets and even writing your own internet servers. Or how about connecting your own block of hardware over USB or Ethernet and controlling it from Visual Basic. Other things like internet-program communication, DDE and the new graphics interface of Windows XP are covered as well.
All examples are ready to compile using Visual Basic 5.0, 6.0, NET or 2005. Extensive coverage is given on the differences between what could be called Visual Basic Classic and Visual basic .NET / 2005.
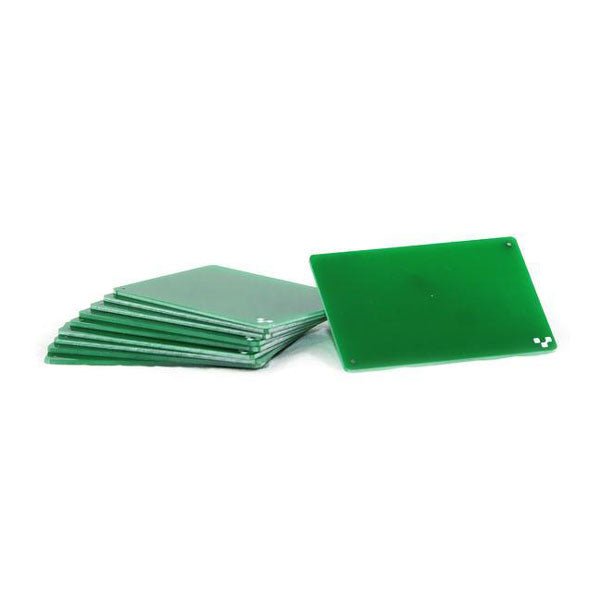
If you are going to be drilling, we recommend drilling on FR1 substrates. Unlike FR4, FR1 dust does not contain fiber glass. It is also a softer material, which means a less wear and tear on the drill bits. Download the template and incorporate them into your design here. 10 substrates included.
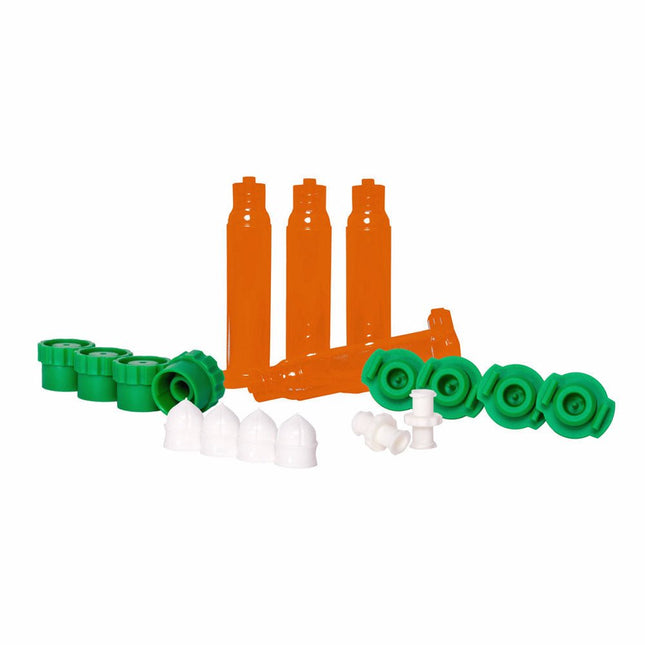
Need to dispense your own UV sensitive fluids (up to 550nm)?
Included
4x 5cc UV-Blocking Syringe Barrels
4x Standard Fit Pistons (white)
4x High Viscosity Fit Pistons (red)
4x Tip Caps
4x End Caps
2x Female to Female Luer couplers
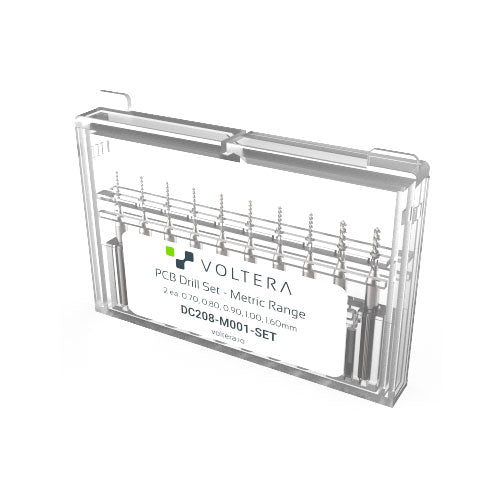
A set of high precision drill bits, covering the most common drill bit sizes.
Just pop them in the V-One Drill with a 2.5 mm hex key (not included) and start drilling.
The following sizes are included (2 of each):
0.70 mm
0.80 mm
0.90 mm
1.00 mm
1.60 mm
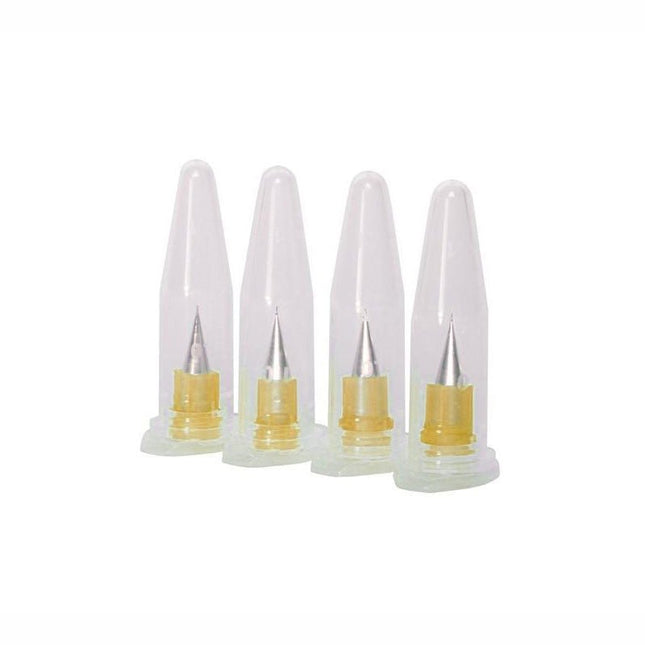
Looking to dispense materials with a lower viscosity? These are the nozzles for you. Don't use this with our standard ink or solder paste... that will result in poor performance.
This pack contains 4 extra fine nozzles with an internal diameter of 0.100 mm (4 mil).
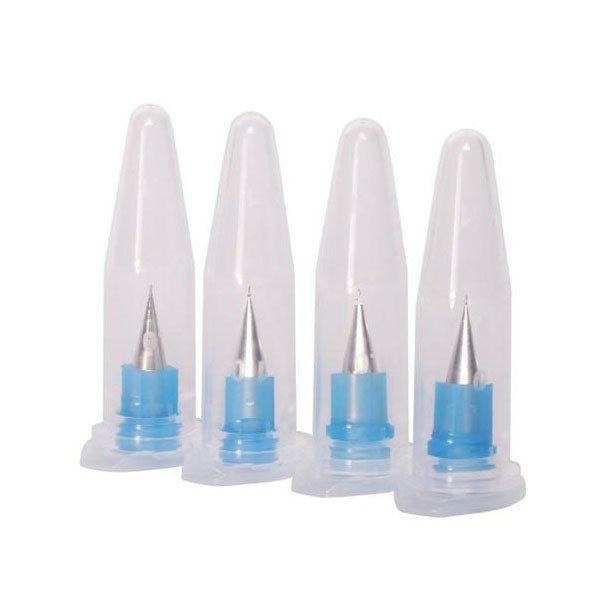
If you want to push the resolution limits of the V-One, these dispensing tips will help enable your experimental projects. This pack contains 4 extra fine nozzles with an internal diameter of 0.150 mm (6 mil).
Do not use with solder paste! It will clog!
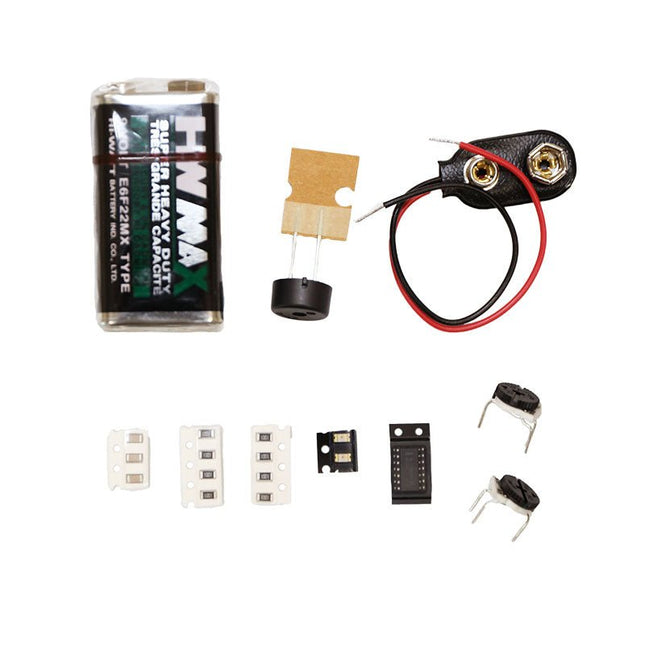
The Punk Console circuit is an advanced tutorial to get you familiar with the V-One Drill attachment. Learn how to create a double sided board and turn the knobs to create music! The kit contains: 2x Green LEDs 8x 1k Resistors 3x 0.01uF Capacitor 2x 500K Trimpots 1x 556 Timer 1x Piezo Buzzer 1x 9 V Battery 1x 9 V Battery Connector Rivets and a V-One Drill are required.
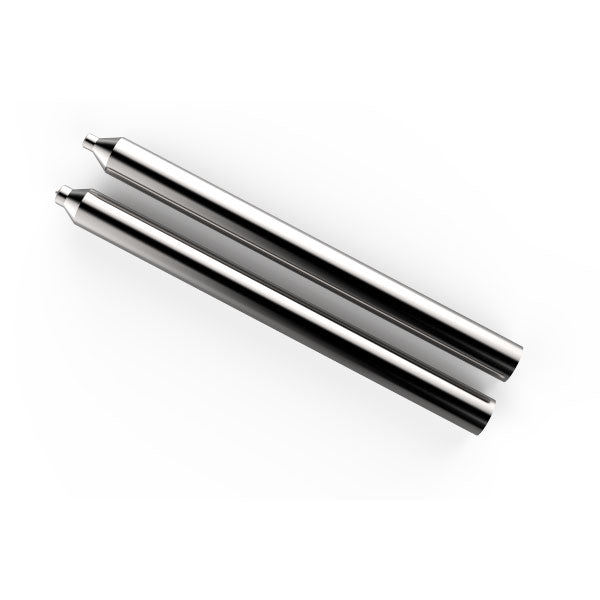
Use the right tool for the right job. These steel stakes are used to press the rivets on the PCB after holes have been drilled. They have been designed for optimum performance on the ink and ensure an electrical connection between the top and bottom layers of your PCB. Learn how to use them here.
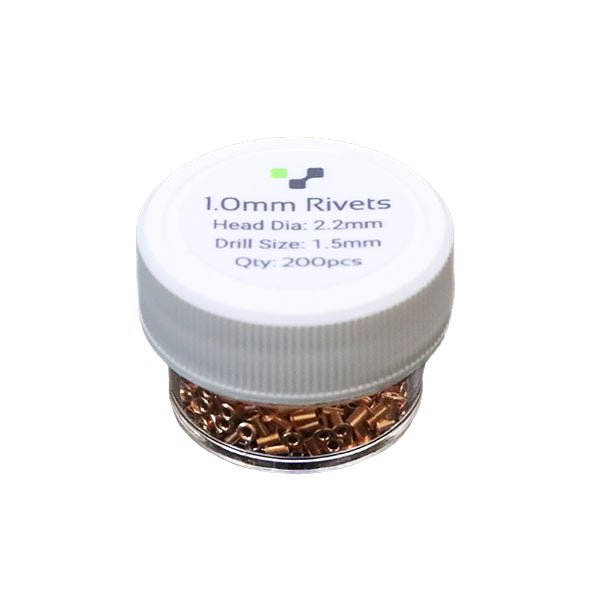
Do you need a way to connect the top and bottom layers? Rivets are the key!Rivets are little copper tubes that make a mechanical connection between the top and bottom layer. We found rivets to be the easiest way to create vias. Be sure to pick up the corresponding rivet tool if you don't have one!
Pack of 200
Inner Diameter - 1.0mm
Head Diameter - 2.2mm
Drill Size: 1.5mm (or 1.6mm)
Confused on how to use them? Checkout our tutorial here.