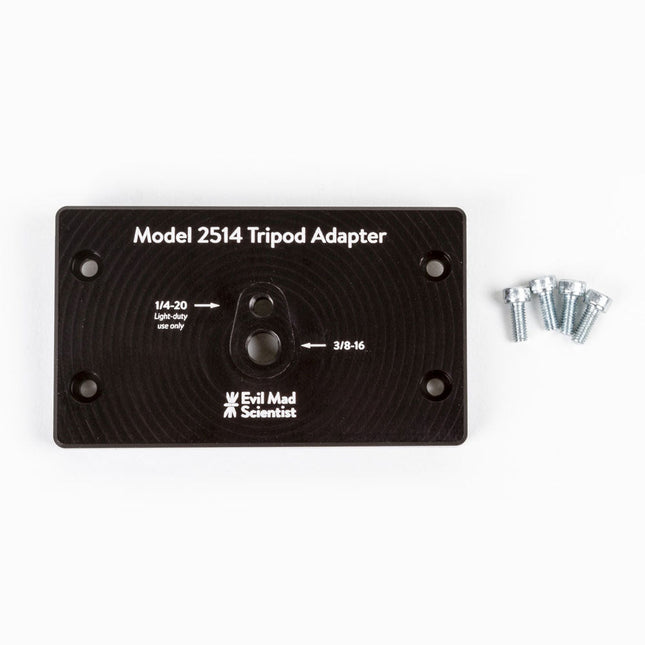
The tripod adapter is custom machined from a solid block of aluminum, and provides two standard tripod mounting points with 3/8-16 and light-duty 1/4-20 thread respectively. This allows you to mount the AxiDraw to a tripod, should you have reason to do so.
We would highly recommend using a sturdy tripod with a 3/8-16 connection point and appropriate counterweight (sand bag, lifting weights, etc) to balance the weight of the AxiDraw while in use.
Installation is straightforward, and does not require any tools other than those included with AxiDraw: Remove the existing foot pads from the AxiDraw (either standard or outrigger feet, depending on model) and attach this plate to the captured nuts in the bottom surface of the AxiDraw. For AxiDraw SE/A3 (April 2019 and newer), the tripod adapter attaches directly to tapped holes in the base of the machine.
This heavy-duty tripod adapter is compatible with AxiDraw V3, AxiDraw V3/A3 and AxiDraw V3 XLX. It is also compatible with AxiDraw SE/A3 manufactured in April 2019 and newer.
Specifications
Material: Anodized 6061-T6 aluminum
Size: 3.90 x 2.36 x 0.35 inches (99.1 x 60 x 8.3 mm)
Weight: Approximately 144 g
Mounting hardware: included (four M4x10 high-strength steel mounting screws)
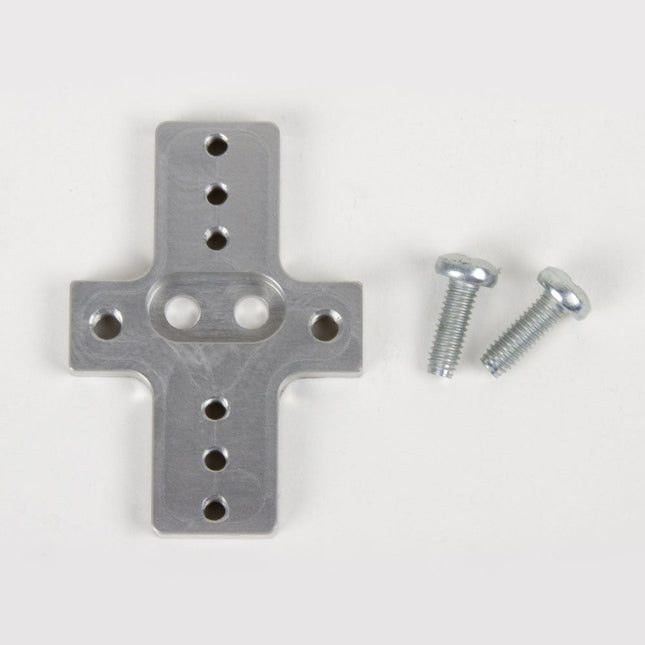
This rigid end effector plate is designed to be in place of the standard AxiDraw pen-lift Z stage, and provides an alternative mounting scheme for mounting various things to the end of the AxiDraw's arm, for applications where greater rigidity is important but the lifting ability of the standard Z stage is not required.
The rigid end effector is custom machined from aluminum, and provides six M3 tapped holes and two M4 tapped holes for mounting what ever it is that you would like to mount to the end of the AxiDraw, to use it as a 2D robot arm. The hole pattern is compatible with the AxiDraw pen clip, so you can, if you like, mount the AxiDraw's pen clip to this end effector.
Installation is straightforward, but requires a Pozidrive PZ2 screwdriver, not included*. Remove the AxiDraw's pen clip, and then remove the pen-lift Z stage by removing two screws with the PZ2 screwdriver. Install the rigid end effector plate in its place, using the two included mounting screws and the PZ2 screwdriver. You may wish to also tie back or fully remove the AxiDraw's cable guides, which normally extend to power the pen-lift stage.
Specifications
Material: Anodized 6061-T6 aluminum
Size: 1.97 x 1.38 x 0.19 inches (50 x 35 x 4.8 mm)
Weight: Approximately 11 g
Mounting hardware: included (Two M4x12 pozidrive-head self-tapping screws)
Compatibility
All AxiDraw V3 family pen plotters
AxiDraw V3/A3
AxiDraw SE/A3
AxiDraw MiniKit models
Extra easel boards for AxiDraw V3/A3 can be used as replacements, or for staging additional workpieces for quickly swapping to the next plot. This set consists of one 11.75 x 17 inch (29.85 x 43.18 cm) hardboard platen with rubber feet attached, plus eight micro binder clips.
PiKVM V3 is an open-source Raspberry Pi-based KVM over IP device. It will help you to manage servers or workstations remotely, whatever the state of the operating system or whether one is installed.
PiKVM V3 allows you to turn on/off or restart your computer, configure the UEFI/BIOS, and even reinstall the OS using the virtual CD-ROM or flash drive. You can use your remote keyboard and mouse or PiKVM can simulate a keyboard, mouse, and a monitor, which are then presented in a web browser as if you were working on a remote system directly.
Features
HDMI Full HD capture based on the TC358743 chip (extra low latency ~100 ms and many features like compression control).
OTG Keyboard & mouse; Mass Storage Drive emulation.
Ability to simulate 'removal and insertion' for USB.
Onboard ATX power control
Onboard fan controller
Real-time clock (RTC)
RJ-45 and USB serial console port (to manage PiKVM OS or to connect with the server).
Optional AVR-based HID (for some rare and strange motherboards whose BIOS doesn't understand the OTG emulated keyboard).
Optional OLED screen to display network status or other desired information.
Ready-made board. No need for soldering or breadboarding.
PiKVM OS – the software is fully open.
Included
PiKVM V3 HAT board for Raspberry Pi 4
USB-C bridge board – to connect the HAT with Pi over USB-C
ATX controller adapter board and wiring – to connect the HAT to the motherboard (if you want to manage power supply through hardware).
2 flat CSI cables
Screws and brass standoffs
Required
Raspberry Pi 4
MicroSD card
USB-C to USB-A cable
HDMI cable
Straight Ethernet cable (for the ATX expansion board connection)
Power supply unit (5.1 V/3 A USB-C, officiel RPi power supply is recommended)
Downloads
User Guide
Images
GitHub
Links
The PiKVM Project and Lessons Learned: Q&A with PiKVM creator and developer Maxim Devaev
PiKVM: Raspberry Pi as a KVM Remote Control
Programming the Finite State Machine with 8-Bit PICs in Assembly and C
Andrew Pratt provides a detailed introduction to programming PIC microcontrollers, as well as a thorough overview of the Finite State Machine (FSM) approach to programming. Most of the book uses assembly programming, but do not be deterred. The FSM gives a structure to a program, making it easy to plan, write, and modify. The last two chapters introduce programming in C, so you can make a direct comparison between the two techniques. The book references the relevant parts of the Microchip datasheet as familiarity with it is the best way to discover detailed information.
This book is aimed at Microsoft Windows and Linux users. To keep your costs to a minimum and to simplify the toolchain, specific applications are provided as a free download to enable you to use an FTDI serial lead as the programmer. The assembler used is the open-source "gpasm". All programming can be done in a text editor. There are detailed instructions on how to perform the necessary installations on Windows, Linux Debian, and derivatives such as Ubuntu and Fedora. For programming in C, Microchip's XC8 compiler is used from the command line. In addition to the programming applications, two serial read and serial write applications can be used for communicating with the PICs from a computer.
A voltmeter project including practical instructions on building a circuit board from scratch is included. All theory is covered beforehand, including how to do integer arithmetic in assembly.
Two PICs are covered: the PIC12F1822 and the PIC16F1823. Both can run at 32 MHz with an internal oscillator. You do not need to buy a factory-made development board and programmer. With relatively inexpensive parts including a serial lead, microcontroller, a few resistors, and LEDs, you can get started exploring embedded programming.
Links
Updated Programmer
Most people are increasingly confronted with the applications of Artificial Intelligence (AI). Music or video ratings, navigation systems, shopping advice, etc. are based on methods that can be attributed to this field.
The term Artificial Intelligence was coined in 1956 at an international conference known as the Dartmouth Summer Research Project. One basic approach was to model the functioning of the human brain and to construct advanced computer systems based on this. Soon it should be clear how the human mind works. Transferring it to a machine was considered only a small step. This notion proved to be a bit too optimistic. Nevertheless, the progress of modern AI, or rather its subspecialty called Machine Learning (ML), can no longer be denied.
In this book, several different systems will be used to get to know the methods of machine learning in more detail. In addition to the PC, both the Raspberry Pi and the Maixduino will demonstrate their capabilities in the individual projects. In addition to applications such as object and facial recognition, practical systems such as bottle detectors, person counters, or a “talking eye” will also be created.
The latter is capable of acoustically describing objects or faces that are detected automatically. For example, if a vehicle is in the field of view of the connected camera, the information 'I see a car!' is output via electronically generated speech. Such devices are highly interesting examples of how, for example, blind or severely visually impaired people can also benefit from AI systems.
Plot, Cut, Drill, Mill and Laser with the Z99
This book covers the construction, hardware, software, and operation of the Z99 – CNC machine. This is a multifunctional 4-axis machine for home construction.
The capabilities of the Z99 machine include:
large-format schematic plotting
PCB plotting with etch-resist pens
schematic plotting with conductive-ink pens
letter cutting out of vinyl
paper cutting
PCB/substrate drilling
PCB/substrate milling
text milling
laser engraving
laser cutting of solder paste masks
By making the support software available as freeware, readers of the book are challenged and encouraged to develop new applications for the Z99.
The machine would not be of much use if the user has no option to create suitable files for the designs in mind. A large part of this book is dedicated to creating source files in a variety of freeware software packages, including Inkscape, DesignSpark PCB, KiCad, and FlatCAM.
The book is also useful for readers keen to comprehend and then master the basic structure of HPGL, Gerber, Drill, and G-code files, as well as to have a go at deciphering them using software.
The flexibility of the Artemis module starts with SparkFun's Arduino core. You can program and use the Artemis module just like you would an Uno or any other Arduino. The time to first blink is just 5 minutes away! We built the core from the ground up, making it fast and as lightweight as possible.
Next is the module itself. Measuring 10 x 15 mm, the Artemis module has all the support circuitry you need to use the fantastic Ambiq Apollo3 processor in your next project. We're proud to say the SparkFun Artemis module is the first open-source hardware module with the design files freely and easily available. We've carefully designed the module so that implementing Artemis into your design can be done with low-cost 2-layer PCBs and 8mil trace/space.
Made in the USA at SparkFun's Boulder production line, the Artemis module is designed for consumer-grade products. This truly differentiates the Artemis from its Arduino brethren. Ready to scale your product? The Artemis will grow with you beyond the Uno footprint and Arduino IDE. Additionally, the Artemis has an advanced HAL (hardware abstraction layer), allowing users to push the modern Cortex-M4F architecture to its limit.
The SparkFun Artemis Module is fully FCC/IC/CE certified and is available in full tape and reel quantities. With 1M flash and 384k RAM, you'll have plenty of room for your code. The Artemis module runs at 48MHz with a 96MHz turbo mode available and with Bluetooth to boot!
Voice recognition, always-on voice commands, gesture, or image recognition are possible with TensorFlow applications. The cloud is impressively robust, but all-the-time connection requires power and connectivity that may not be available. Edge computing handles discrete tasks such as determining if someone said 'yes' and responds accordingly. The audio analysis is done on the MicroMod combination rather than on the web. This dramatically reduces costs and complexity while limiting potential data privacy leaks.
This board features two MEMS microphones (one with a PDM interface, one with an I²S interface), an ST LIS2DH12 3-axis accelerometer, a connector to interface to a camera (sold separately), and a Qwiic connector. A modern USB-C connector makes programming easy and we've exposed the JTAG connector for more advanced users who prefer to use the power and speed of professional tools. We've even added a convenient jumper to measure current consumption for low power testing.
Features
M.2 MicroMod Keyed-E H4.2mm 65 pins SMD Connector 0.5mm
Digital I²C MEMS Microphone PDM Invensense ICS-43434 (COMP)
Digital PDM MEMS Microphone PDM Knowles SPH0641LM4H-1 (IC)
ML414H-IV01E Lithium Battery for RTC
ST LIS2DH12TR Accelerometer (3-axis, ultra-low-power)
24 Pin 0.5mm FPC Connector (Himax camera connector)
USB-C
Qwiic connector
MicroSD socket
Phillips #0 M2.5x3mm screw included
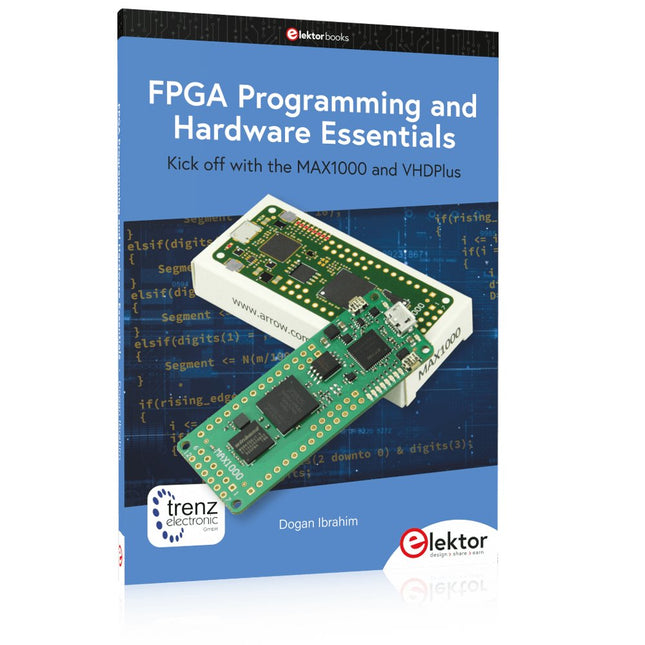
Kick off with the MAX1000 and VHDPlus
Ready to Master FPGA Programming? In this guide, we’re diving into the world of Field Programmable Gate Arrays (FPGAs) – a configurable integrated circuit that can be programmed after manufacturing. Imagine bringing your ideas to life, from simple projects to complete microcontroller systems!
Meet the MAX1000: a compact and budget-friendly FPGA development board packed with features like memory, user LEDs, push-buttons, and flexible I/O ports. It’s the ideal starting point for anyone wanting to learn about FPGAs and Hardware Description Languages (HDLs).
In this book, you’ll get hands-on with the VHDPlus programming language – a simpler version of VHDL. We’ll work on practical projects using the MAX1000, helping you gain the skills and confidence to unleash your creativity.
Get ready for an exciting journey! You’ll explore a variety of projects that highlight the true power of FPGAs. Let’s turn your ideas into reality and embark on your FPGA adventure – your journey starts now!
Exciting Projects You’ll Find in This Book
Arduino-Driven BCD to 7-Segment Display Decoder
Use an Arduino Uno R4 to supply BCD data to the decoder, counting from 0 to 9 with a one-second delay
Multiplexed 4-Digit Event Counter
Create an event counter that displays the total count on a 4-digit display, incrementing with each button press
PWM Waveform with Fixed Duty Cycle
Generate a PWM waveform at 1 kHz with a fixed duty cycle of 50%
Ultrasonic Distance Measurement
Measure distances using an ultrasonic sensor, displaying the results on a 4-digit 7-segment LED
Electronic Lock
Build a simple electronic lock using combinational logic gates with push buttons and an LED output
Temperature Sensor
Monitor ambient temperature with a TMP36 sensor and display the readings on a 7-segment LED
Downloads
Software
,
by Clemens Valens
The Anet 4540 Desktop CNC and Engraving Machine
Like 3D printers and laser engraving machines, CNC machines have become more mainstream too. Where they used to cost thousands of euros in the past,...