The Pro Tech Toolkit is the one thing every DIYer, fixer, hacker, hobbyist, and professional needs to tackle any job.
Every tool in the Pro Tech Toolkit has been re-engineered to be better. From the 64 Bit Driver Kit to the iFixit Opening Picks, every tool is specially designed and selected to maximize your repair capabilities.
At the core of this kit is the iFixit 64 Bit Driver Kit, designed with extensive research into what fastener types are currently used in the consumer electronics industry and which legacy fasteners are still in demand by consumers. From the Apple Watch with its new tiny Tri-Point screws to vintage Nintendo game consoles with gamebit fasteners, the 64 bit kit covers them all with the highest quality CNC machined bits. Even the sturdy case was carefully engineered, having no hinges or latches to break, and features a sorting tray inside the magnetically attached lid.
High-Performance Toolkit for DIY Repairs
The perfect toolkit for pros to average joes.
Contains all the poking, prying, gripping, lifting, ESD safety, and screw driving tools needed to service consumer electronics.
Completely re-engineered to provide all the tools that you need, and none that you don't.
Included
Anti-Static Wrist Strap – protection for circuits against static electricity
Small Suction Handle – suction handle for holding onto things lacking handles
3x iFixit Opening Tool – soft plastic prying tools
6x iFixit Opening Picks – thin prying tool for opening electronic devices
Nylon Tipped Reverse Tweezers – to elevate and hold your work
Angled ESD Tweezers – ESD-safe, feature teeth for tougher grip
Blunt ESD Tweezers – ESD-safe, feature teeth for tougher grip
Standard Spudger – tough antistatic tool for a variety of purposes
Halberd Spudger – features a hook for scooping, scraping, pulling, and guiding.ESD-safe.
Metal Spudger – for more powerful prying, scraping, probing, and poking action
Jimmy – handy tool for 'Jimmy'ing open electronics.
Magnetic Pad – Holds tiny screws and parts during repairs
Tool Roll – Durable and compact
Mako Precision Bit Set – all the bits needed for repairs on small electronics
Mako Precision Bit Set Includes
64 Bit Driver
150 mm Flex Extension
4 mm Screwdriver Bits
Phillips – 000, 00, 0, 1, 2
Flathead – 1, 1.5, 2, 2.5, 3, 4 mm
Torx – T2, T3, T4, T5
Torx Security – TR6, TR7, TR8, TR9, TR10, TR15, TR20, TR25
Pentalobe – P2, P5, P6
JIS – J000, J00, J0, J1
Hex – 0.7, 0.9, 1.3, 1.5, 2, 2.5, 3, 3.5, 4, 4.5, 5 mm
Tri-point – Y000, Y00, Y0, Y1
Nut Driver – 2.5, 3, 3.5, 4, 4.5, 5, 5.5 mm
Square – 1, 2
Gamebit – 3.8, 4.5 mm
Spanner – 6, 8
Triangle – 2, 3 mm
Standoff Bit for iPhone
Oval Bit
Magnetic Pickup Bit
SIM Eject Bit
1/4" to 4 mm Driver Adapter
The QA403 is QuantAsylum's fourth-generation audio analyzer. The QA403 extends the functionality of the QA402 with improved noise and distortion performance, in addition to a flatter response at band edges. The compact size of the QA403 means you can take it just about anywhere.
Features
24-bit ADC/DAC
Up to 192 kSPS
Fully isolated from PC
Differential Input/Output
USB powered
Built-in Attenuator
Fast Bootup and Driverless
The QA403 is a driverless USB device, meaning it’s ready as soon as you plug it in. The software is free and it is quick and easy to move the hardware from one machine to the next. So, if you need to head to the factory to troubleshoot a problem or take the QA403 home for a work-from-home day, you can do it without hassle.
No-Cal Design
The QA403 comes with a factory calibration in its flash memory, ensuring consistent unit-to-unit performance. On your manufacturing line you can install another QA403 and be confident what you read on one unit will be very similar to the next unit. It is not expected that re-calibration will be required at regular intervals.
Measurements
Making basic measurements is quick and easy. In a few clicks you will understand the frequency response, THD(+N), gain, SNR and more of your device-under test.
Dynamic Range
The QA403 offers 8 gain ranges on the input (0 to +42 dBV in 6 steps), and 4 gain ranges on the output (-12 to +18 dBV in 10 dB steps). This ensures consistent performance over very wide ranges of input and output levels. The maximum AC input to the QA403 is +32 dBV = 40 Vrms. The maximum DC is ±40 V, and the maximum ACPEAK + DC = ±56 V.
Easy Programmability
The QA403 supports a REST interface, making it easy to automate measurements in just about any language you might anticipate. From Python to C++ to Visual Basic—if you know how to load a web page in your favorite language, you can control the QA403 remotely. Measurements are fast and responsive, usually with dozens of commands being processed per second.
Isolated and USB Powered
The QA403 is isolated from the PC, meaning you are measuring your DUT and not chasing some phantom ground loop. The QA403 is USB powered, like nearly all our instruments. If you are setting up remotely, throw a powered hub in your bag and your entire test setup can be running with a minimum of cables.
Goodbye Soundcard, Hello QA403
Tired of trying to make a soundcard work? The calibration nightmare? The lack of gain stages? The limited drive? Are you tired of dealing with the fixed input ranges? The worry that you might destroy it with too much DC or AC? Tired of the ground loops? That’s why QuantAsylum built the QA403.
Specifications
Dimensions
177 x 44 x 97 mm (W x H x D)
Weight
435 g
Case Material
Powder-coating Aluminum (2 mm thick front panel, 1.6 mm thick top/bottom)
Downloads
Datasheet
Manual
GitHub
Arduinonext is an initiative powered by an electronics and microcontrollers specialist team aiming to help all those who are entering in the technology world, using the well-known Arduino platform to take the next step in electronics.
We strive to bring you the necessary knowledge and experience for developing your own electronics applications; interacting with environment; measuring physical parameters; processing them and performing the necessary control actions.
This is the first title in the 'Hands-On' series in which Arduino platform co-founder, David Cuartielles, introduces board programming, and demonstrates the making of an 8-bit Sound Generator.
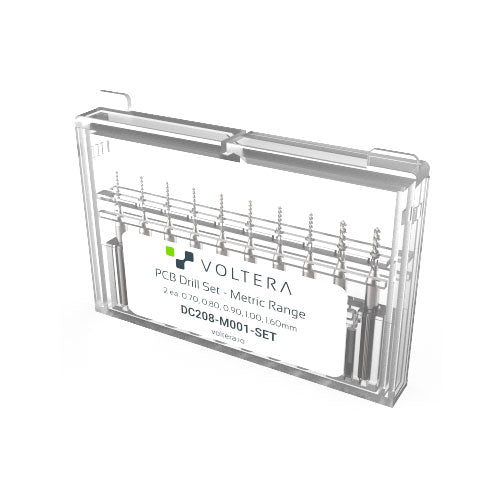
A set of high precision drill bits, covering the most common drill bit sizes. Just pop them in the V-One Drill with a 2.5 mm hex key (not included) and start drilling. The following sizes are included (2 of each): 0.70 mm 0.80 mm 0.90 mm 1.00 mm 1.60 mm
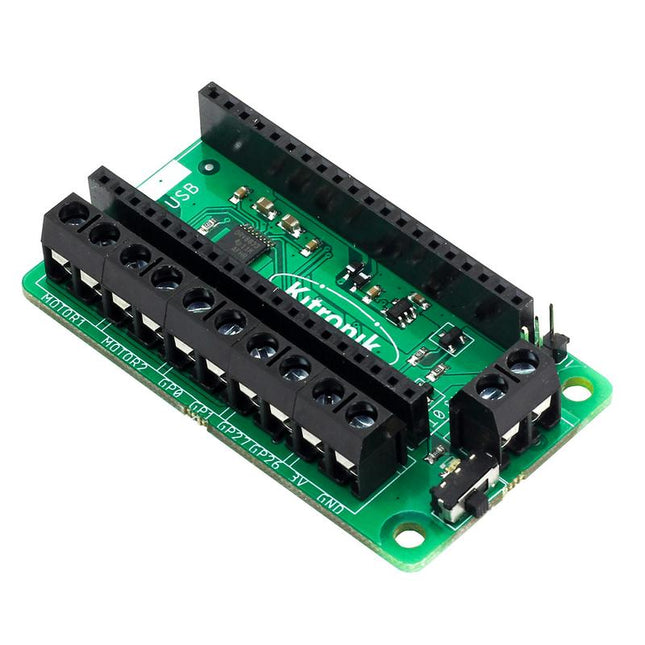
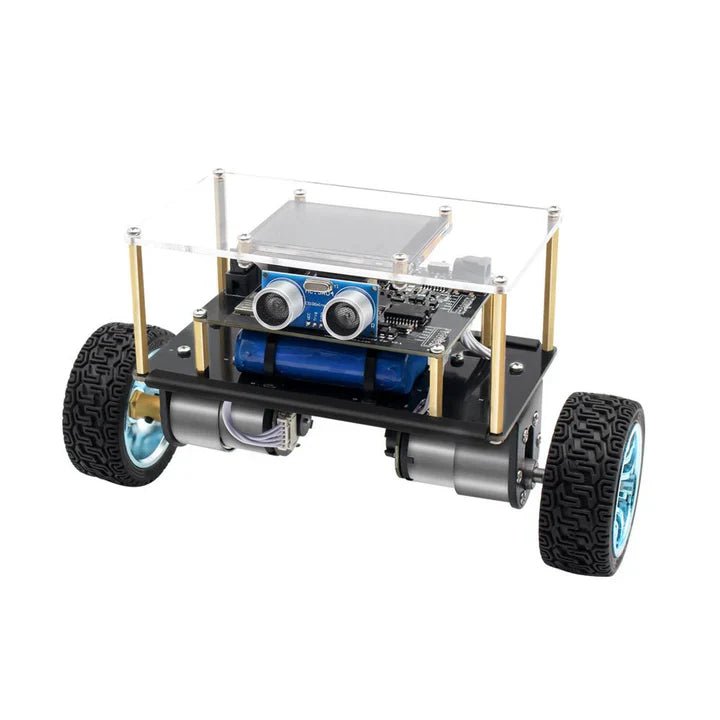
This board allows the Raspberry Pi Pico (connected via pin header) to drive two motors simultaneously with full forward, reverse & stop control, making it ideal for Pico controlled buggy projects. Alternatively, the board can be used to power a stepper motor. The board features the DRV8833 motor driver IC, which has built-in short circuit, over current and thermal protection. The board has 4 external connections to GPIO pins and a 3 V and GND supply from the Pico. This allows for additional IO options for your buggy builds that can be read or controlled by the Pico. In addition there is an on/off switch and power status LED, allowing you to see at a glance if the board is powered up and save your batteries when your project is not in use. To use the motor driver board, the Pico should have a soldered pin header and be inserted firmly into the connector. The board produces a regulated supply that is fed into the 40-way connector to power the Pico, removing the need to power the Pico directly. The motor driver board is powered via either screw terminals or a servo style connector. Kitronik has developed a micro-python module and sample code to support the use of the Motor Driver board with the Pico. This code is available in the GitHub repo. Features A compact yet feature-packed board designed to sit at the heart of your Raspberry Pi Pico robot buggy projects. The board can drive 2 motors simultaneously with full forward, reverse, and stop control. It features the DRV8833 motor driver IC, which has built-in short circuit, over current and thermal protection. Additionally, the board features an on/off switch and power status LED. Power the board via a terminal block style connector. The 3V and GND pins are also broken out, allowing external devices to be powered. Code it with MicroPython via an editor such as the Thonny editor. Dimensions: 63 mm (L) x 35 mm (W) x 11.6 mm (H) Download Datasheet
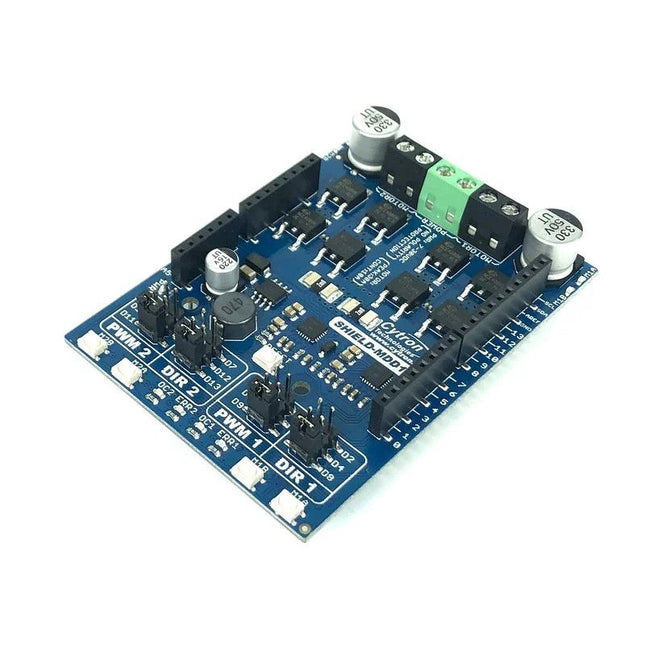
You can control the motor driver with PWM and DIR inputs. The Arduino pins for these inputs are configurable via jumpers. If the specified pins on Arduino are already used up by other application/shield, you can select another pin easily with the jumper. There is also a possibility to quickly and conveniently test the functionality of the motor driver with the onboard test buttons and output LEDs. Buck regulator which produces 5 V output is also available to power the Arduino mainboard, which eliminates the need of extra power supply for the Arduino mainboard. The board also offers various protection features. Overcurrent protection prevents the motor driver from damage when the motor stalls or an oversized motor is hooked up. When the motor is trying to draw current more than what the motor driver can support, the motor current will be limited at the maximum threshold. Assisted by temperature protection, the maximum current limiting threshold is determined by the board temperature. The higher the board temperature, the lower the current limiting threshold. As a result, the motor driver delivers its full potential depending on the current conditions without damaging any MOSFETs. Features Shield for Arduino form factor Bidirectional control for two brushed DC motors Control one unipolar/bipolar stepper motor Operating Voltage: DC 7 V to 30 V Maximum Motor Current: 10 A continuous, 30 A peak Buck regulator to produce 5 V output (500 mA max) Buttons for quick testing LEDs for motor output state Selectable Arduino pins for PWM/DIR inputs. PWM/DIR inputs compatible with 1.8 V, 3.3 V and 5 V logic PWM frequency up to 20 kHz (Output frequency is same as input frequency). Overcurrent protection with active current limiting Temperature protection Undervoltage shutdown Possible applications Mobile Robot Automated Guided Vehicle (AGV) Solar Tracker Game Simulator Automation Machine
Downloads Datasheet Sample Code 3D CAD Files Packing List 1x 10Amps 7V-30V DC Motor Driver Shield for Arduino (2 Channels) MDD010
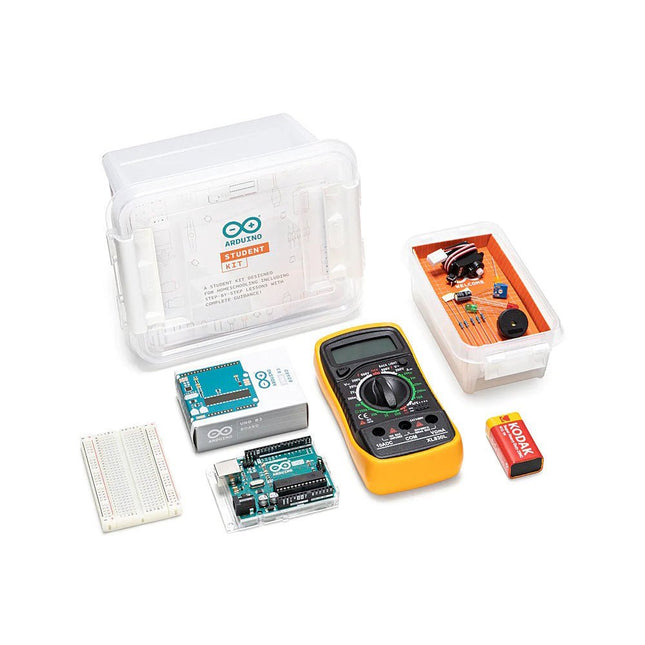
The Arduino Student Kit is a hands-on, step-by-step remote learning tool for ages 11+: get started with the basics of electronics, programming, and coding at home. No prior knowledge or experience is necessary as the kit guides you through step by step. Educators can teach their class remotely using the kits, and parents can use the kit as a homeschool tool for their child to learn at their own pace. Everyone will gain confidence in programming and electronics with guided lessons and open experimentation.
Learn the basics of programming, coding and electronics including current, voltage, and digital logic. No prior knowledge or experience is necessary as the kit guides you through step by step.
You’ll get all the hardware and software you need for one person, making it ideal to use for remote teaching, homeschooling, and for self-learning. There are step-by-step lessons, exercises, and for a complete and in-depth experience, there’s also extra content including invention spotlights, concepts, and interesting facts about electronics, technology, and programming.
Lessons and projects can be paced according to individual abilities, allowing them to learn from home at their own level. The kit can also be integrated into different subjects such as physics, chemistry, and even history. In fact, there’s enough content for an entire semester.
How educators can use the kit for remote teaching
The online platform contains all the content you need to teach remotely: exclusive learning guidance content, tips for remote learning, nine 90-minute lessons, and two open-ended projects. Each lesson builds off the previous one, providing a further opportunity to apply the skills and concepts students have already learned. They also get a logbook to complete as they work through the lessons.
The beginning of each lesson provides an overview, estimated completion times, and learning objectives. Throughout each lesson, there are tips and information that will help to make the learning experience easier. Key answers and extension ideas are also provided.
How the kit helps parents homeschool their children
This is your hands-on, step-by-step remote learning tool that will help your child learn the basics of programming, coding, and electronics at home. As a parent, you don’t need any prior knowledge or experience as you are guided through step-by-step. The kit is linked directly into the curriculum so you can be confident that your children are learning what they should be, and it provides the opportunity for them to become confident in programming and electronics. You’ll also be helping them learn vital skills such as critical thinking and problem-solving.
Self-learning with the Arduino Student Kit
Students can use this kit to teach themselves the basics of electronics, programming, and coding. As all the lessons follow step-by-step instructions, it’s easy for them to work their way through and learn on their own. They can work at their own pace, have fun with all the real-world projects, and increase their confidence as they go. They don’t need any previous knowledge as everything is clearly explained, coding is pre-written, and there’s a vocabulary of concepts to refer to.
The Arduino Student Kit comes with several parts and components that will be used to build circuits while completing the lessons and projects throughout the course.
Included in the kit
Access code to exclusive online content including learning guidance notes, step-by-step lessons and extra materials such as resources, invention spotlights and a digital logbook with solutions.
1x Arduino Uno
1x USB cable
1x Board mounting base
1x Multimeter
1x 9 V battery snap
1x 9 V battery
20x LEDs (5x red, 5x green, 5x yellow & 5x blue )
5x Resistors 560 Ω
5x Resistors 220 Ω
1x Breadboard 400 points
1x Resistor 1 kΩ
1x Resistor 10 kΩ
1x Small Servo motor
2x Potentiometers 10 kΩ
2x Knob potentiometers
2x Capacitors 100 uF
Solid core jumper wires
5x Pushbuttons
1x Phototransistor
2x Resistors 4.7 kΩ
1x Jumper wire black
1x Jumper wire red
1x Temperature sensor
1x Piezo
1x Jumper wire female to male red
1x Jumper wire female to male black
3x Nuts and Bolts
This hot-air single-cylinder Stirling engine generator converts thermal energy into mechanical energy. This kit comes with a little electricity generator that can power a USB reading light.
The Stirling engine comes as an easy-to-build kit with all the parts and tools included, and a printed sheet with instructions and explanations. Building the kit takes about 15 minutes. The assembled motor measures 16 x 8 cm and is 10.5 cm high. It weighs 380 grams.
Turn the flywheel by hand to ensure it moves smoothly.
Check that the sliding parts are clean.
Fill the alcohol lamp to less than two-thirds full with 95% or higher concentration alcohol.
Light the alcohol lamp at the front end of the test tube.
After about 1 minute, turn the flywheel.
The engine should start spinning. Note that the warm-up time is slightly longer when using the generator.
,
by Lobna Belarbi
Affordable Robot Kits to Kickstart Your Robotics Journey
Robotics is an exciting and rewarding field, but getting started can be intimidating—especially when it comes to choosing the right kit. Fortunately, Elektor offers a...
,
by Lobna Belarbi
Must-Have Boards, Kits & Tools to Start Your Arduino Journey with Elektor
Whether you're a newcomer eager to explore the world of microcontrollers or an experienced maker seeking to expand your toolkit, Elektor offers a curated selection...