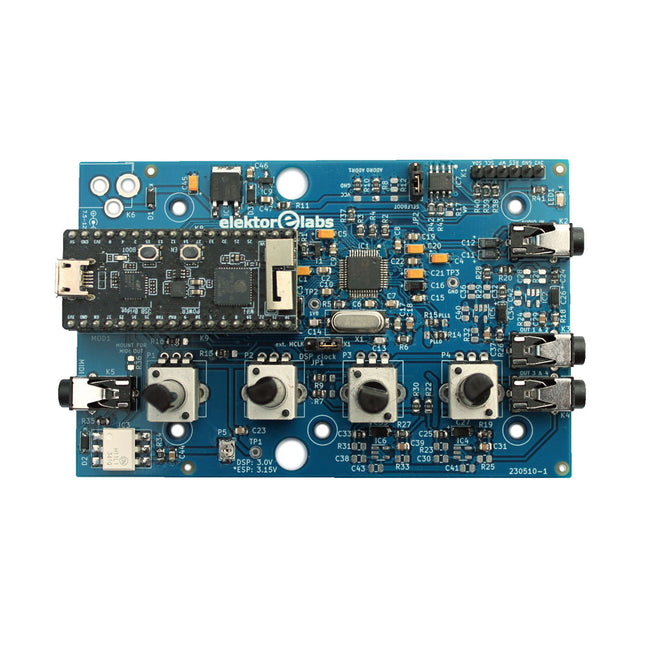
Some Highlights from the contents Surround-sound decoder Compact amp Sampling rate converter Battery powered preamplifier Titan 2000 amplifier Crescendo Millennium amplifier Audio-DAC/ADC IR-S/PDFI receiver and transmitter High-End Power Amp Hi-fi Wireless Headset Paraphase Tone Control and more… Using Adobe Reader you are able to browse and search the articles on your computer, as well as print texts, circuit diagrams and PCB layouts.
This DIY kit (HU-017A) is a wireless FM radio receiver with a 4-digit 7-segment display. It operates within the global FM receiving frequency band of 87.0-108.0 MHz, making it suitable for use in any country or region. The kit offers two power supply modes, allowing you to use it both at home and outdoors. This DIY electronic product will help you understand circuits and improve your soldering skills.
Features
87.0-108.0 MHz FM Radio: Built-in RDA5807 FM data processor with a standard FM receiving frequency band. The FM frequency can be adjusted using the F+ and F- buttons.
Adjustable Volume: Two volume adjustment methods – button and potentiometer. There are 15 volume levels.
Active & Passive Audio Output: The kit has a built-in 0.5 W power amplifier to drive 8 Ω speakers directly. It also outputs audio signals to headsets or loudspeakers with AUX interfaces, allowing personal listening and sharing of FM audio.
Configured with a 25 cm dedicated FM antenna and a (red) 4-digit 7-segment display for real-time display of FM radio frequency. The transparent acrylic shell protects the internal circuit board. It supports dual power supply methods – 5 V USB and 2x 1.5 V (AA) batteries.
DIY Hand Soldering: The kit comes with various components that need to be installed manually. It helps exercise and improve soldering skills, making it suitable for electronics hobbyists, beginners, and educational purposes.
Specifications
Operating voltage
DC 3 V/5 V
Output impedance
8 Ω
Output power
0.5 W
Output channel
Mono
Receiver frequency
87.0 MHz~108.0 MHz
Frequency accuracy
0.1 MHz
Operating temperature
−40°C to +85°C
Operating humidity
5% to 95% RH
Dimensions
107 x 70 x 23 mm
IMPORTANT: Remove the batteries when powering the radio over to USB.
Included
1x PCB
1x RDA5807M FM Receiver
1x STC15W404AS MCU
1x IC Socket
1x 74HC595D Register
1x TDA2822M Amplifier
1x IC Socket
1x AMS1117-3.3 V Voltage Converter
18x Metal Film Resistor
1x Potentiometer
4x Ceramic Capacitor
5x Electrolytic Capacitor
4x S8550 Transistor
1x Red LED
1x 4-digit 7-segment Display
1x Toggle Switch
1x SMD Micro USB Socket
1x Radio Antenna
1x AUX Audio Socket
4x Black Button
4x Button Cap
1x 0.5 W/8 Ω Speaker
1x Red/Black Wire
2x Double-sided adhesive
1x AA Battery Box
1x USB cable
6x Acrylic Board
4x Nylon Column Screw
4x M3 Screw
4x M3 Nut
4x M2x22 mm Screw
1x M2x6 mm Screw
5x M2 Nut
The Elektor Audio DSP FX Processor combines an ESP32 microcontroller and an ADAU1701 Audio DSP from Analog Devices. Besides a user-programmable DSP core, the ADAU1701 has high-quality analog-to-digital and digital-to-analog converters built-in and features an I²S port. This makes it suitable as a high-quality audio interface for the ESP32.
Programs for the ESP32 can be created with Arduino, Platform IO, CMake or by using the Espressif IDF in another way. Programs for the ADAU7101 audio DSPs are created with the free visual programming tool SigmaStudio by dragging and dropping pre-defined algorithm blocks on a canvas.
Applications
Bluetooth/Wi-Fi audio sink (e.g. loudspeaker) & source
Guitar effect pedal (stomp box)
Music synthesizer
Sound/function generator
Programmable cross-over filter for loudspeakers
Advanced audio effects processor (reverb, chorus, pitch shifting, etc.)
Internet-connected audio device
DSP experimentation platform
Wireless MIDI
MIDI to CV converter
and many more...
Specifications
ADAU1701 28-/56-bit, 50-MIPS digital audio processor supporting sampling rates of up to 192 kHz
ESP32 32-bit dual-core microcontroller with Wi-Fi 802.11b/g/n and Bluetooth 4.2 BR/EDR and BLE
2x 24-bit audio inputs (2 V RMS, 20 kΩ)
4x 24-bit audio outputs (0.9 V RMS, 600 Ω)
4x Control potentiometer
MIDI in- and output
I²C expansion port
Multi-mode operation
Power supply: 5 V DC USB or 7.5-12 V DC (barrel jack, center pin is GND)
Current consumption (average): 200 mA
Included
1x ESP32 Audio DSP FX Processor board (assembled)
1x ESP32-PICO-KIT
2x Jumpers
2x 18-pin headers (female)
4x 10 KB potentiometers
Downloads
Documentation
GitHub
Raspberry Pi DAC+ (formerly known as IQaudio DAC+) is a high-performance audio HAT designed for any Raspberry Pi with a 40-pin GPIO header. Equipped with the Texas Instruments PCM5122 DAC, it delivers crystal-clear stereo analogue audio through a pair of phono (RCA) connectors.
No external power is needed – the DAC+ connects directly to the Raspberry Pi’s GPIO header without requiring soldering or cables.
Features
Power LED
Analogue audio out (0-2 V RMS) via panel-mounted stereo
phono (RCA) sockets with MUTE signal (headphone detect)
Dedicated headphone amplifier, output via 3.5 mm panel-mounted barrel socket
40-pin pass-through GPIO header
HAT EEPROM write-enabled
Downloads
Datasheet
The HiFiBerry DAC+ ADC is an analog-to-digital and a digital-to-analog converter for the Raspberry Pi. This unique sound card for the Raspberry Pi is optimized for one specific use case: the best audio playback quality.
Features
Stereo input and output
Dedicated 192 kHz / 24-bit high-quality Burr-Brown DAC
Dedicated 192 kHz / 24-bit high-quality Burr-Brown ADC
Hardware volume control for DAC. The output volume can be controlled using “alsamixer” or any application that supports ALSA mixer controls.
Connects directly onto the Raspberry Pi.
No soldering required.
Compatible with all Raspberry Pi models, that have a 40-pin GPIO connector
No additional power supply required.
Three ultra-low-noise linear voltage regulators.
HAT compliant, EEPROM for automatic configuration.
Gold plated RCA output connectors.
Includes 4 M 2.5 x 12 mm spacers.
Balanced/unbalanced input connector (P6)
The 5-pin connector can be used to connect a balanced input. Please note that the balanced input has to be selected with the jumpers and will always have a 12 dB gain. It shouldn't be used with line-level inputs.
Pin 1 is on the left.
right +
right –
GND
left –
left +
Output connector (P5)
The output connector realizes connections to external components like an amplifier.
Pin 1 is on the top left.
+5 V
1
2
R
GND
3
4
GND
+5 V
5
6
L
Input gain settings (J1)
The jumper block is responsible for the input configuration. It is recommended to use the default setting without additional input gain. 32 dB gain can be used to connect dynamic microphones.
Jumpers are numbered from top to bottom.
1
2
3
4
function
1
0
0
–
0 dB gain
0
1
1
–
12 dB gain
0
1
0
–
32 dB gain
0
0
1
–
balanced input, 12 dB gain
Specifications
Maximum input voltage: 2.1 Vrms - 4.2 Vrms for balanced input
Maximum output voltage: 2.1 Vrms
ADC signal-to-noise ratio: 110 dB
DAC signal-to-noise ratio: 112 dB
ADC THD+N: -93 dB
DAC THD+N: -93 dB
Input voltage for lowest distortions: 0.8 Vrms
Input gain (configurable with Jumpers): 0 dB, 12 dB, 32 dB
Power consumption: <0.3 W
Sample rates: 44.1 kHz - 192 kHz
In order to use the HiFiBerry DAC + ADC, your Raspberry Pi Linux kernel must be at least version 4.18.12.
Click here to learn how to update the Raspberry Pi kernel
Using microphones with the DAC+ ADC
The DAC+ ADC is equipped with a stereo analogue input that can be configured for a wide range of input voltages. It performs best with line-level analogue sources. However, it is also possible to use it as a microphone input.
You can only use dynamic microphones. Microphones that require a power supply are not supported.
The microphone output voltage is very low. This means you need to amplify it. The DAC+ ADC has the necessary pre-amplifier already equipped. You will have to set the jumpers correctly.
The sound from the input won’t be played back automatically on the output. You will have to use some software that reads the input and outputs it again.
Setting the correct input amplifier settings for a microphone
By default, the input sensitivity is matched for line-level audio sources. This is done via a jumper on the J1 header.
Audio input to output
There is no direct connection between the input and the output. That leads to the input from the connected microphone to not be played back automatically. If you want to hear it on the output, you need to use the command line tool alsaloop can be used for this.
This small mono amplifier is surprisingly powerful – able to deliver up to 2.5 W into 4-8 Ω impedance speakers. Inside the miniature chip is a class D controller, able to run from 2.0-5.5 V DC. Since the amplifier is a class D, it's very efficient making it perfect for portable and battery-powered projects. It has built-in thermal and over-current protection. There's even a volume trim pot so you can adjust the volume on the board down from the default 24 dB gain.
The A+ and A- inputs of the amplifier go through 1.0 µF capacitors, so they are fully 'differential' – if you don't have differential outputs, simply tie the Audio-pin to ground. The output is 'Bridge Tied' – that means the output pins connect directly to the speaker pins, no connection to ground. The output is a high frequency 250 KHz square wave PWM that is then 'averaged out' by the speaker coil – the high frequencies are not heard. All the above means that you can't connect the output into another amplifier, it should drive the speakers directly.
The amplifier comes with a fully assembled and tested breakout board, a header to plug it into a breadboard and a 3.5 mm screw-terminal blocks so you can easily attach/detach your speaker. Speaker is not included, we recommend using any 4 Ω or greater impedance speaker.
Features
Output Power: 2.5 W at 4 Ω, 10% THD (total harmonic distortion), 1.5 W at 8 Ω, 10% THD, with 5.5 V Supply
50 dB PSRR (power supply rejection ratio) at 1 KHz
Filterless design, with ferrite bead + capacitors on output.
Fixed 24 dB gain, an onboard trim potentiometer for adjusting input volume.
Thermal and short-circuit/over-current protection
Low current draw: 4 mA quiescent and 0.5 mA in shutdown (due to pull-up resistor on SD pin)
SHIM is an old Yorkshire term meaning 'Shove Hardware In Middle' - we use it for Raspberry Pi add-ons that are designed to be sandwiched between your Pi and a HAT or mini HAT. This one has a clever friction fit header that slips handily over your GPIO pins, doesn't need soldering*, and is easily removable. The MAX98357A combined DAC / amplifier chip takes high-quality digital audio from your Pi and amplifies it so it can be used with an unpowered speaker. The push-fit connectors make it straightforward to connect up your speaker, whether it's a bookshelf or floor-standing speaker, the speaker in an old radio, or any other speaker you might have laying around. Because Audio Amp SHIM adds no extra bulk to your Pi it's perfect for building into a compact enclosure - you could use it to make a tiny MP3 player to play local files or stream from services like Spotify, give a vintage radio the ability to play digital radio streams or incorporate bleepy noises into your very own retro handheld. It's also a handy way to add audio output to your Pi Zero or Pi 400! Please note: Raspberry Pi and speakers are not included with this board. Features MAX98357A DAC / amplifier chip Mono 3W audio out Push-fit speaker terminals SHIM-format board with friction-fit connectors 2x mounting holes (M2.5) for if you want to secure everything together with bolts Fully-assembled No soldering required (*unless you're using a Pi that comes without a header) Compatible with all 40-pin header Raspberry Pi models
Software The easiest way to get everything set up is to use Pimoroni's Pirate Audio software and installer which configures I2S audio, as well as installing Mopidy and our custom Pirate Audio plugins which will let you stream Spotify and play local files. Here's how to get started: Set an SD card up with the latest version of Raspberry Pi OS. Connect to Wi-Fi or a wired network. Open a terminal and type the following:git clone https://github.com/pimoroni/pirate-audiocd pirate-audio/mopidysudo ./install.sh
Reboot your Pi Downloads MAX98357A Datasheet Pirate Audio software Schematic
You could use Pirate Audio Headphone Amp to build a tidy, pocket-sized player for local audio files (MP3, FLAC, etc) or for streaming music from online services like Spotify. To help get you started, Pimoroni has built plugins for Mopidy that will let you display gorgeous album art, play/pause your tracks and adjust the volume. The DAC and headphone amp will give you crisp digital amplified audio through your wired headphones. Pirate Audio is a range of all-in-one audio boards for Raspberry Pi, with high-quality digital audio, beautifully-crisp IPS displays for album art, tactile buttons for playback control, and a custom Pirate Audio software and installer to make setting it all up a breeze. Features Amplified digital audio (24-bit / 192KHz) over I2S PAM8908 headphone amplifier chip Low-gain / high-gain switch (high-gain boosts by 12dB) PCM5100A DAC chip 3.5mm stereo jack 1.3' IPS colour LCD (240x240px) (ST7789 driver) Four tactile buttons Mini HAT-format board Fully-assembled Compatible with all 40-pin header Raspberry Pi models
Dimensions: 65x30.5x9.5mm Software The Pirate Audio software and installer installs the Python library for the LCD, configures the I2S audio and SPI, and then installs Mopidy and the custom Pirate Audio plugins to display album art and track info, and to use the buttons for playback control. Here's how to get started: Set an SD card up with the latest version of Raspberry Pi OS. Connect to Wi-Fi or a wired network. Open a terminal and type the following:git clone https://github.com/pimoroni/pirate-audiocd pirate-audio/mopidysudo ./install.sh
Reboot your Pi Downloads PAM8908 Datasheet PCM5100A Datasheet Pirate Audio software
The Mixer Geek Theremin+ is a fun and innovative electronic musical instrument inspired by the classic Theremin. Unlike traditional instruments, the Theremin+ is played without physical contact, using hand movements in the air to control pitch and volume.
The Theremin+ offers an exciting and hands-on way to explore music and sound experimentation.
Features
Ready to use out of the box
Equipped with a loudspeaker and full-color screen
Intuitive button-based navigation and confirmation
Choose from over 70 tones
Multiple customizable function settings
Displays waveform, time, frequency, volume, and corresponding piano pitch (display can be turned off)
Powered via USB-C port; compatible with power banks
Compact design with removable telescopic antenna for easy storage
Connects to headphones, external speakers, or recording devices
Dimensions: 98 x 70 x 18 mm
Included
1x Theremin+ Musical Instrument
2x Antennas
1x USB-C cable