Products
-
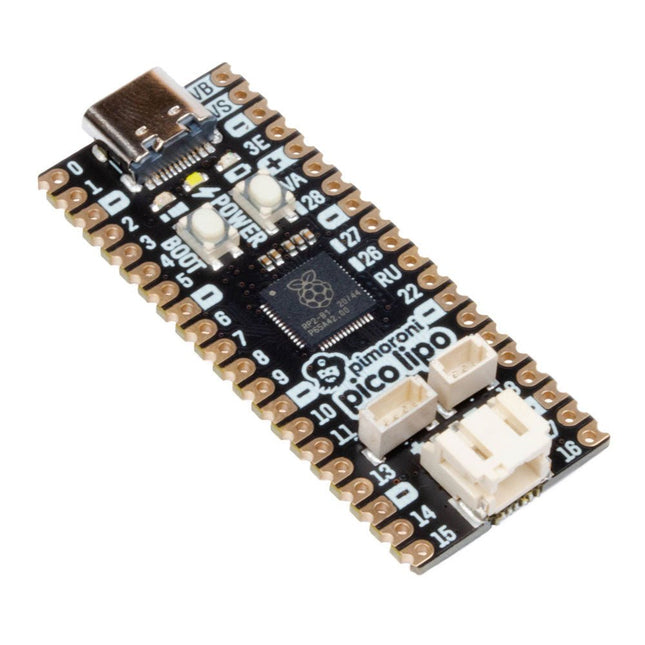
Pimoroni Pimoroni Pico LiPo
Pimoroni Pico LiPo is powered and programmable via USB-C and comes with 16 MB of QSPI (XiP) flash. With the Qwiic/STEMMA QT connector you can hook up a whole host of different sensors and breakouts, and a debug connector for if you want to do your programming using a SWD debugger. There is an on/off button and a BOOTSEL button, which can also be used as a user switch.Pimoroni Pico LiPo also has onboard LiPo/LiIon battery management – the inbuilt charging circuitry means charging your battery is as easy as plugging your Pimoroni Pico Lipo in via USB. Two indicator LEDs connected to the battery circuit keep you informed of on/off state and charging status and it's compatible with any of our LiPo, LiIon and high capacity LiPo batteries.Programmable with C++, MicroPython or CircuitPython, Pimoroni Pico LiPo is the perfect powerhouse for your portable projects.Features Powered by RP2040 Dual ARM Cortex M0+ running at up to 133 Mhz 264 kB of SRAM 16 MB of QSPI flash supporting XiP MCP73831 charger with 215 mA charging current (datasheet) XB6096I2S battery protector (datasheet) USB-C connector for power, programming, and data transfer 4 pin Qw-ST (Qwiic / STEMMA QT) connector 3 pin debug connector (JST-SH) 2-pole JST PH battery connector, with polarity marked on the board Switch for basic input (doubles up as DFU select on boot) Power button Power, charging and user LED indicators On-board 3V3 regulator (max regulator current output 600mA) Input voltage range 3 - 5.5 V Compatible with Raspberry Pi Pico add-ons Measurements: approx 53 x 21 x 8 mm (L x W x H, including connectors) Downloads CircuitPython Getting started with CircuitPython guide
€ 19,95
Members € 17,96
-
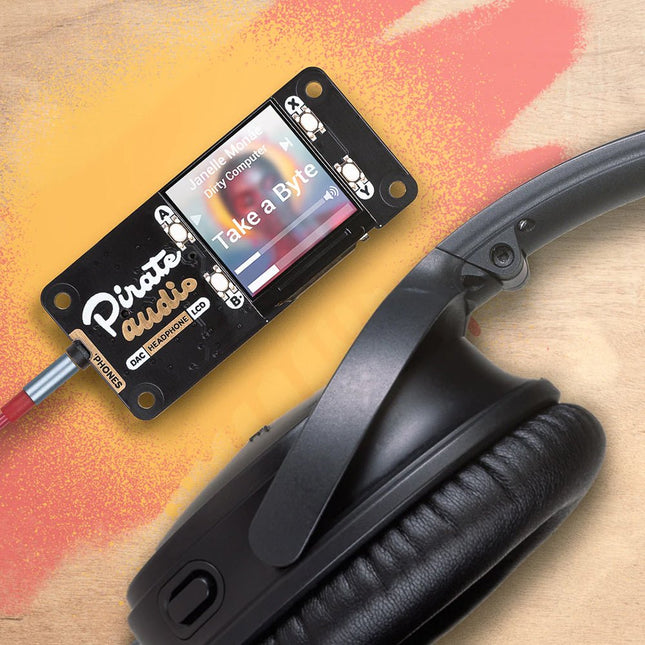
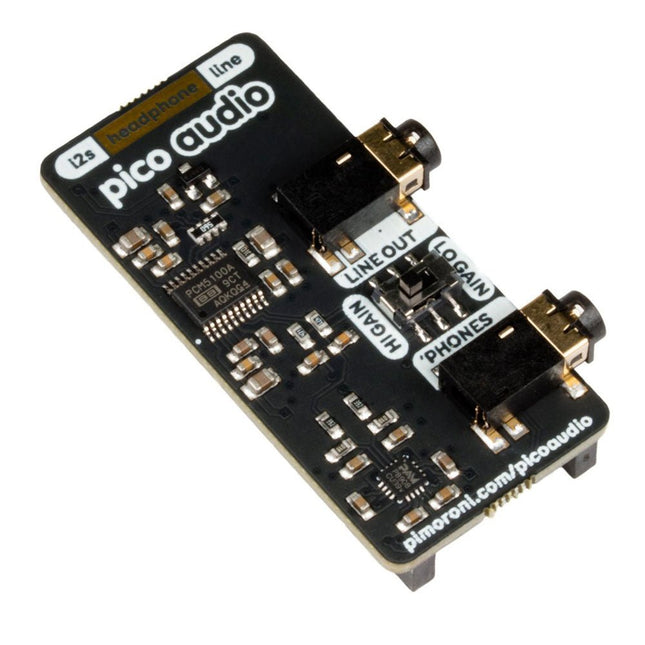
Pimoroni Pimoroni Pirate Audio: Headphone Amp for Raspberry Pi
You could use Pirate Audio Headphone Amp to build a tidy, pocket-sized player for local audio files (MP3, FLAC, etc) or for streaming music from online services like Spotify. To help get you started, Pimoroni has built plugins for Mopidy that will let you display gorgeous album art, play/pause your tracks and adjust the volume. The DAC and headphone amp will give you crisp digital amplified audio through your wired headphones. Pirate Audio is a range of all-in-one audio boards for Raspberry Pi, with high-quality digital audio, beautifully-crisp IPS displays for album art, tactile buttons for playback control, and a custom Pirate Audio software and installer to make setting it all up a breeze. Features Amplified digital audio (24-bit / 192KHz) over I2S PAM8908 headphone amplifier chip Low-gain / high-gain switch (high-gain boosts by 12dB) PCM5100A DAC chip 3.5mm stereo jack 1.3' IPS colour LCD (240x240px) (ST7789 driver) Four tactile buttons Mini HAT-format board Fully-assembled Compatible with all 40-pin header Raspberry Pi models Dimensions: 65x30.5x9.5mm Software The Pirate Audio software and installer installs the Python library for the LCD, configures the I2S audio and SPI, and then installs Mopidy and the custom Pirate Audio plugins to display album art and track info, and to use the buttons for playback control. Here's how to get started: Set an SD card up with the latest version of Raspberry Pi OS. Connect to Wi-Fi or a wired network. Open a terminal and type the following:git clone https://github.com/pimoroni/pirate-audiocd pirate-audio/mopidysudo ./install.sh Reboot your Pi Downloads PAM8908 Datasheet PCM5100A Datasheet Pirate Audio software
€ 26,95
Members € 24,26
-
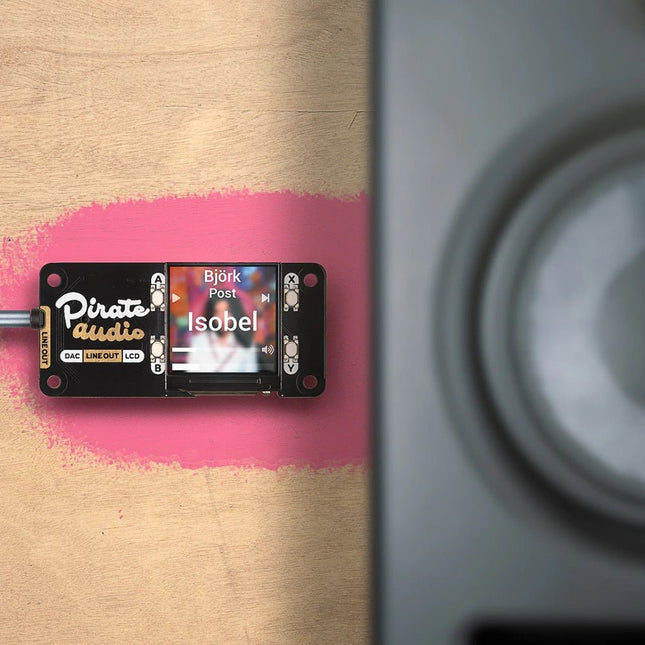
Pimoroni Pimoroni Pirate Audio: Line-out for Raspberry Pi
This board is perfect for upgrading an existing hi-fi amp and speakers, or a set of powered monitors, with digital audio from local audio files (MP3, FLAC, etc.) or from streaming services like Spotify. The DAC on Pirate Audio Line-out gives you crisp 24-bit/192 KHz digital audio through its 3.5 mm stereo jack. Features Line-level digital audio (24-bit/192 KHz) over I2S PCM5100A DAC chip 3.5 mm stereo jack 1.3" IPS color LCD (240x240px) (ST7789 driver) Four tactile buttons Mini HAT-format board Fully-assembled Compatible with all 40-pin header Raspberry Pi models Dimensions: 65 x 30.5 x 9.5 mm Software The Pirate Audio software and installer installs the Python library for the LCD, configures the I²S audio and SPI, and then installs Mopidy and the custom Pirate Audio plugins to display album art and track info, and to use the buttons for playback control. Here's how to get started: Set an SD card up with the latest version of Raspberry Pi OS. Connect to Wi-Fi or a wired network. Open a terminal and type the following:git clone https://github.com/pimoroni/pirate-audiocd pirate-audio/mopidysudo ./install.sh Reboot your Pi Downloads PCM5100A Datasheet Pirate Audio software
-
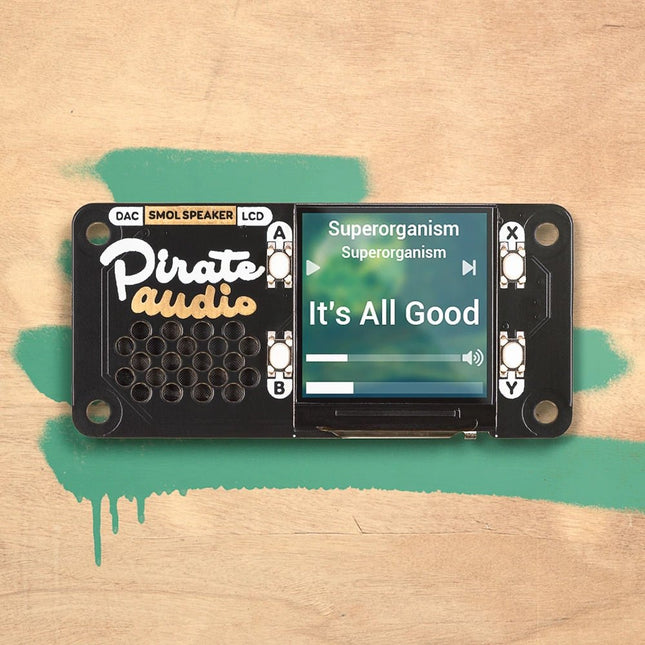
Pimoroni Pimoroni Pirate Audio: Speaker for Raspberry Pi
Pirate Audio Speaker is perfect for making a Lilliputian radio, sound effect player, or even as a teeny-weeny games console! The built-in 1W speaker isn't the loudest but it's great fun for lots of projects. The display and playback buttons let you control your audio or sound effects in a jiffy. Use Pimoroni's Pirate Audio software to play local audio files (MP3, FLAC, etc) or stream from services like Spotify. Features MAX98357A DAC / amplifier chip Mono audio Mini speaker (1W / 8Ω, attached) Push-fit speaker terminals 1.3' IPS colour LCD (240x240px) (ST7789 driver) Four tactile buttons Mini HAT-format board Fully-assembled Compatible with all 40-pin header Raspberry Pi models Pirate Audio software Dimensions: 65x30.5x9.5mm Software The Pirate Audio software and installer installs the Python library for the LCD, configures the I2S audio and SPI, and then installs Mopidy and our custom Pirate Audio plugins to display album art and track info, and to use the buttons for playback control. Here's how to get started: Set an SD card up with the latest version of Raspberry Pi OS. Connect to Wi-Fi or a wired network. Open a terminal and type the following:git clone https://github.com/pimoroni/pirate-audiocd pirate-audio/mopidysudo ./install.sh Reboot your Pi Downloads MAX98357A Datasheet Pirate Audio software
-
Pimoroni Pimoroni Raspberry Pi Pico Audio Pack (Line-Out and Headphone Amp)
Pico Audio Pack uses its PCM5100A DAC to output up to 32-bit, 384 KHz stereo audio along its 3.5 mm line out connector, ready for plugging into an external amp or powered speakers. If you're after something a little louder for your ears, it can also pump out amplified stereo audio from its 3.5 mm headphone jack.You could generate interesting noises with code on your Pico to output into a lo-fi synth, or hook your Pico up to another device and use it as a custom USB sound card.Features PCM5100A stereo DAC (datasheet) PAM8908JER stereo headphone amp (datasheet) 3.5 mm stereo headphone jack connector 3.5 mm stereo line out jack connector Switch to adjust headphone amp gain (low / high) Pre-soldered female headers for attaching to Pico Compatible with Raspberry Pi Pico Fully assembled No soldering required (as long as your Pico has header pins attached). Dimensions: approx 53 x 29 x 11 mm (L x W x H, including headers and audio jacks) Programmable with C/C++ The labels on the underside of Pico Audio will show you which way round to plug it into your Pico ‐ just match up the USB port with the markings on the board.
-

Pimoroni Pimoroni Raspberry Pi Pico Breakout Garden Base
Pico Breakout Garden Base sits underneath your Pico and lets you connect up to six of our extensive selection of Pimoroni breakouts to it. Whether it's environmental sensors so you can keep track of the temperature and humidity in your office, a whole host of little screens for important notifications and readouts, and, of course, LEDs. Scroll down for a list of breakouts that are currently compatible with our C++/MicroPython libraries!As well as a labelled landing area for your Pico, there's also a full set of broken out Pico connections, in case you need to attach even more sensors, wires, and circuitry. We've thrown in some rubber feet to keep the base nice and stable and to stop it from scratching your desk, or there are M2.5 mounting holes at the corners so that you can bolt it onto a solid surface if you prefer.The six sturdy black slots are edge connectors that connect the breakouts to the pins on your Pico. There's two slots for SPI breakouts, and four slots for I²C breakouts. Because I²C is a bus, you can use multiple I²C devices at the same time, providing they don't have the same I²C address (we've made sure that all of our breakouts have different addresses, and we print them on the back of the breakouts so they're easy to find).As well as being a handy way to add functionality to your Pico, Breakout Garden is also very useful for prototyping projects without the need for complicated wiring, soldering, or breadboards, and you can grow or change up your setup at any time.Features Six sturdy edge-connector slots for breakouts 4x I²C slots (5 pins) 2x SPI slot (7 pins) Landing area with female headers for Raspberry Pi Pico 0.1” pitch, 5 or 7 pin connectors Broken-out pins Reverse polarity protection (built into breakouts) 99% assembled – just need to stick on the feet! Compatible with Raspberry Pi Pico
€ 17,95
Members € 16,16
-

Pimoroni Pimoroni Raspberry Pi Pico Display Pack
Pico Display lets you turn a Pico into a compact user interface device for a bigger project, capable of giving instructions, displaying readouts and even incorporating elaborate nested menus. If you'd rather use your Pico as a standalone device you could make a little rotating slideshow of images, display beautiful graphs from sensor data or build your own Tamagotchi or matchbox sized text adventure game.Features 1.14” 240x135 pixel IPS LCD screen 4 x tactile buttons RGB LED Pre-soldered female headers for attaching to Pico Compatible with Raspberry Pi Pico. Fully assembled No soldering required (as long as your Pico has header pins attached). Dimensions: approx 53 x 25 x 9 mm (L x W x H) Screen usable area: approx 25 x 15 mm (L x W) C/C++ and MicroPython libraries
€ 19,95
Members € 17,96
-
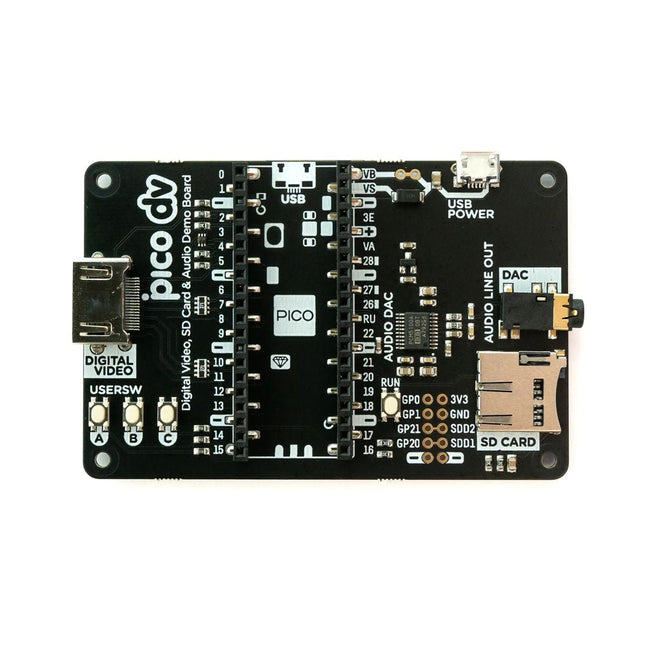
Pimoroni Pimoroni Raspberry Pi Pico DV Demo Base
This board is an all-digital conversion of Raspberry Pi's VGA reference design, great for if you want to start hacking on video and/or audio output from a Raspberry Pi Pico and piping it straight into a modern monitor.Features HDMI connector PCM5100A DAC for line out audio over I²S (datasheet) SD card slot Reset button Socket headers to install your Raspberry Pi Pico Three user-controllable switches Rubber feet Compatible with Raspberry Pi Pico No soldering required (as long as your Pico has header pins attached) Programmable with C/C++ Note: Raspberry Pi Pico is not included. Your Pico will need to have pin headers soldered to it (with the pins pointing downwards) to attach to our add-on boards.Downloads Schematic GitHub
€ 24,95
Members € 22,46
-

Pimoroni Pimoroni Raspberry Pi Pico Explorer Base
We've incorporated tinkering essentials like a mini breadboard, motor drivers, ADC inputs, a built in speaker, general purpose inputs/outputs, switches, and two Breakout Garden slots so you can add on a couple of breakouts. We've also managed to fit in a vibrant 240x240 IPS LCD screen with four tactile buttons so you can easily monitor and control what your project is doing. It's all wrapped up in a nice, sturdy baseboard with a pleasingly compact footprint which won't involve nearly as many trailing wires as if you were experimenting with a traditional breadboard setup. Our comprehensive MicroPython and C++ libraries will let you control every aspect of the board like a digital maestro. It's great for beginners and advanced users. Features Pico Explorer Base Piezo speaker 1.54' IPS LCD screen (240x240) Four user-controllable switches Two Half-Bridge motor drivers (with over current indicator LED) Easy access GPIO and ADC pin Headers Two Breakout Garden I²C sockets Mini breadboard Rubber feet Compatible with Raspberry Pi Pico No soldering required (as long as your Pico has header pins attached). Dimensions: approx 117 x 63 x 20 mm (L x W x H, assembled) C/C++ and MicroPython libraries Schematic
-

Pimoroni Pimoroni Raspberry Pi Pico Omnibus (Dual Expander)
Struggling to choose which Pico add-on to go for? Pico Omnibus lets you plug in two Pico Packs or Bases at once, or you can use the extra set of male GPIO pins to easily attach other devices, jumper wires or circuitry – very useful for prototyping. We've added useful labels to all three sets of connectors, so you can be sure that all those lovely wires are going to the right places. We've also thrown in some little feet to keep everything solid.Features One landing area with labelled female headers for attaching to your Pico. Two landing areas with labelled (mirrored) male headers for attaching add-ons. 4x rubber feet Compatible with Raspberry Pi Pico. 99% assembled – just need to stick on the feet! Fully assembled. No soldering required. Dimensions: approx 94 x 52 x 12 mm (L x W x H, including headers)
€ 14,95
Members € 13,46
-

Pimoroni Pimoroni Raspberry Pi Pico Proto
With a 6x20 grid of 2.54 mm spaced holes for easy soldering and labelled Pico pins so you know what's what, Pico Proto is perfect for when you're happy with your breadboard project and want to give it a secure, smart and compact long-term home. Pico Proto doesn't come with any headers attached, so you will need to either solder it directly to your Pico's male header pins (for a permanent, but super slim sandwich) or solder it to some female header. Features 40 2.54 mm spaced holes for attaching to your Pico. 120 2.54 mm spaced holes (6x20 grid) for attaching other things Compatible with Raspberry Pi Pico. Dimensions: approx 51 x 25 x 1 mm (L x W x H)
€ 6,95
Members € 6,26
-
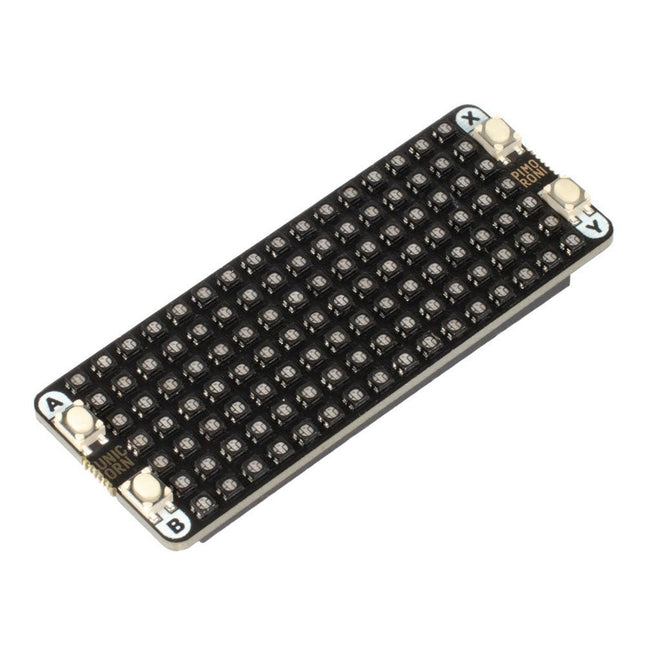
Pimoroni Pimoroni Raspberry Pi Pico Unicorn Pack
The Unicorn Pack fits nicely on the back of your Pico - with a tidy 7x16 matrix (that's 112 RGB LEDs!) it's surely the fanciest backpack going. The four tactile buttons can be used to switch between modes, as controls for simple games, or adjusting brightness. It's possible to control the colour and brightness of each LED individually so you can use it to display animations, text, simple images, and more. Make a mini photo FX lamp, a smart status light for Zoom, use it to display colourful scrolling messages on your fridge, or just enjoy some pretty animations. Features 16x7 matrix of RGB LEDs (112 total) Individual colour/brightness control of each LED 4 x tactile buttons Pre-soldered female headers for attaching to Pico Compatible with Raspberry Pi Pico. Fully assembled No soldering required (as long as your Pico has header pins attached). Dimensions: approx 62mm x 25mm x 10mm (L x W x H, including headers and buttons) C/C++ and MicroPython libraries
-

Pimoroni Pimoroni Raspberry Pi Pico VGA Demo Base
Based on the reference design by Raspberry Pi, our Pimoroni Pico VGA Demo Base is a great way to start experimenting with Raspberry Pi Pico/RP2040. It's the perfect way to demo of some of the fun things you can achieve with the RP2040 microcontroller such as generating a solid VGA output without taxing the CPU at all! Amaze your friends by showing them you still own a D-sub cable! Bask in the glory of 15-bit analog video! Get teary eyed over the warm, authentic, RC filtered PWM audio! This board will run the various video example programs that Raspberry Pi have put together to demonstrate features of the RP2040.Features 15-pin VGA (D-sub) connector PCM5100A DAC for line out audio over I²S (datasheet) PWM audio output SD card slot Reset button Female headers to install your Raspberry Pi Pico Three user-controllable switches Rubber feet Compatible with Raspberry Pi Pico No soldering required (as long as your Pico has header pins attached) Programmable with C/C++
€ 29,95
Members € 26,96
-

Pimoroni Pimoroni Raspberry Pi Pico Wireless Pack
Raspberry Pi Pico Wireless Pack attaches to the back of your Pico and uses an ESP32 chip to let your Pico connect to 2.4 GHz wireless networks and transfer data. There's a microSD card slot for if you want to store lots of data locally as well as a RGB LED (for status updates) and a button (useful for things like enabling/disabling Wi-Fi).Great for quickly adapting an existing Pico project to have wireless functionality, Raspberry Pi Pico Wireless Pack would come in handy for sending sensor data into home automation systems or dashboards, for hosting a web page from a matchbox or for letting your Pico interact with online APIs.Features ESP32-WROOM-32E module for wireless connectivity (connected via SPI) (datasheet) 1x tactile button RGB LED Micro-SD card slot Pre-soldered female headers for attaching your Raspberry Pi Pico Fully assembled No soldering required (as long as your Pico has header pins attached) Compatible with Raspberry Pi Pico Dimensions: approx 53 x 25 x 11 mm (L x W x H, including headers and components) C++ and MicroPython libraries
€ 17,95
Members € 16,16
-

Pimoroni Pimoroni Weather HAT for Raspberry Pi
A meteorologically minded Raspberry Pi HAT designed to make hooking up weather sensors a breeze (or a squall, or a gale). Weather HAT is an all-in-one solution for hooking up climate and environmental sensors to a Raspberry Pi. It has a bright 1.54' LCD screen and four buttons for inputs. The onboard sensors can measure temperature, humidity, pressure and light. The sturdy RJ11 connectors will let you easily attach wind and rain sensors. It will work with any Raspberry Pi with a 40-pin header. You could install it outside in a suitable weatherproof enclosure and connect to it wirelessly – logging the data locally or piping it into Weather Underground, a MQTT broker or a cloud service like Adafruit IO. Alternatively, you could house your weather Pi inside and run wires to your weather sensors outside - making use of the nice screen to display readouts. Features 1.54' IPS LCD screen (240 x 240) Four user-controllable switches BME280 temperature, pressure, humidity sensor (datasheet) LTR-559 light and proximity sensor (datasheet) Nuvoton MS51 microcontroller with inbuilt 12-bit ADC (datasheet) RJ11 connectors for connecting wind and rain sensors (optional) HAT-format board Fully-assembled Compatible with all 40-pin header Raspberry Pi models Downloads Python library Schematic Included Weather HAT 2 x 10 mm standoffs
-
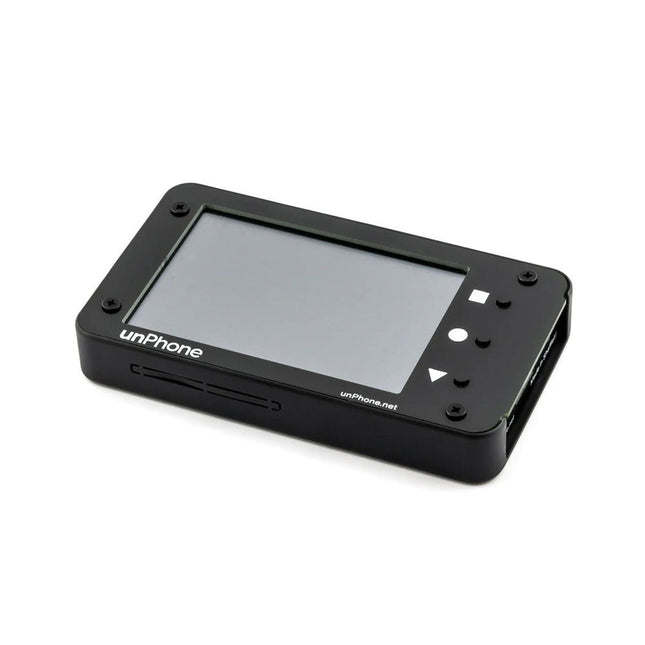
Pimoroni unPhone IoT Development Platform
The unPhone is an open-source IoT development platform powered by the ESP32S3 microcontroller. It features integrated LoRa, Wi-Fi, and Bluetooth connectivity, a touchscreen, and a LiPo battery, offering a robust and versatile solution for IoT development. Its compatibility with Adafruit's FeatherWing standard enables easy expansion, making it an ideal choice for educators, makers, and developers seeking a flexible and user-friendly platform. Features ESP32S3 microcontroller (with 8 MB flash and 8 MB PSRAM) LoRaWAN licence-free radio communication (plus the ESP32's excellent wifi and bluetooth support) 3.5" (320 x 480) LCD capacitive touchscreen for easy debugging and UI creation IR LEDs for surreptitiously switching the cafe TV off 1200 mAh LiPo battery with USB-C charging Vibration motor for notifications Compass/Accelorometer A robust case SD card slot Power and reset buttons Programmable in C++ or CircuitPython Expander board that supports two Featherwing sockets and a prototyping area Open source firmware compatible with the Arduino IDE, PlatformIO and Espressif's IDF development framework Included unPhone (assembled) Expander board FPC cable (to link the expander board to unPhone) Self adhesive mounts for the expander board Code Examples C++ library Kick the tyres on everything in the box The main LVGL demo CircuitPython Support forum Textbook (especially chapter 11)
€ 219,00€ 179,95
Members identical


