
Search results for "monkmakes or air or quality or kit or for or raspberry or pi"
-
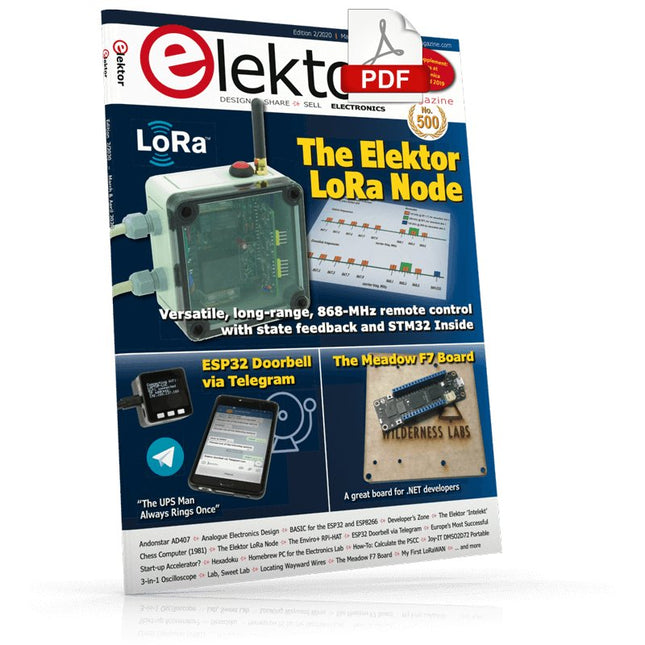
Elektor Digital Elektor March/April 2020 (PDF) EN
The Elektor LoRa NodeVersatile, long-range, 868-MHz remote control with state feedback and STM32 Inside InteractiveCorrections & Updates || Questions & Answers Analogue Electronics DesignCase Study #1 — Section 2: Preamplifier optimized for MEMS microphone My IoT Button: A Button for the WebPart 1: IoT architecture BASIC for the ESP32 and ESP8266Programming with Annex WiFi RDS ESP32 Doorbell via Telegram“The UPS Man Always Rings Once” Small Circuits RevivalCapita Selecta from the Elektor Project Suggestions Box My First LoRaWANWith Blue Pill, LoRa Breakout Board and The Things Network Elektor Connexions 2003EL “A Strong Supporter of Open Internet”Interview with Wienke Giezeman, Initiator of The Things Network The Meadow F7 BoardA great board for .NET developers Practical ESP32 Multitasking (2)Task priorities Sigfox and the IoT (3)First steps on the network Raspberry Pi Bash Command Cheat Sheet Europe's Most Successful Start-up Accelerator?HighTechXL, Eindhoven, The Netherlands Review: The Enviro+ RPi-HATMeasure air quality with a Raspberry Pi and the Enviro+ HAT Steeped in Electronicsordering components from Ukraine and Russia Review: Andonstar AD407Better than its predecessor? Lab, Sweet LabA glimpse of The Holy Place — no unauthorized entry. Optical Probe for OscilloscopesMeasure brightness fluctuations of lighting systems The 'TABULA' Project - An UpdateTangibles with user feedback How-To Calculate the Prospective Short-Circuit Current or PSCCand choose the proper circuit breaker TMS1000 Series Microcontrollers Peculiar Parts, the series Starting Out in Electronics (2) Easier than imagined! Developer's ZoneTips & Tricks, Best Practices and Other Useful Information Locating Wayward Wires Track and trace concealed and defective cables with ease and certainty Review: Joy-IT DMSO2D72 Portable 3-in-1 Oscilloscope Homebrew PC for the Electronics LabTips on Component Choice and Construction The Elektor ‘Intelekt’ Chess Computer (1981)Tiny Chess 86 ported to the Intel 8088 Beyond ElectronicsPCB Art - Pushing the Limits of Industrial Manufacturing
€ 7,50
-

Elektor Digital Elektor Septembre/Octobre 2022 (PDF)
electronica Fast Forward Start- & Scale-Up AwardsLes préparatifs s?accélèrent?! Bluetooth Low Energy avec ESP32-C3 et ESP32Vous n?avez pas toujours besoin de choisir le wifi?! Renifleur BLEReconfiguration du dongle USB nRF52840 MDK de makerdiary Cube magique de LED RGBcircuit avec un RP2040 Marche/arrêt automatique pour le compresseur de pâte à souder Contenu vidéo d?ElektorLivestreams, webinaires et cours pour les ingénieurs et les fabricants professionnels Électrification d?un véloUtilisation d?un kit de modification de vélo électrique Démarer en électroniqueMultiplication de tensions Sur le vifTransmutations Teensy 4.0 ? comment cette carte peut-elle être aussi rapide ?Ou: La vitesse, ce n'est pas sorcier ! Simulation d?amplificateur de puissance audio avec TINA«?simuler avant de construire?» Développer et utiliser vos n?uds LoRaWAN pour l'Internet des Objets (IdO)Exemple de chapitre : Modules LoRaWAN Dragino LHT65, LDS01 et LDS02 Projet 2.0Corrections, mises à jour et courriers des lecteurs 5G pour mon propre exploitMaîtrise totale du déploiement de la 5G avec les réseaux cellulaires privés Infographics Les meilleurs conseils pour développer une interface WiFiComment mon appareil apprend-il à transmettre ? Horloge Tour du Rhin Mod 2 Analyseur de spectre audio avec dekatronsUne nouvelle façon d'utiliser les tubes rétro Envoi de données à TelegramAvec un ESP32 et quelques composants Filtre coupe-bande de Fliege pour les mesures audioFaites de meilleures mesures avec un filtre coupe-bande Démontage d?un CO2-mètrePeut-on le bidouiller pour vos projets?? Tout mis ensembleLe transistor unijonction programmable expliqué Écran tactile rond pour Raspberry PiL?HyperPixel 2.1 Round de Pimoroni Télémesure avec détection des pertes de connexionGrâce aux modules nRF24L01+ Récepteur FM numérique avec Arduino et TEA5767Restez à l?écoute avec un Arduino Nano Convertir une interface OLED de SPI vers I²C HomeLab ToursUn passe-temps ne prend pas sa retraite Une décennie d?éthique en électroniqueLe regard de Tessel Renzenbrink sur la société numérique. HexadokuThe Original Elektorized Sudoku
€ 10,95
-

Elektor Digital ESP32 steuert Roboterauto (PDF)
Open-Source-Code mit Arduino IDE und PlatformIO Autonomes Fahren: GPS, Accelerometer, Gyroskop PS3-Controller Mikrocontroller wie der Arduino und Einplatinenrechner wie der Raspberry Pi haben sich zu beliebten Komponenten entwickelt. Dritter im Bunde ist der ESP32 der Firma Espressif. Mikrocontroller dieser Baureihe zeichnen sich durch eine Vielzahl implementierter Funktionen aus, die bei einem Arduino konventioneller Prägung mit einem Atmel-AVR-Mikrocontroller erst mit weiterer Hardware möglich sind. Prominentes Beispiel sind hier die WiFi- und Bluetooth-Funktionalitäten. Gegenüber einem Raspberry Pi zeichnen sie sich durch einen deutlich geringeren Preis aus. Allgemeine Informationen für die Realisierung eines Roboterauto-Projekts mit dem ESP32 sind leicht zu finden. Dabei handelt es sich aber oft nur um Ausführungen zu einem Teilaspekt, ohne inhaltliche oder funktionale Abstimmung. So ist nicht nur die Beschaffung der benötigten Informationen mühselig und zeitaufwändig, sie kann auch außerordentlich fehlerträchtig sein. Ansatzpunkt dieses Buches ist, diese Lücke zu schließen. Es geht auf verschiedene Möglichkeiten eines Chassis ein, vermittelt nötige Kenntnisse und führt schrittweise von einer einfachen Motorsteuerung zu einem komplexen sensor- und sprachgesteuerten Roboterauto. Hacks rund um GPS und eine PlayStation 3 runden die Sache ab. Inhalt Bei der Reihenfolge der Kapitel wurde versucht – beginnend bei der Darstellung von grundlegenden Informationen – über die Lösung einfacher Aufgaben zu etwas anspruchsvolleren Techniken zu führen. Der Mikrocontroller ESP32 Die Software erstellen Die Stromversorgung Rund um die Hardware Das Chassis Der Gleichstrommotor Kabellose Steuerung über WiFi Mit Sensoren Hindernisse erkennen Eine eigene Roboterauto-App Servo und Lichtsensor GPS Accelerometer / Gyroskop PS3-Controller Roboterauto-App Hinweis zur Software Die Dateien haben das Suffix (.cpp). Grund ist die Entwicklung mit PlatformIO. Mit Copy & Paste sollten sie auch in der Arduino-IDE verwendet werden können.
€ 32,80
Members: € 29,52
-

Elektor Digital Sprachsteuerung von IoT-Projekten mit Amazon Alexa (PDF)
Sprachsteuerung von IoT-Projekten mit Amazon Alexa gibt dem Leser einen tiefen Einblick in die Technik der Sprachsteuerung am Beispiel von Amazon Alexa. Es erklärt detailliert Schritt für Schritt, wie man Raspberry Pi, ESP8266/32 und Arduino mit einem Sprachassistenten verbindet und steuert. Dieses geschieht anhand von Projekten aus den Bereichen Hausautomation und Robotik. Der Leser erfährt, wie man Heizkessel, Roboter und Gartenhäuser mit dieser modernen Mensch-Maschine-Schnittstelle kommandieren kann. Der Autor Walter Trojan führt dabei den Leser in die vielschichtige Welt der Amazon Web Services ein, wo er neben dem Alexa Skills Kit weitere Module wie AWS Lambda und IoT Core kennenlernt. Das erwartet den Leser: Kapitel 1: Sprachassistenten setzen sich durch Kapitel 2: Alexa intern Kapitel 3: Der erste Alexa Skill Kapitel 4: Alexa Skills für Fortgeschrittene Kapitel 5: Erster Hardware-Skill auf Raspberry Pi Kapitel 6: Auch Alexa liebt die Arduino-IDE Kapitel 7: Hacks mit Schaltern Kapitel 8: Alexa steuert ein Gartenhaus Kapitel 9: Auch Roboter gehorchen Alexa Kapitel 10: Alexa geht fremd
€ 32,80
Members: € 29,52
-

Elektor Digital Elektor Mei/Juni 2023 PDF (NL)
Elektor GREEN en GOLD leden kunnen deze uitgave hier downloaden.Nog geen lid? Klik hier om een lidmaatschap af te sluiten. Super-servotestervoor vier servo’s – stand-alone of in-system Analoge signalen en microcontrollersADC’s, DAC’s, stroommeting en meer embedded world 2023 Sub-Nyquist-sampling in de praktijkhogere frequenties betrouwbaar bemonsteren met subsampling Met Android-smartphone, spreek ik met ESP32?praktisch project met behulp van de Android WiFi-API Actief 1kHz-filter voor vervormingsmetingmeet beter door het het meetsignaal te optimaliseren Alle begin......multivibreert verder! Project 2.0correcties, updates en brieven van lezers Het nieuwe I3C-protocoleen waardig opvolger van I2C – of gebakken lucht? BlueRC: IR-afstandsbediening met smartphone en ESP32universeel en aanpasbaar Microcontroller-documentatie verklaarddeel 2: registers en blokschema’s Automatisering van testen en metentestapparatuur programmeren om je te dienen Elektor Infographicstesten en meten Overspanningsbeveiliging voor veilige werkingtransiëntbescherming voor niet-geïsoleerde DC/DC-voedingsmodules Meetapparatuur van het merk Wihatesters en meters voor installaties waar u op kunt bouwen Automatisch testen en samenwerken aan testresultaten Uit het leven gegrepenelektronica op hoog niveau Energieloggermeet en registreert het stroomverbruik Montage van de M.A.R.S. Rover Kit van 4tronix Parkeerschijf met e-papier displayinnovatief digitaal alternatief eCO2 Telegram-botmeet de luchtkwaliteit via Telegram Achter de schermen van DHZ high-end audioTon Giesberts van Elektor over de fijne kneepjes van het analoog ontwerpen Oost West Lab Bestwerk in uitvoering... RFID-tag’s lezen, en een RFID-deurslotvoorbeeldprojecten uit de Elektor Arduino Experimenteerbundel HF-stroomprobe voor oscilloscoopHF-stroommetingen gemakkelijk gemaakt Niet voor watjes – Makerfabs Robot Arm Kitmet de Raspberry Pi Pico en MicroPython Generatieve KIwie heeft dit eigenlijk gemaakt? Hexadokupuzzelen voor elektronici
€ 9,95
-

Speciale Elektor / E&M: 33 Progetti Top di Elettronica
Una ricca selezione di articoli dal Mondo Elektor! Gli articoli di questo libro sono una selezione accurata, il "meglio del meglio" di circuiti e progetti recenti, realizzati da tecnici di grande talento provenienti da tutto il mondo. Nel tipico stile di Elektor, questa raccolta offre qualcosa di interessante per tutti, dai progettisti esperti a coloro che praticano l'elettronica nel tempo libero. Sommario Super Servo TesterProva Fino a Quattro Servocomandi, Stand-Alone o in Sistema The TubeUn Insolito Amplificatore a Valvole Cloc 2.0La Sveglia che Avete Sempre Desiderato Stazione Meteo LoRa Low-PowerCostruitevi una Stazione Meteorologica “Long Range” Uscita Video con Microcontrollori (Parte 1)Video Composito Uscita Video con Microcontrollori (Parte 2)Uscita VGA e DVI Un Raspberry Pi Pico come Analizzatore di SpettroFFT su Base Hardware a Basso Costo PIC O’Clock – In Contatto col TempoProgettare un Ricevitore di Segnali Orari SDR Frequenzimetro di Rete ACMisura Frequenza e Tensione della Rete Elettrica Generatore di Funzioni con Arduino NanoNano + Codice = Generatore di Funzioni Monitor CO2Un Approccio Fai-Da-Te per Il Controllo della Qualità dell‘Aria ChatMagLevLa Levitazione Magnetica con AI Alimentatore Lineare Variabile Combinato0…50 V / 0…2 A con Struttura Simmetrica Duale Ricevitore Digitale FM con Arduino e TEA5767Restate in Ascolto con un Arduino Nano Protezione Antigelo per Piante da FruttoCon Registrazione della Temperatura Carico Elettronico con Generatore di clock IntegratoPer Collaudare Alimentatori, Convertitori di Tensione e Batterie 128 Termostato Web con ESP32Mantieni il Vino alla Giusta Temperatura Iniezione di Segnali e di Potenza......per Rilevare le Interruzioni nei Cavi DIY LiPo Supercharger KitDal Prototipo al Mercato di Massa Livella Digitale con Stroboscopio AttivoCalibra il Tuo giradischi con Questo Strumento "Tutto-in-Uno" The Game of Life – 262.144 Modi di GiocareDal Progetto di un Lettore Rilevatore di PerditeCollegato ad Arduino Cloud Orologio di LissajousL’Incedere del Tempo con le Figure di Lissajous Mastermind – Controllato da ArduinoUna Versione Moderna del Classico Gioco di Decifrazione Generatore Audio Analogico 1 kHzOnda Sinusoidale a Bassa Distorsione Aggiorna il tuo Caricabatteria (Parte 1)Non Buttarlo, Modificalo! Aggiorna il tuo Caricabatteria (Parte 2)Non Buttarlo, Modificalo! Sistemi GNSS RTK a Basso CostoCon Accuratezza a Livello Centimetrico Esperimenti a 10 GHz con LNB Satellitari ModificatiSbloccare la Banda X a Basso Costo Telecamera per FerromodellismoInstalla un Modulo ESP32 CAM a Bordo! Monitor di Tensione con MicrocontrolloreProtezione dalla Scarica Profonda per Batterie e Altro Nodo Sensore AutonomoTrasmissione Dati LoRa con Alimentazione a Batterie Solari Layout e Sicurezza sul PCBConsigli per un Progetto Sicuro e Durevole
€ 29,95
Members: € 26,96
-

Elektor Labs Elektor Sand Clock for Raspberry Pi Pico (incl. Laser Head Upgrade)
This bundle contains the popular Elektor Sand Clock for Raspberry Pi Pico and the new Elektor Laser Head Upgrade, offering even more options for displaying the time. Not only can you "engrave" the current time in sand, you can now alternatively write it on a glow-in-the-dark foil or create green drawings. Contents of the bundle Elektor Sand Clock for Raspberry Pi Pico (normal price: €50) Elektor Laser Head Upgrade for Sand Clock (normal price: €35) Elektor Sand Clock for Raspberry Pi (Raspberry Pi-based Eye Catcher) A standard sand clock just shows how time passes. In contrast, this Raspberry Pi Pico-controlled sand clock shows the exact time by "engraving" the four digits for hour and minute into the layer of sand. After an adjustable time the sand is flattened out by two vibration motors and everything begins all over again. At the heart of the sand clock are two servo motors driving a writing pen through a pantograph mechanism. A third servo motor lifts the pen up and down. The sand container is equipped with two vibration motors to flatten the sand. The electronic part of the sand clock consists of a Raspberry Pi Pico and an RTC/driver board with a real-time clock, plus driver circuits for the servo motors. A detailed construction manual is available for downloading. Features Dimensions: 135 x 110 x 80 mm Build time: approx. 1.5 to 2 hours Included 3x Precut acrylic sheets with all mechanical parts 3x Mini servo motors 2x Vibration motors 1x Raspberry Pi Pico 1x RTC/driver board with assembled parts Nuts, bolts, spacers, and wires for the assembly Fine-grained white sand Elektor Laser Head Upgrade for Sand Clock The new Elektor Laser Head transforms the Sand Clock into a clock that writes the time on glow-in-the-dark film instead of sand. In addition to displaying the time, it can also be used to create ephemeral drawings. The 5 mW laser pointer, with a wavelength of 405 nm, produces bright green drawings on the glow-in-the-dark film. For best results, use the kit in a dimly lit room. Warning: Never look directly into the laser beam! The kit includes all the necessary components, but soldering three wires is required. Note: This kit is also compatible with the original Arduino-based Sand Clock from 2017. For more details, see Elektor Magazine 1-2/2017 and Elektor Magazine 1-2/2018.
-
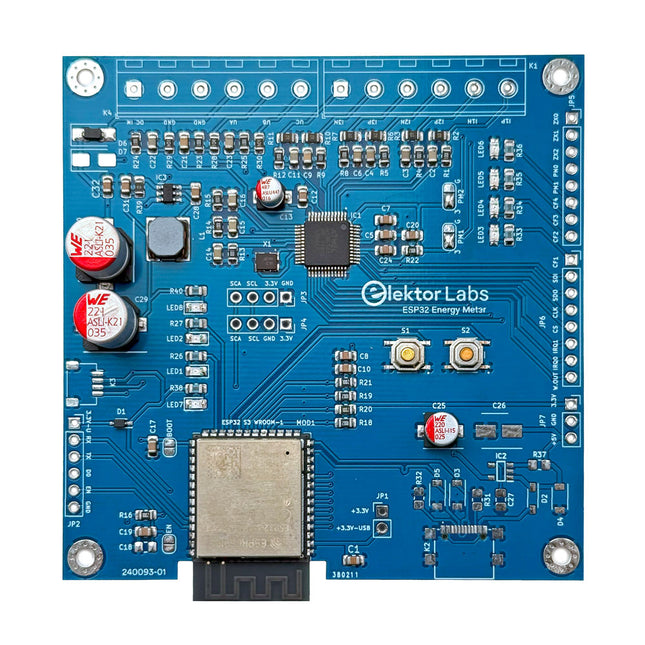
Elektor Labs Elektor ESP32 Energy Meter
The Elektor ESP32 Energy Meter is a device designed for real-time energy monitoring and smart home integration. Powered by the ESP32-S3 microcontroller, it offers robust performance with modular and scalable features. The device uses a 110/230 VAC to 12 VAC step-down transformer for voltage sampling, ensuring galvanic isolation and safety. Its compact PCB layout includes screw-type terminal blocks for secure connections, a Qwiic connector for additional sensors, and a programming header for direct ESP32-S3 configuration. The energy meter is compatible with single-phase and three-phase systems, making it adaptable for various applications. The energy meter is simple to set up and integrates with Home Assistant, offering real-time monitoring, historical analytics, and automation capabilities. It provides accurate measurements of voltage, current, and power, making it a valuable tool for energy management in homes and businesses. Features Comprehensive Energy Monitoring: Get detailed insights into your energy usage for smarter management and cost savings. Customizable Software: Tailor functionality to your needs by programming and integrating custom sensors. Smart Home Ready: Compatible with ESPHome, Home Assistant, and MQTT for full Smart Home integration. Safe & Flexible Design: Operates with a 110/230 VAC to 12 VAC step-down transformer and features a pre-assembled SMD board. Quick Start: Includes one Current Transformer (CT) sensor and access to free setup resources. Specifications Microcontroller ESP32-S3-WROOM-1-N8R2 Energy Metering IC ATM90E32AS Status Indicators 4x LEDs for power consumption indication2x Programmable LEDs for custom status notifications User Input 2x Push buttons for user control Display Output I²C OLED display for real-time power consumption visualization Input Voltage 12~16 VAC (via a step-down transformer 110/230 VAC to 12 VAC) Clamp Current Sensor YHDC SCT013-000 (100 A/50 mA) included Smart Home Integration ESPHome, Home Assistant, and MQTT for seamless connectivity Connectivity Header for programming, Qwiic for sensor expansion Applications Supports single-phase and three-phase energy monitoring systems Dimensions 79.5 x 79.5 mm Included 1x Partly assembled board (SMDs are pre-mounted) 2x Screw terminal block connectors (not mounted) 1x YHDC SCT013-000 current transformer Required Power transformer not included Downloads Datasheet (ESP32-S3-WROOM-1) Datasheet (ATM90E32AS) Datasheet (SCT013-000) Frequently Asked Questions (FAQ) From Prototype to Finished Product What started as an innovative project to create a reliable and user-friendly energy meter using the ESP32-S3 microcontroller has evolved into a robust product. Initially developed as an open-source project, the ESP32 Energy Meter aimed to provide precise energy monitoring, smart home integration and more. Through meticulous hardware and firmware development, the energy meter now stands as a compact, versatile solution for energy management.
-

SunFounder SunFounder Kepler Kit (Ultimate Starter Kit for Raspberry Pi Pico W)
Your gateway to IoT and microcontroller programming With 450+ components and 117 online projects, this comprehensive kit ignites your creativity. The tutorials by Paul McWhorter make learning enjoyable for beginners and advanced users. This kit supports MicroPython, C/C++, and Piper Make, offering diverse programming options. Explore sensors, actuators, LEDs, and LCDs for endless project possibilities. From home automation to robotics, this kit empowers your tech journey. Features IoT Starter Kit for Beginners: This kit offers a rich IoT learning experience for beginners. With 450+ components, 117 projects, and expert-led video lessons, this kit makes learning microcontroller programming and IoT engaging and accessible. Expert-Guided Video Lessons: The kit includes 27 video tutorials by the renowned educator, Paul McWhorter. His engaging style simplifies complex concepts, ensuring an effective learning experience in microcontroller programming. Wide Range of Hardware: The kit includes a diverse array of components like sensors, actuators, LEDs, LCDs, and more, enabling you to experiment and create a variety of projects with the Raspberry Pi Pico W. Supports Multiple Languages: The kit offers versatility with support for three programming languages - MicroPython, C/C++, and Piper Make, providing a diverse programming learning experience. Dedicated Support: Benefit from our ongoing assistance, including a community forum and timely technical help for a seamless learning experience. Included Raspberry Pi Pico W Breadboard Jumper Wires Resistor Transistor Capacitor Diode Li-po Charger Module 74HC595 TA6586 – Motor Driver Chip LED RGB LED LED Bar Graph 7-segment Display 4-Digit 7-Segment Display LED Dot Matrix I²C LCD1602 WS2812 RGB 8 LEDs Strip Buzzer DC Motor Servo DC Water Pump Relay Button Micro Switch Slide Switch Potentiometer Infrared Receiver Joystick Module 4x4 Keypad MPR121 Module MFRC522 Module Photoresistor Thermistor Tilt Switch Reed Switch PIR Motion Sensor Module Water Level Sensor Module Ultrasonic Module DHT11 Humiture Sensor MPU6050 Module Documentation Online Tutorials in 3 languages (EN, DE and JP)
-
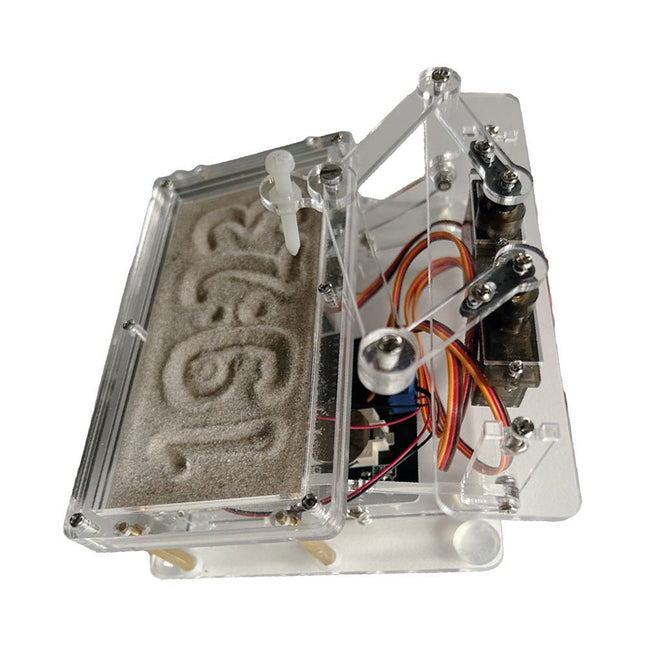
Elektor Labs Elektor Sand Clock for Raspberry Pi Pico
Raspberry Pi-based Eye Catcher A standard sand clock just shows how time passes. In contrast, this Raspberry Pi Pico-controlled sand clock shows the exact time by “engraving” the four digits for hour and minute into the layer of sand. After an adjustable time the sand is flattened out by two vibration motors and everything begins all over again. At the heart of the sand clock are two servo motors driving a writing pen through a pantograph mechanism. A third servo motor lifts the pen up and down. The sand container is equipped with two vibration motors to flatten the sand. The electronic part of the sand clock consists of a Raspberry Pi Pico and an RTC/driver board with a real-time clock, plus driver circuits for the servo motors. A detailed construction manual is available for downloading. Features Dimensions: 135 x 110 x 80 mm Build time: approx. 1.5 to 2 hours Included 3x Precut acrylic sheets with all mechanical parts 3x Mini servo motors 2x Vibration motors 1x Raspberry Pi Pico 1x RTC/driver board with assembled parts Nuts, bolts, spacers, and wires for the assembly Fine-grained white sand


