Highlights
Output Frequency (Sine): 100 MHz
Output Frequency (Square): 25 MHz
Channels: 2
Arbitrary Waveform Length: 16 Mpts
Features
Unique SiFi II (Signal Fidelity II) technology: generate the arbitrary waveforms point by point; recover the signal without distortion; sample rate accurate and adjustable; jitter of all the output waveforms (including Sine, Pulse, etc.) as low as 200 ps
16 Mpts memory depth per channel for arbitrary waveforms
Standard dual-channel with the same performance, equivalent to two independent signal sources
High frequency stability: ±1 ppm; low phase noise: -105 dBc/Hz
Built-in high-order harmonic generator (at most 8-order harmonics)
Built-in 7 digits/s, 240 MHz bandwidth full featured frequency counter
Up to 160 built-in arbitrary waveforms, covering the common signals in engineering application, medical electronics, auto electronics, math processing, and other various fields
Sample rate up to 250 MSa/s, vertical resolution 16 bits
Arbitrary waveform sequence editing function available; arbitrary waveforms also can be generated through the PC software
Various analog and digital modulation functions: AM, FM, PM, ASK, FSK, PSK, and PWM.
Standard waveform combine function, capable of outputting specified waveforms combined with the basic waveforms
Standard channel tracking function, when enabled, all the parameters of both channels are updated based on users' configurations
Standard interface: USB Host&Device and LAN (LXI Core 2011 Device); USB-GPIB function supported
4.3'' TFT
Included
1x Rigol DG2102 Function/Arbitrary Waveform Generator
1x Power cord
1x USB cable
3K5 Noteworthy Designs (1975-2026)
This USB archive stick contains over 3,500 noteworthy circuits from all areas of electronics (audio & video, hobby & modelling, home & garden, test & measurement, computers & microcontrollers, radio, power supplies & batteries) published in Elektor Magazine since 1975. Most circuits are sourced from the Elektor Summer Circuits editions.
You can use the article search function to find specific content in the full text. The results are always shown as preformatted PDF documents. Adobe Reader may be used to browse articles as well as find individual words and expressions using the program’s integrated Search functions.
Please note that no Summer Circuits editions were published between 2014 and 2022, so these years are not included in the directory.
Specifications
Storage
16 GB
Connectors
1x USB-A1x USB-C
This upgraded version 2.0 (available exclusively from Elektor) contains the following improvements:
Enhanced protective earthing (PE) for furnace chassis
Extra thermal insulation layer around furnace to reduce odors
Connection to a computer, allowing curve editing on a PC
Features such as constant temperature control and timing functions
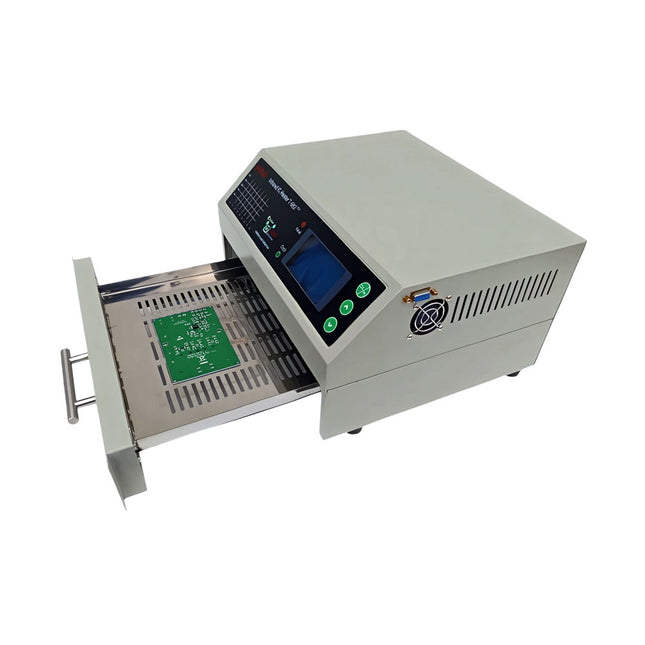
The infrared IC heater T-962 v2.0 is a microprocessor-controlled reflow oven that you can use for effectively soldering various SMD and BGA components. The whole soldering process can be completed automatically and it is very easy to use. This machine uses a powerful infrared emission and circulation of the hot air flow, so the temperature is being kept very accurate and evenly distributed.
A windowed drawer is designed to hold the work-piece, and allows safe soldering techniques and the manipulation of SMDBGA and other small electronic parts mounted on a PCB assembly. The T-962 v2.0 may be used to automatically rework solder to correct bad solder joints, remove/replace bad components and complete small engineering models or prototypes.
Features
Large infrared soldering area
Effective soldering area: 180 x 235 mm; this increases the usage range of this machine drastically and makes it an economical investment.
Choice of different soldering cycles
Parameters of eight soldering cycles are pre defined and the entire soldering process can completed automatically from Preheat, Soak and Reflow through to cool down.
Special heat up and temperature equalization with all designs
Uses up to 800 Watts of energy efficient Infrared heating and air circulation to re-flow solder.
Ergonomic design, practical and easily operated
Good build quality but at the same time light weight and a small footprint allows the T-962 v2.0 to be easily bench positioned transported or stored.
Large number of available functions
The T-962 v2.0 can solder most small parts of PCB boards, for example CHIP, SOP, PLCC, QFP, BGA etc. It is the ideal rework solution from single runs to on-demand small batch production.
Specifications
Soldering area (max)
180 x 235 mm (7.1 x 9.3")
Power (max)
800 W
Temperature range
0-280°C (32-536°F)
Heating method
Infrared
Processing time
1~8 minutes
Power supply
220 V AC/50 Hz
Display
LCD with Backlight
Control mode
8 intelligent temperature curves
Dimensions
310 x 290 x 170 mm (12.2 x 11.4 x 6.7")
Weight
6.2 kg
Included
1x T-962 v2.0 Reflow Soldering Oven (Elektor Version)
2x Fuses
1x Power cord (EU)
Learn, Build, and Understand Electronics – with Elektor
Projects, Expert Knowledge, Archive Access, and Exclusive Discounts – All in One Membership
Would you like to learn electronics, develop your own circuits, and gain a better understanding of modern technologies? Elektor Magazine has been one of the leading sources of information for electronics engineers, developers, start-ups, and companies for 65 years. With an Elektor Green Membership, you get:
✅ The international electronics magazine Elektor (in digital format)
✅ Access to the Elektor archive with 65 years of electronics know-how
✅ DIY projects, tested circuits, in-depth reviews and tutorials
✅ Exclusive member discounts at Elektor.com
Why Elektor?
For 65 years, Elektor has stood for in-depth electronics knowledge, practical projects, and innovative technologies.
From microcontrollers and embedded systems to Raspberry Pi, Arduino, and ESP32, as well as IoT, AI, measurement technology, audio, RF, and robotics, Elektor covers the key platforms and application areas of modern electronics.
Whether you are a beginner, maker, or professional – Elektor helps you take your skills to the next level.
Who Is This Membership for?
Beginners – Start your journey into electronics with clear fundamentals and first projects
Makers – Discover new projects, ideas, and inspiration for your own developments
Professionals & Engineers – Stay up to date with modern technologies and deepen your expertise
Your Benefits at a Glance
Magazine (Digital) – Receive every issue digitally, delivered straight to your inbox
65 Years of Electronics Knowledge – Access the extensive Elektor archive anytime (since 1974)
Hands-on Projects – Turn your ideas into reality with guides, circuits, and tutorials
Exclusive Discounts – Save on every purchase at Elektor.com
Unlock All Elektor Benefits Today!
Free Membership
Green Membership
❌ 8x Elektor Magazine (Digital Edition) as PDF
✅ 8x Elektor Magazine (Digital Edition) as PDF
❌ 12 Months of Access to the Full Elektor Archive
✅ 12 Months of Access to the Full Elektor Archive
❌ Access to Over 5,000 Gerber Files
✅ Access to Over 5,000 Gerber Files
❌ 10% Member Discount at Elektor.com
✅ 10% Member Discount at Elektor.com
✅ Read Elektor weekly every Friday
✅ Read Elektor weekly every Friday
ℹ️ Do you prefer reading Elektor Magazine in print? Find out everything about the Elektor Gold Membership (Print) here.
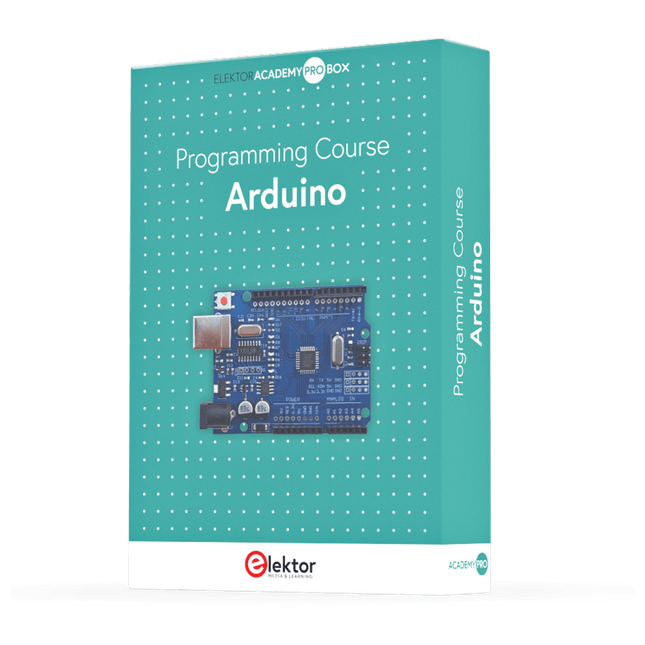
This complete Arduino Uno-based microcontroller programming course features a textbook, a component kit, hands-on projects, and a comprehensive online course with simulations. It is ideal for step-by-step learning of embedded systems programming with Arduino using a practical, hands-on approach.
A Practical Introduction to Embedded Systems with the Arduino Uno
This course is designed for people who are new to embedded systems and looking for a structured, example-driven way to get started.
A kit of parts comprising LEDs and resistors, switches, sensors and actuators, displays, a breadboard and wires, and more is included. These are used in the course to illustrate example applications.
No prior experience with Arduino or embedded development is required. Each section features hands-on examples and mini projects designed to reinforce key concepts and inspire deeper exploration. By the end of the course, you’ll be able not only to reproduce the examples but also to build on them with your own ideas and applications.
What Will You Learn?
Microcontroller programming with Arduino using the Uno R3 board
Working with Digital I/O, read buttons and encoders, control LEDs and relays
Read analog inputs, voltages, and analog sensors
Generating analog output signals and PWM
Use serial communication like UART, I²C and SPI to control displays and read digital sensors and SD cards
Managing time
Working with interrupts
Real-time sensor input and control via buttons, LEDs, and displays
Control actuators like relays and servo motors
Who Is It For?
Students and self-learners exploring embedded systems
Makers and IoT enthusiasts looking to improve their hardware skills
Educators and trainers seeking ready-to-teach material
What's Inside the Box?
Access to the full course on the Elektor Academy Pro Learning Platform
Uno R3 microcontroller board + USB cable
Book: Programming Microcontrollers in C/C++ Using Arduino
Downloadable project files for every module
Component Box:
2× LED, red, 5 mm
LED, green, 5 mm
3× Resistor, 470 Ω, 0.25 W
LDR
Potentiometer, 10 kΩ, linear
Pushbutton
Rotary encoder module
Relay module
DHT22 Humidity & Temperature Sensor
TM1637-compatible 4-digit 7-segment display
MPU-6050 IMU with headers
SSD1306-compatible I²C OLED display
Micro SD card adapter with header
Buzzer
SG90 Micro Servo
ILI9341-compatible SPI 240×320 TFT display
20× Jumper wires
Breadboard
All Programming Courses (and differences in content)
Course
Arduino
Raspberry Pi Pico with Arduino C/C++
ESP32 with Arduino C/C++
Raspberry Pi Pico with MicroPython
ESP32 with MicroPython
Online Course
Access to Arduino Course
Access to Pico with Arduino C/C++ Course
Access to ESP32 with Arduino C/C++ Course
Access to Pico with MicroPython Course
Access to ESP32 with MicroPython Course
Board
Uno R3
Raspberry Pi Pico
ESP32
Raspberry Pi Pico
ESP32
Book
Programming Microcontrollers in C/C++ Using Arduino
Programming Microcontrollers in C/C++ Using Arduino
Programming Microcontrollers in C/C++ Using Arduino
Programming Microcontrollers in MicroPython
Programming Microcontrollers in MicroPython
Kit
40-piece Component Box
40-piece Component Box
40-piece Component Box
40-piece Component Box
40-piece Component Box
Raspberry Pi-based Eye Catcher
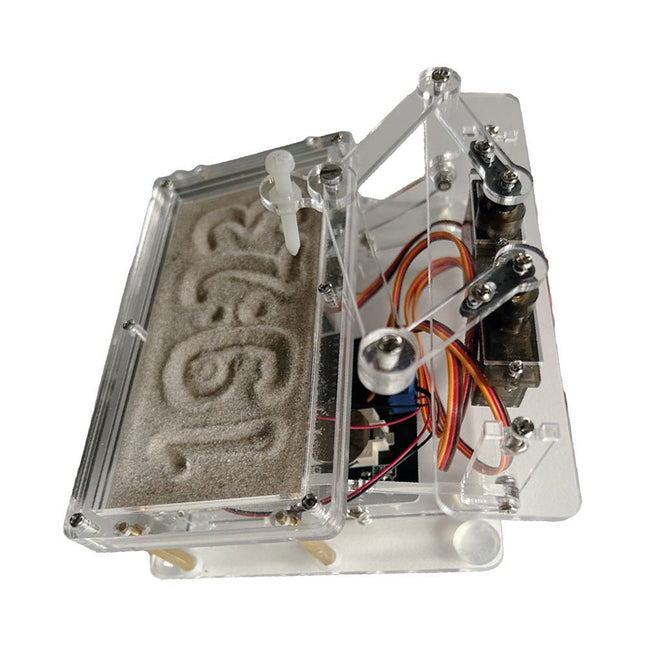
A standard sand clock just shows how time passes. In contrast, this Raspberry Pi Pico-controlled sand clock shows the exact time by “engraving” the four digits for hour and minute into the layer of sand. After an adjustable time the sand is flattened out by two vibration motors and everything begins all over again.
At the heart of the sand clock are two servo motors driving a writing pen through a pantograph mechanism. A third servo motor lifts the pen up and down. The sand container is equipped with two vibration motors to flatten the sand. The electronic part of the sand clock consists of a Raspberry Pi Pico and an RTC/driver board with a real-time clock, plus driver circuits for the servo motors.
A detailed construction manual is available for downloading.
Features
Dimensions: 135 x 110 x 80 mm
Build time: approx. 1.5 to 2 hours
Included
3x Precut acrylic sheets with all mechanical parts
3x Mini servo motors
2x Vibration motors
1x Raspberry Pi Pico
1x RTC/driver board with assembled parts
Nuts, bolts, spacers, and wires for the assembly
Fine-grained white sand
Diese Ausgabe steht allen GOLD- und GREEN-Mitgliedern auf der ElektorMagazine-Website zum Download bereit!
Sie sind noch kein Mitglied? Hier klicken!
Der ESP-BLASTEine Mini-Raketendrohne mit ESP32, die über 100 km/h erreicht
Wireless Workshop (1)Freigeschaltetes Funkmodul: 433-MHz-CC1101-Sub-GHz-Transceiver
AM-Sendermit Rechteck-/Sinuswellengenerator auf Raspberry Pi Pico
STM32Cube Innovations ChallengeTreten Sie mit Ihrem besten STM32C5-Design an
CoffeeCallerWie ein langer Flur zu einer maßgefertigten Mesh-Netzwerk-Platine führte
AudiotronicsKlirrfaktor
Elektor ist 65Projekte aus früheren September/Oktober-Ausgaben
Geräteortung durch Bluetooth Channel SoundingZentimetergenaue Entfernungsmessung im IoT der nächsten Generation
2026: Eine KI-OdysseeQuantencomputing ist nicht die nächste GPU
Cloud-Schutz durch Edge-Sicherheit
Erste Erfahrungen mit dem HackRF ProPraktische Tests mit der neuen SDR-Hardware
Herausforderung ElektromobilitätEffiziente Lötlösungen für moderne Fahrzeugtechnik
Modem-Update von GPRS/2G auf LTE/4Gam Beispiel einer Funk-Alarmzentrale
Loop-Antenne mit RF BricksTeil 1: Kurzwellen-Antenne mit einstellbarer Richtwirkung im Selbstbau
Internetradio-zu-AM-KonverterVerwendung eines ESP32-S3 als Sender
Projekt 2.0
mioty – ein ÜberblickLPWAN à la Fraunhofer
Werkbank-WeisheitPraktische Tipps von Experten
Walter, das kompakte IoT-ModulTeil 2: Zugriff auf Wetter- und Datendienste
electronica Fast Forward Start- & Scale-Up AwardsLes préparatifs s?accélèrent?!
Bluetooth Low Energy avec ESP32-C3 et ESP32Vous n?avez pas toujours besoin de choisir le wifi?!
Renifleur BLEReconfiguration du dongle USB nRF52840 MDK de makerdiary
Cube magique de LED RGBcircuit avec un RP2040
Marche/arrêt automatique pour le compresseur de pâte à souder
Contenu vidéo d?ElektorLivestreams, webinaires et cours pour les ingénieurs et les fabricants professionnels
Électrification d?un véloUtilisation d?un kit de modification de vélo électrique
Démarer en électroniqueMultiplication de tensions
Sur le vifTransmutations
Teensy 4.0 ? comment cette carte peut-elle être aussi rapide ?Ou: La vitesse, ce n'est pas sorcier !
Simulation d?amplificateur de puissance audio avec TINA«?simuler avant de construire?»
Développer et utiliser vos n?uds LoRaWAN pour l'Internet des Objets (IdO)Exemple de chapitre : Modules LoRaWAN Dragino LHT65, LDS01 et LDS02
Projet 2.0Corrections, mises à jour et courriers des lecteurs
5G pour mon propre exploitMaîtrise totale du déploiement de la 5G avec les réseaux cellulaires privés
Infographics
Les meilleurs conseils pour développer une interface WiFiComment mon appareil apprend-il à transmettre ?
Horloge Tour du Rhin Mod 2
Analyseur de spectre audio avec dekatronsUne nouvelle façon d'utiliser les tubes rétro
Envoi de données à TelegramAvec un ESP32 et quelques composants
Filtre coupe-bande de Fliege pour les mesures audioFaites de meilleures mesures avec un filtre coupe-bande
Démontage d?un CO2-mètrePeut-on le bidouiller pour vos projets??
Tout mis ensembleLe transistor unijonction programmable expliqué
Écran tactile rond pour Raspberry PiL?HyperPixel 2.1 Round de Pimoroni
Télémesure avec détection des pertes de connexionGrâce aux modules nRF24L01+
Récepteur FM numérique avec Arduino et TEA5767Restez à l?écoute avec un Arduino Nano
Convertir une interface OLED de SPI vers I²C
HomeLab ToursUn passe-temps ne prend pas sa retraite
Une décennie d?éthique en électroniqueLe regard de Tessel Renzenbrink sur la société numérique.
HexadokuThe Original Elektorized Sudoku
This bundle contains the popular Elektor Sand Clock for Raspberry Pi Pico and the new Elektor Laser Head Upgrade, offering even more options for displaying the time. Not only can you "engrave" the current time in sand, you can now alternatively write it on a glow-in-the-dark foil or create green drawings.
Contents of the bundle
Elektor Sand Clock for Raspberry Pi Pico (normal price: €50)
Elektor Laser Head Upgrade for Sand Clock (normal price: €35)
Elektor Sand Clock for Raspberry Pi (Raspberry Pi-based Eye Catcher)
A standard sand clock just shows how time passes. In contrast, this Raspberry Pi Pico-controlled sand clock shows the exact time by "engraving" the four digits for hour and minute into the layer of sand. After an adjustable time the sand is flattened out by two vibration motors and everything begins all over again.
At the heart of the sand clock are two servo motors driving a writing pen through a pantograph mechanism. A third servo motor lifts the pen up and down. The sand container is equipped with two vibration motors to flatten the sand. The electronic part of the sand clock consists of a Raspberry Pi Pico and an RTC/driver board with a real-time clock, plus driver circuits for the servo motors.
A detailed construction manual is available for downloading.
Features
Dimensions: 135 x 110 x 80 mm
Build time: approx. 1.5 to 2 hours
Included
3x Precut acrylic sheets with all mechanical parts
3x Mini servo motors
2x Vibration motors
1x Raspberry Pi Pico
1x RTC/driver board with assembled parts
Nuts, bolts, spacers, and wires for the assembly
Fine-grained white sand
Elektor Laser Head Upgrade for Sand Clock
The new Elektor Laser Head transforms the Sand Clock into a clock that writes the time on glow-in-the-dark film instead of sand. In addition to displaying the time, it can also be used to create ephemeral drawings. The 5 mW laser pointer, with a wavelength of 405 nm, produces bright green drawings on the glow-in-the-dark film. For best results, use the kit in a dimly lit room. Warning: Never look directly into the laser beam!
The kit includes all the necessary components, but soldering three wires is required.
Note: This kit is also compatible with the original Arduino-based Sand Clock from 2017. For more details, see Elektor Magazine 1-2/2017 and Elektor Magazine 1-2/2018.
Discover endless creativity with the Universal Maker Sensor Kit, designed for use with Raspberry Pi, Pico W, Arduino, and ESP32. This versatile kit offers compatibility across popular development platforms, including Arduino Uno R4 Minima/WiFi, Uno R3, Mega 2560, Raspberry Pi 5, 4, 3B+, 3B, Zero, Pico W, and ESP32.
Featuring over 35 sensors, actuators, and displays, it's perfect for projects ranging from environmental monitoring and smart home automation to robotics and interactive gaming. Step-by-step tutorials in C/C++, Python, and MicroPython guide beginners and experienced makers alike through 169 exciting projects.
Features
Wide Compatibility: Fully supports Arduino (Uno R3, Uno R4 Minima/WiFi, Mega 2560), Raspberry Pi (5, 4, 3B+, 3B, Zero, Pico W), and ESP32, enabling extensive flexibility across numerous development platforms. Includes instructions for building 169 projects.
Comprehensive Components: Features more than 35 sensors, actuators, and display modules suitable for diverse projects such as environmental monitoring, smart home automation, robotics, and interactive game controllers.
Detailed Tutorials: Provides clear, step-by-step tutorials covering Arduino, Raspberry Pi, Pico W, ESP32, and each included component. Tutorials are available in C/C++, Python, and MicroPython, catering effectively to both beginners and experienced makers.
Suitable for All Skill Levels: Offers structured projects designed to guide users seamlessly from beginner to advanced proficiency in electronics and programming, enhancing creativity and technical expertise.
Included
Breadboard
Button Module
Capacitive Soil Moisture Module
Flame Sensor Module
Gas/Smoke Sensor Module (MQ2)
Gyroscope & Accelerometer Module (MPU6050)
Hall Sensor Module
Infrared Speed Sensor Module
IR Obstacle Avoidance Sensor Module
Joystick Module
PCF8591 ADC DAC Converter Module
Photoresistor Module
PIR Motion Module (HC-SR501)
Potentiometer Module
Pulse Oximeter and Heart Rate Sensor Module (MAX30102)
Raindrop Detection Module
Real Time Clock Module (DS1302)
Rotary Encoder Module
Temperature Sensor Module (DS18B20)
Temperature and Humidity Sensor Module (DHT11)
Temperature, Humidity & Pressure Sensor (BMP280)
Time of Flight Micro-LIDAR Distance Sensor (VL53L0X)
Touch Sensor Module
Ultrasonic Sensor Module (HC-SR04)
Vibration Sensor Module (SW-420)
Water Level Sensor Module
I²C LCD 1602
OLED Display Module (SSD1306)
RGB LED Module
Traffic Light Module
5 V Relay Module
Centrifugal Pump
L9110 Motor Driver Module
Passive Buzzer Module
Servo Motor (SG90)
TT Motor
ESP8266 Module
JDY-31 Bluetooth Module
Power Supply Module
Documentation
Online Tutorial
Open-Source-Code mit Arduino IDE und PlatformIO
Autonomes Fahren: GPS, Accelerometer, Gyroskop
PS3-Controller
Mikrocontroller wie der Arduino und Einplatinenrechner wie der Raspberry Pi haben sich zu beliebten Komponenten entwickelt. Dritter im Bunde ist der ESP32 der Firma Espressif. Mikrocontroller dieser Baureihe zeichnen sich durch eine Vielzahl implementierter Funktionen aus, die bei einem Arduino konventioneller Prägung mit einem Atmel-AVR-Mikrocontroller erst mit weiterer Hardware möglich sind. Prominentes Beispiel sind hier die WiFi- und Bluetooth-Funktionalitäten. Gegenüber einem Raspberry Pi zeichnen sie sich durch einen deutlich geringeren Preis aus.
Allgemeine Informationen für die Realisierung eines Roboterauto-Projekts mit dem ESP32 sind leicht zu finden. Dabei handelt es sich aber oft nur um Ausführungen zu einem Teilaspekt, ohne inhaltliche oder funktionale Abstimmung. So ist nicht nur die Beschaffung der benötigten Informationen mühselig und zeitaufwändig, sie kann auch außerordentlich fehlerträchtig sein.
Ansatzpunkt dieses Buches ist, diese Lücke zu schließen. Es geht auf verschiedene Möglichkeiten eines Chassis ein, vermittelt nötige Kenntnisse und führt schrittweise von einer einfachen Motorsteuerung zu einem komplexen sensor- und sprachgesteuerten Roboterauto. Hacks rund um GPS und eine PlayStation 3 runden die Sache ab.
Inhalt
Bei der Reihenfolge der Kapitel wurde versucht – beginnend bei der Darstellung von grundlegenden Informationen – über die Lösung einfacher Aufgaben zu etwas anspruchsvolleren Techniken zu führen.
Der Mikrocontroller ESP32
Die Software erstellen
Die Stromversorgung
Rund um die Hardware
Das Chassis
Der Gleichstrommotor
Kabellose Steuerung über WiFi
Mit Sensoren Hindernisse erkennen
Eine eigene Roboterauto-App
Servo und Lichtsensor
GPS
Accelerometer / Gyroskop
PS3-Controller
Roboterauto-App
Hinweis zur Software
Die Dateien haben das Suffix (.cpp). Grund ist die Entwicklung mit PlatformIO. Mit Copy & Paste sollten sie auch in der Arduino-IDE verwendet werden können.
Preiswerter Audio-MessplatzMit PC-Software und USB-Audio-Interface
Netzspannungs-FrequenzmessgerätNetzfrequenz und -spannung überwachen
Kleines InduktivitätsmessgerätEine erschwingliche Lösung für Ihr Heimlabor
Reiten auf der SchallwelleEin Blick auf das Makerfabs Acoustic Levitation Kit
Aller Anfang...muss nicht schwer sein: Dioden als Gleichrichter
E-FFWD: Der Blick wieder nach vorn gerichtet!
Erste Schritte mit dem OszilloskopFinden Sie den Weg durch den Knopf-und-Tasten-Dschungel
Raspberry Pi Pico als Software Defined RadioFür das MSF-Zeitsignal
Feuchtigkeitssensoren für GießanlagenAutomatische Bewässerung
Umbruch in der Mess- und PrüftechnikInnovationen kleinerer Akteure
Infografik 7-8/2022
Inspiration: Was wirklich wichtig istInterview mit dem Unternehmer Walter Arkesteijn von InnoFaith Beauty Sciences
EMV-Störungen durch Speicherdrosseln minimieren
Grafische Benutzeroberflächen mit Python:Tic-Tac-Toe
Reed-RelaisBemerkenswerte Bauteile
Einfaches analoges ESR-Messgerätmit Drehspulinstrument-Genauigkeit
CO2-Ampel mit Sigfox-InterfaceVom WLAN unabhängig!
Frauen in der Technik„Es geht nur so lange um Leistung, bis diese Leistung Titten hat.“
Low-Budget Tablet-Oszilloskop ADS1013DGutes Preis-/Leistungsverhältnis?
Aufgeschraubt und reingeschaut: Wireless Smart PlugsSmarte Funksteckdosen mit ESP8266 & Co.
Hautwiderstand und HautkapazitätKleine Experimente mit der menschlichen Hülle
Aus dem Leben gegriffenDer Prophet gilt nichts im Vaterland
Messgerät Pokit – die eierlegende Wollmilchsau?Klein und mit vielen Messmöglichkeiten
HexadokuSudoku für Elektroniker