
Search results for "motorsteuerung OR mit OR arduino OR und OR raspberry OR pi"
-

Elektor Digital Röhren 8 (PDF)
Aus dem Inhalt Sieben Jahre Elektor Röhren-Sonderhefte Der Kompressionseffekt oder das Geheimnis des Schirmgitters Phasenumkehrstufen Gitterwiderstand und Gitterstrom Eintakt-A-Endstufe mit der 6C33 Single-Ended-Endstufe mit der legendären Röhre 300B Eintaktverstärker: Eine Handvoll gutklingender Watt Parallel-Push-Pull-Monoblock mit 140 Watt Ruhestromsteuerung von Röhrenendstufen mithilfe eines Mikrocontrollers Kompakter Stereo-Röhrenverstärker mit der ECL 85 2-V-1-Audion für Mittel- und Kurzwelle Hi-Fi-Röhren-Endstufe Das Klanggeheimnis von sauerstofffreiem Kupferkabel Stereo-Basisbreite Röhrendaten mit Sockelschaltungen
€ 17,50
Members: € 15,75
-

Elektor Digital 308 Schaltungen (E-book)
308 Schaltungen – das zehnte Buch innerhalb der „Dreihunderter-Reihe“. 308 Schaltungen und neue Konzepte in einem Buch sind ein (fast) unerschöpflicher Fundus zu allen Bereichen der Elektronik: Audio & Video, Spiel & Hobby, Haus & Hof, Prozessor & Controller, Messen & Testen, PC & Peripherie, Stromversorgung & Ladetechnik sowie zu Themen, die sich nicht katalogisieren lassen. 308 Schaltungen – enthält viele komplette Problemlösungen, zumindest aber die Idee hierzu. Nicht zuletzt sind die 308 Schaltungen der Anstoß zu ganz neuen Überlegungen. 308 Schaltungen – sind eine Zusammenfassung der Beiträge aus den Halbleiterheften 2000 bis 2002. Die Halbleiterhefte sind die jährlichen Doppelausgaben Juli/August der Zeitschrift Elektor. 308 Schaltungen ist das Buch für alle, die kreativ mit der Elektronik umgehen; sei es im Beruf oder als Hobby.
€ 29,80
Members: € 26,82
-

Elektor Digital Röhren 10 (PDF)
Inhalt Grundlagen Kathodengegenkopplung – bei Endröhren durch eine Übertragerwicklung Der Zwischenübertrager Bauanleitungen Eintakt-A-Endstufe mit 4x 6V6 – 6V6 quatroSE – ernsthafter Eintakter mit 16 W, nicht nur für hocheffiziente Lautsprecher CD-Vorverstärker mit CD-Filter Moderne Hybridendstufe Die Kathedrale in der Streichholzschachtel – Elektronische Hallspirale UKW-Mischteil – mit der Doppeltriode ECC2000 und der Triode/Pentode ECF80 Technik In die Röhre geschaut – Computer-tomografische Bilder vom Röhreninneren 6L6GC – with best Regards from the United States of America Röhrensockel Info Die Röhren-Sonderheft-Reihe hat die runde Zahl 10 erreicht Nachruf Jan Jurco – Gründer von JJ Electronic Buchbesprechung Röhrendaten
€ 18,50
Members: € 16,65
-

Elektor Digital Elektrogitarren (PDF)
Technik + Sound Was wäre die heutige Rock- und Popmusik ohne Elektrogitarren und Elektrobässe? Diese Instrumente geben seit mehr als vierzig Jahren klar den Ton an. Ihr Sound wird zum großen Teil von den elektrischen Komponenten bestimmt. Doch wie funktionieren sie eigentlich? Kaum jemand ist in der Lage, diese Frage auch dem Vollblutmusiker ohne technischen Background verständlich zu beantworten. Dieses Buch beantwortet viele offene Fragen unkompliziert und in einer leicht verständlichen Art und Weise. Was bisher noch weitgehend als Herstellergeheimnis galt, entschleiert dieses Buch für jeden interessierten Musiker (auch für andere) in einer deutlichen und fundierten Art. Der Blick geht tief ins Innere der Gitarren bis in die Tonabnehmer (Pickups) und ihr elektrisches Umfeld. Damit ist die Gitarrenelektronik im Kern kein Buch mehr mit sieben Siegeln. Mit ein paar geschickten Eingriffen lassen sich viele Instrumente im Klang noch deutlich verbessern und vielseitiger machen – mit optimalem Verhältnis von investiertem Geld zu Nutzeffekt. Der Autor ist langjähriger Elektronik-Profi und aktiver Musiker. Was hier beschrieben ist, hat er alles selbst ausgiebig in der Praxis getestet.
€ 29,80
Members: € 26,82
-

Elektor Digital Röhren 6 (PDF)
Aus dem Inhalt Neues von den Röhrenherstellern Dem Klang auf der Spur Wirkung und Anwendung von Gettermaterialien für Vakuum-Röhren Klanghersteller und Klang beeinflussende Elemente im NF-Verstärker Eintakt-A-Endstufe mit EL 156 in Trioden- und Pentodenschaltung Kopfhörerverstärker mit Ausgangübertrager Mehr Sound My first Super Netzfilter Messfilter Messergebnisse relativ, absolut und interpretiert Welche Röhre klingt besser? Moderne HiFi-Technik und DIN 45 500 Röhrenverstärker, Energieverbrauch und Recycling Röhrendaten mit Sockelschaltungen
€ 16,90
Members: € 15,21
-

Elektor Digital LEDs 1 (PDF)
Inhalt Theorie & Anwendung Es werde Licht – Physikalische Grundlagen zu Licht und Beleuchtung Illuminati – Beleuchtungstechnik: Grundlagen und Anwendungen Steuerzentrale – LED-Leistungseinheit und -Steuerung auf einem Chip LED-Beamer-Technologie – Funktionsweise und Anwendungen Hitzeschild – Kaltleiter als Strombegrenzer für LEDs Strahler 09 – Ansteuerelektronik und Wärmemanagement für Leuchtmittel auf LED-Basis LEDs für eine neue Ära in der Lichttechnik – Die Leuchtdiode und ihre Möglichkeiten aus Sicht eines Herstellers Ökobilanz von LED-Lampen – Ergebnisse einer Gesamtlebenszyklusanalyse für LED-Lampen Lichtpumpe – Spannungswandler mit Konstantstromausgang für 0,5-W- und 1-W-Power-LEDs LED the sun shine – LED-Licht fürs Automobil Licht im Tunnel – Die XLamp LED-Serie von Cree Selbstbauprojekte Ambilight mit Bluetooth – Ein modulares RGB-Power-LED-System mit PC-Schnittstelle Universelle LED-Lampe – Mit programmierbarem Farbwechsel LED-Tester – Lichtstärke prüfen und vergleichen Künstlerischer LED-Dimmer – Farbmischung stufenlos einstellen Computerisierter LED-Weihnachtsbaum LED-Würfel – Mogeln unmöglich!
€ 17,50
Members: € 15,75
-

Elektor Digital Audio 5 (PDF)
Inhalt Röhrentechnik Classic Three Vorverstärker: Gegentaktschaltung mit Kathodenfolger Line-Vorverstärker mit der 6C33: Vorverstärkung mit einer Leistungsröhre? Der Dirigent: Ein Vorverstärker mit aktiver Frequenzweiche Single ended Stereo-Endverstärker KR300B: Die außergewöhnliche 300B 1 Watt Wohnzimmer-Gitarrenverstärker: Röhrensound auch bei kleinen Lautstärken iGoliathSingle ended 211: Eintakt-Triodenverstärker mit 211 Wie funktioniert ein Ausgangstrafo? Lautsprecher Morel Elite 420 von Eltim Audio: Kleine aktive Zweiweg-Kombi mit DSP All Black von Henkjan Olthuis: Breitbänder CSS EL70 mit Transmission-Line HATT-SE Mk. II: Ein kompakter 2-Wege-Monitor mit Seas Excel-Chassis Silverado von Sander Sassen: 2-Weg-D´Appolitomit Seas L12 und 27TB Legno TL von Monacor: Ein FAST-System mit TL-Subwoofer, vollaktiv mit DSP und Klasse-D Wall–i von ASE: Der Bildlautsprecher zur eigenen Gestaltung SAK-PC mit Peerless/Vifa von ASE: Aktiv oder passiv, so oder so PC-optimiert Mini-Wall von Blue Planet Acoustic: An die Wand oder auf den Tisch – beides geht gut mit der kleinen Punktschallquelle. Halbleitertechnik Prelude, der Vorverstärker: Kompromisslos puristisches Design Klick an / Klick aus-Schalter: Die Elektronik für das angemessene Schalten
€ 16,90
Members: € 15,21
-

Elektor Labs Elektor Sand Clock for Raspberry Pi Pico (incl. Laser Head Upgrade)
This bundle contains the popular Elektor Sand Clock for Raspberry Pi Pico and the new Elektor Laser Head Upgrade, offering even more options for displaying the time. Not only can you "engrave" the current time in sand, you can now alternatively write it on a glow-in-the-dark foil or create green drawings. Contents of the bundle Elektor Sand Clock for Raspberry Pi Pico (normal price: €50) Elektor Laser Head Upgrade for Sand Clock (normal price: €35) Elektor Sand Clock for Raspberry Pi (Raspberry Pi-based Eye Catcher) A standard sand clock just shows how time passes. In contrast, this Raspberry Pi Pico-controlled sand clock shows the exact time by "engraving" the four digits for hour and minute into the layer of sand. After an adjustable time the sand is flattened out by two vibration motors and everything begins all over again. At the heart of the sand clock are two servo motors driving a writing pen through a pantograph mechanism. A third servo motor lifts the pen up and down. The sand container is equipped with two vibration motors to flatten the sand. The electronic part of the sand clock consists of a Raspberry Pi Pico and an RTC/driver board with a real-time clock, plus driver circuits for the servo motors. A detailed construction manual is available for downloading. Features Dimensions: 135 x 110 x 80 mm Build time: approx. 1.5 to 2 hours Included 3x Precut acrylic sheets with all mechanical parts 3x Mini servo motors 2x Vibration motors 1x Raspberry Pi Pico 1x RTC/driver board with assembled parts Nuts, bolts, spacers, and wires for the assembly Fine-grained white sand Elektor Laser Head Upgrade for Sand Clock The new Elektor Laser Head transforms the Sand Clock into a clock that writes the time on glow-in-the-dark film instead of sand. In addition to displaying the time, it can also be used to create ephemeral drawings. The 5 mW laser pointer, with a wavelength of 405 nm, produces bright green drawings on the glow-in-the-dark film. For best results, use the kit in a dimly lit room. Warning: Never look directly into the laser beam! The kit includes all the necessary components, but soldering three wires is required. Note: This kit is also compatible with the original Arduino-based Sand Clock from 2017. For more details, see Elektor Magazine 1-2/2017 and Elektor Magazine 1-2/2018.
-
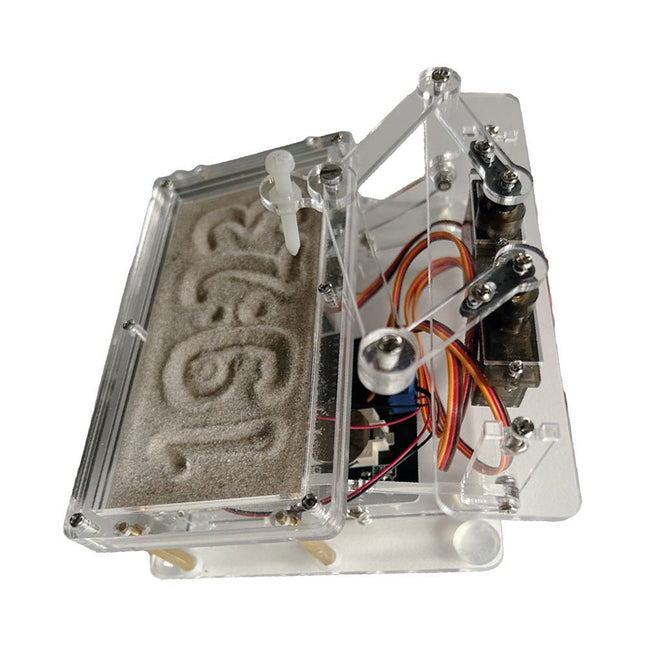
Elektor Labs Elektor Sand Clock for Raspberry Pi Pico
Raspberry Pi-based Eye Catcher A standard sand clock just shows how time passes. In contrast, this Raspberry Pi Pico-controlled sand clock shows the exact time by “engraving” the four digits for hour and minute into the layer of sand. After an adjustable time the sand is flattened out by two vibration motors and everything begins all over again. At the heart of the sand clock are two servo motors driving a writing pen through a pantograph mechanism. A third servo motor lifts the pen up and down. The sand container is equipped with two vibration motors to flatten the sand. The electronic part of the sand clock consists of a Raspberry Pi Pico and an RTC/driver board with a real-time clock, plus driver circuits for the servo motors. A detailed construction manual is available for downloading. Features Dimensions: 135 x 110 x 80 mm Build time: approx. 1.5 to 2 hours Included 3x Precut acrylic sheets with all mechanical parts 3x Mini servo motors 2x Vibration motors 1x Raspberry Pi Pico 1x RTC/driver board with assembled parts Nuts, bolts, spacers, and wires for the assembly Fine-grained white sand
-

SunFounder SunFounder Kepler Kit (Ultimate Starter Kit for Raspberry Pi Pico W)
Your gateway to IoT and microcontroller programming With 450+ components and 117 online projects, this comprehensive kit ignites your creativity. The tutorials by Paul McWhorter make learning enjoyable for beginners and advanced users. This kit supports MicroPython, C/C++, and Piper Make, offering diverse programming options. Explore sensors, actuators, LEDs, and LCDs for endless project possibilities. From home automation to robotics, this kit empowers your tech journey. Features IoT Starter Kit for Beginners: This kit offers a rich IoT learning experience for beginners. With 450+ components, 117 projects, and expert-led video lessons, this kit makes learning microcontroller programming and IoT engaging and accessible. Expert-Guided Video Lessons: The kit includes 27 video tutorials by the renowned educator, Paul McWhorter. His engaging style simplifies complex concepts, ensuring an effective learning experience in microcontroller programming. Wide Range of Hardware: The kit includes a diverse array of components like sensors, actuators, LEDs, LCDs, and more, enabling you to experiment and create a variety of projects with the Raspberry Pi Pico W. Supports Multiple Languages: The kit offers versatility with support for three programming languages - MicroPython, C/C++, and Piper Make, providing a diverse programming learning experience. Dedicated Support: Benefit from our ongoing assistance, including a community forum and timely technical help for a seamless learning experience. Included Raspberry Pi Pico W Breadboard Jumper Wires Resistor Transistor Capacitor Diode Li-po Charger Module 74HC595 TA6586 – Motor Driver Chip LED RGB LED LED Bar Graph 7-segment Display 4-Digit 7-Segment Display LED Dot Matrix I²C LCD1602 WS2812 RGB 8 LEDs Strip Buzzer DC Motor Servo DC Water Pump Relay Button Micro Switch Slide Switch Potentiometer Infrared Receiver Joystick Module 4x4 Keypad MPR121 Module MFRC522 Module Photoresistor Thermistor Tilt Switch Reed Switch PIR Motion Sensor Module Water Level Sensor Module Ultrasonic Module DHT11 Humiture Sensor MPU6050 Module Documentation Online Tutorials in 3 languages (EN, DE and JP)
-
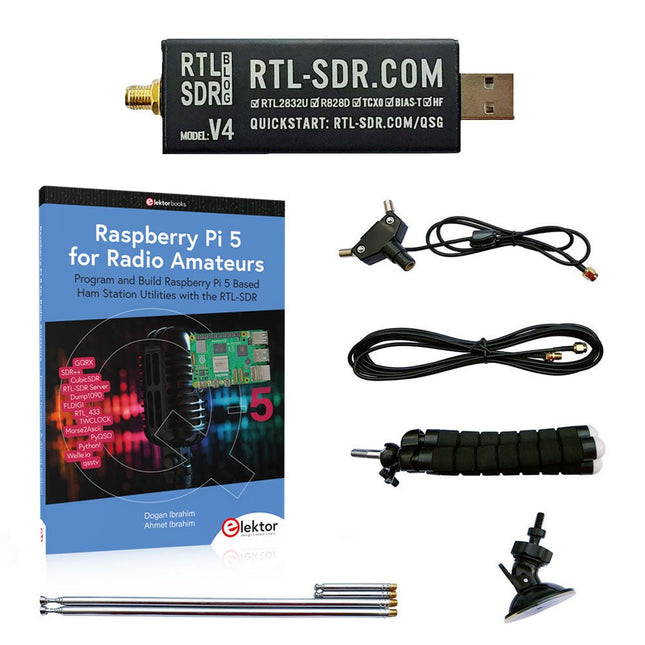
Elektor Bundles Raspberry Pi 5 RTL-SDR V4 (Bundle)
Program and build Raspberry Pi based ham station utilities, tools, and instruments The improved RTL-SDR V4 allows you to receive radio signals between 500 kHz and 1.75 GHz from stations utilizing different bands including MW/SW/LW broadcast, ham radio, utility, air traffic control, PMR, SRD, ISM, CB, weather satellite, and radio astronomy. The book Raspberry Pi 5 for Radio Amateurs gives extensive coverage of deploying the RTL-SDR kit through the use of a Raspberry Pi 5. This bundle contains: RTL-SDR V4 (incl. Dipole Antenna Kit) (normal price: €75) Raspberry Pi 5 for Radio Amateurs (normal price: €40) RTL-SDR V4 (Software Defined Radio) with Dipole Antenna Kit RTL-SDR is an affordable dongle that can be used as a computer-based radio scanner for receiving live radio signals between 500 kHz and 1.75 GHz in your area. The RTL-SDR V4 offers several improvements over generic brands including use of the R828D tuner chip, triplexed input filter, notch filter, improved component tolerances, a 1 PPM temperature compensated oscillator (TCXO), SMA F connector, aluminium case with passive cooling, bias tee circuit, improved power supply, and a built in HF upconverter. RTL-SDR V4 comes with the portable dipole antenna kit. It is great for beginners as it allows for terrestrial and satellite reception and easy to mount outdoors and designed for portable and temporary outside usage. Features Improved HF reception: V4 now uses a built-in upconverter instead of using a direct sampling circuit. This means no more Nyquist folding of signals around 14.4 MHz, improved sensitivity, and adjustable gain on HF. Like the V3, the lower tuning range remains at 500 kHz and very strong reception may still require front end attenuation/filtering. Improved filtering: The V4 makes use of the R828D tuner chip, which has three inputs. The SMA input has been triplexed input into 3 bands: HF, VHF and UHF. This provides some isolation between the 3 bands, meaning out of band interference from strong broadcast stations is less likely to cause desensitization or imaging. Improved filtering x2: In addition to the triplexing, the open drain pin on the R828D can be also used, which allows to add simple notch filters for common interference bands such as broadcast AM, broadcast FM and the DAB bands. These only attenuate by a few dB, but may still help. Improved phase noise on strong signals: Due to an improved power supply design, phase noise from power supply noise has been significantly reduced. Less heat: Another advantage of the improved power supply is low power consumption and less heat generation compared to the V3. Included 1x RTL-SDR V4 dongle (R828D RTL2832U 1PPM TCXO SMA) 2x 23 cm to 1 m telescopic antenna 2x 5 cm to 13 cm telescopic antenna 1x Dipole antenna base with 60 cm RG174 1x 3 m RG174 extension cable 1x Flexible tripod mount 1x Suction cup mount Downloads Datasheet User Guide Quick Start Guide SDR# User Guide Dipole Antenna Guide Book: Raspberry Pi 5 for Radio Amateurs The RTL-SDR devices (V3 and V4) have gained popularity among radio amateurs because of their very low cost and rich features. A basic system may consist of a USB based RTL-SDR device (dongle) with a suitable antenna, a Raspberry Pi 5 computer, a USB based external audio input-output adapter, and software installed on the Raspberry Pi 5 computer. With such a modest setup, it is possible to receive signals from around 24 MHz to over 1.7 GHz. This book is aimed at amateur radio enthusiasts and electronic engineering students, as well as at anyone interested in learning to use the Raspberry Pi 5 to build electronic projects. The book is suitable for both beginners through experienced readers. Some knowledge of the Python programming language is required to understand and eventually modify the projects given in the book. A block diagram, a circuit diagram, and a complete Python program listing is given for each project, alongside a comprehensive description. The following popular RTL-SDR programs are discussed in detail, aided by step-by-step installation guides for practical use on a Raspberry Pi 5: SimpleFM GQRX SDR++ CubicSDR RTL-SDR Server Dump1090 FLDIGI Quick RTL_433 aldo xcwcp GPredict TWCLOCK CQRLOG klog Morse2Ascii PyQSO Welle.io Ham Clock CHIRP xastir qsstv flrig XyGrib FreeDV Qtel (EchoLink) XDX (DX-Cluster) WSJT-X The application of the Python programming language on the latest Raspberry Pi 5 platform precludes the use of the programs in the book from working on older versions of Raspberry Pi computers.
-

Elektor Bundles Mikrocontroller-Praxiskurs für Arduino-Einsteiger (Bundle)
Mit dem Elektor Arduino Nano Trainingsboard (MCCAB) eigene Projekte realisieren Der Mikrocontroller ist das wohl faszinierendste Teilgebiet der Elektronik, denn aufgrund der Vielzahl von Funktionen, die er auf seinem Chip vereinigt, ist er für den Entwickler ein universelles Multi-Tool zur Realisierung seiner Projekte. Praktisch jedes Gerät des täglichen Gebrauchs wird heute von einem Mikrocontroller gesteuert. Für einen elektronischen Laien blieb es aufgrund der Komplexität bisher allerdings ein Wunschtraum, eigene Ideen mit einem Mikrocontroller zu realisieren. Das Arduino-Konzept hat den Einsatz von Mikrocontrollern weitgehend vereinfacht, sodass jetzt auch Laien eigene Elektronik-Ideen mit einem Mikrocontroller verwirklichen können. Buch & Hardware im Bundle: 'Learning by Doing' Dieses im Bundle mitgelieferte Buch (im großen A4-Format) zeigt, wie man auch ohne große Erfahrung in Elektronik und Programmiersprachen eigene Projekte mit einem Mikrocontroller realisieren kann. Es ist ein Mikrocontroller-Praxiskurs für Einsteiger, denn nach einem Überblick über die Interna des Mikrocontrollers und einer Einführung in die Programmiersprache C liegt der Schwerpunkt des Kurses auf den praktischen Übungen. Der Leser eignet sich die erforderlichen Kenntnisse durch 'Learning by Doing' an: in dem umfangreichen Praxisteil mit 12 Projekten und 46 Übungen wird das im vorderen Teil des Buches Gelernte mit vielen Beispielen unterlegt. Die Übungen sind dabei so aufgebaut, dass der Bearbeiter eine Aufgabenstellung erhält, die er mit seinem im Theorieteil des Buches aufgebauten Wissen löst. Für jede Übung gibt es anschließend eine ausführlich erklärte und kommentierte Musterlösung, die dem Bearbeiter bei Problemen weiterhilft und die er mit seiner eigenen Lösung vergleichen kann. Arduino IDE In der Arduino IDE, einer Software-Entwicklungsumgebung, die kostenlos auf den eigenen PC heruntergeladen werden kann und die das gesamte Softwarepaket enthält, das für ein eigenes Mikrocontroller-Projekt benötigt wird, schreibt der Bearbeiter mit dem Editor der IDE seine Programme („Apps“) in der Programmiersprache C. Der in die Arduino IDE integrierte Compiler übersetzt sie in die Bits und Bytes, die der Mikrocontroller versteht und die dann über ein USB-Kabel in den Speicher des Mikrocontrollers auf dem Elektor Arduino Nano Trainingsboard (MCCAB) geladen werden. Externe Sensoren, Motoren oder Baugruppen abfragen oder steuern Das Elektor Arduino Nano Trainingsboard (MCCAB) enthält neben einem Mikrocontrollermodul Arduino Nano alle für die Übungen benötigten Bauteile wie Leuchtdioden, Schalter, Taster, akustische Signalgeber usw. Auch externe Sensoren, Motoren oder Baugruppen können mit diesem Mikrocontroller-Übungssystem abgefragt oder gesteuert werden. Technische Daten (Arduino Nano Trainingsboard MCCAB) Stromversorgung Über die USB-Verbindung des zur Erstellung der Programme sowieso angeschlossenen PCs oder ein externes Netzteil (nicht im Lieferumfang enthalten) Betriebsspannung +5 Vcc Eingangsspannung Alle Eingänge 0 V bis +5 V VX1 und VX2 +8 V bis +12 V (nur bei Verwendung eines externen Netzteils) Mikrocontrollermodul Arduino Nano Hardwareperipherie LCD 2x16 Zeichen Potenziometer P1 & P2 JP3: Auswahl der Betriebsspannung von P1 & P2 Verteiler SV4: Verteiler für die BetriebsspannungenSV5, SV6: Verteiler für die Ein-/Ausgänge des Mikrocontrollers Schalter und Taster RESET-Taster auf dem Arduino Nano-Modul6x Tastschalter K1 … K66x Schiebeschalter S1 … S6JP2: Verbindung der Schalter mit den Eingängen des Mikrocontrollers Summer Piezo-Summer Buzzer1 mit Steckbrücke auf JP6 Leuchtanzeigen LED L auf dem Arduino Nano-Modul, verbunden mit GPIO D1311x LED: Zustandsanzeige für die Ein-/AusgängeJP6: Verbindung der LEDs LD10 … LD20 mit den GPIOs D2 … D12 Serielle SchnittstellenSPI & I²C JP4: Auswahl des Signals an Pin X der SPI-Steckerleiste SV12SV9 bis SV12: SPI-Interface (3,3 V/5 V) bzw. I²C-Interface Schaltausgang für externe Geräte SV1, SV7: Schaltausgang (maximal +24 V/160 mA, extern zugeführt)SV2: 2x13 Pins zum Anschluss externer Module 3x3 LED-Matrix (9 rote LEDs) SV3: Spalten der 3x3 LED-Matrix (Ausgänge D6 … D8)JP1: Verbindung der Reihen mit den GPIOs D3 … D5 Software Library MCCABLib Steuerung der Hardware-Komponenten (Schalter, Taster, Leuchtdioden, 3x3 LED-Matrix, Summer) auf dem MCCAB Trainingsboard Betriebstemperatur bis +40 °C Abmessungen 100 x 100 x 20 mm Technische Daten (Arduino Nano) Mikrocontroller ATmega328P Architektur AVR Betriebsspannung 5 V Flashspeicher 32 KB, davon 2 KB vom Bootloader belegt SRAM 2 KB Taktfrequenz 16 MHz Analoge IN-Pins 8 EEPROM 1 KB DC-Strom pro I/O-Pin 40 mA an einem I/O-Pin, insgesamt maximal 200 mA an allen Pins gemeinsam Eingangsspannung 7-12 V Digitale I/O-Pins 22 (6 davon sind PWM-fähig) PWM-Ausgänge 6 Stromverbrauch 19 mA Abmessungen 18 x 45 mm Gewicht 7 g Lieferumfang Elektor Arduino Nano MCCAB Trainingsboard Arduino Nano Buch: Mikrocontroller-Praxiskurs für Arduino-Einsteiger


