
Search results for "can OR et OR can OR fd"
-

Elektor Digital Elektor circuits de vacances 2022 (PDF)
Plus de 50 circuits et projets Sirène de style américain Deux codeurs rotatifs sur une seule entrée analogique Construire un gradateur numérique 220-V CA avec Arduino Source de courant pour LED Détecter quatre contacts avec une seule broche Petit interrupteur marche/arrêt avec protection de batterie Distributeur de désinfectant DIY pour les mains Un orgue électronique simple Ampli stéréo ultrasimple Interrupteur activé par le son pour amplificateurs Balanced/Unbalanced Converter Filtre externe pour réseau électrique Télécommande comodo Boîte de direct pour smartphone Amusez-vous avec les feux de circulation Commande de thyristor avec un seul bouton Posemètre quasi analogique pour chambre noire Circuits à volonté de la communauté Hackster.io Minuteur analogique de bronzage Encore une interface LCD à un seul fil Générateur PWM simple avec AVR ATtiny13 Une seconde vie pour les piles Interrupteur tactile pour les lampes à LED Testeur de LED et d?interrupteurs DIP Testeur de contrôle IR Go/No-Go Testeur de semiconducteurs de puissance SPI pour les LED WS2812(B) Mesure des inductances de puissance Une seule prise pour le RPi et le CN/A audio Accessoire de test DIY pour le compteur LCR Ampèremètre Arduino Orgue à deux doigts Calibrateur de CAN à faible bruit Convertisseur élévateur DC/DC Deux potentiomètres sur une entrée numérique Capteur de proximité acoustique Capteur de radiateur sans pile Détecter les micros et les caméras sans fil Minuteur pour éclairage intérieur de voiture Simulateur de bougie Minuteur numérique de cuisine Milliohmmètre Minuteur de production d?eau chaude Chargeur simple pour les batteries 2S 18650 Référence de fréquence avec ATtiny Commutateur IR à faible puissance Recycler le chargeur de téléphone de votre voiture Préamplificateur de microphone pour Arduino Filtres IEM DIY Dé électronique sans microcontrôleur Condensateur digital Clignotant à LED autochargeable Aussi dans ce numéro KiCad 6 ? Cinq fonctionnalités à prendre en compte Flashback ? Ordinateur SC/MP d?Elektor Interview ? Faire de l?art avec l?électricité Mon premier circuit imprimé ? Se lancer avec KiCad Minimiser le matériel avec un logiciel intelligent Infographie ? Faits et chiffres Nouveaux dispositifs d?Analog Flashback ? Le détecteur de métaux d?Elektor Hexadoku ? Casse-tête pour elektorniciens
€ 10,95
-

Great Scott Gadgets Acrylic Case for HackRF SDR
This clear acrylic case is the official case for the HackRF One/Pro board. It can replace the standard black plastic case of the HackRF One/Pro. Assembly Instructions Use a guitar pick or spudger to extract the HackRF One/Pro circuit board from the black plastic case. Insert one long screw into each corner of the bottom acrylic panel. Secure each long screw with a short (5 mm) spacer on the opposite side of the panel. Place the HackRF One/Pro circuit board (facing up) on top of the bottom panel, fitting the ends of the long screws through the corner mounting holes of the circuit board. Secure the circuit board with one long (6 mm) spacer in each corner. Place the top acrylic panel on top of the circuit board, aligning the cutouts with the circuit board’s expansion headers. Secure each corner with a short screw. Note: Do not overtighten! Hand-tighten only at every step.
€ 19,95
Members: € 17,96
-

Elektor Digital Elektor Arduino Guest Edition 2022 (PDF) FR
Le téléchargement intégral de ce numéro est disponible pour nos membres GOLD et GREEN sur le site Elektor Magazine ! Pas encore membre ? Cliquez ici. Arduino Portenta Machine Control et Arduino Portenta H7démonstration avec une passerelle CAN vers MQTT le kit LCR-mètre 2 MHz d?Elektorrejoignez David Cuartielles, cofondateur d?Arduino, en direct ! MicroPython entre dans le monde de l?Arduino Les projets connectés simplifiésPlongez dans l'Arduino Cloud Introduction à TinyMLPlus gros n?est pas toujours mieux Arduino K-Way l?écriture des croquis Arduino en net progrès Arduino en questions débuter avec le Portenta X8gestion sécurisée des logiciels avec les conteneurs créez, déployez et maintenez des applications évolutives et sécuriséesavec Arduino Portenta X8 équipé du mini processeur d?applications i.MX 8M de NXP et de l?élément de sécurité EdgeLock SE050 comment j?ai automatisé ma maisonFabio Violante, PDG d?Arduino, partage ses solutions simulateur Altair 8800simulation matérielle d?un ordinateur ancien MS-DOS sur le Portenta H7exécuter des logiciels old-school sur du matériel moderne cultivez-le vous-mêmeune jardinière numérique d?intérieur tout-en-un Sauver la planète avec la domotique??MQTT sur l?Arduino Nano RP2040 Connect devenez professionnel avec Arduino Pro les fours intelligents font un bond dans le futur Tagvance conçoit des chantiers de construction plus sûrs avec Arduino Santagostino respire facilementavec une surveillance à distance qui tire parti de l?IA pour une maintenance prédictive la sécurité atteint des sommets avec la solution basée sur les cartes MKR de RIoT Secure l?open-source apporte au monde du progrès dans la gestion de l?eau SensoDétecter la déforestation grâce à l?analyse sonore Bibliothèque Mozzi Arduino pour la synthèse sonoreLe point de vue de Tim Barrass les nouveaux Portenta X8 (avec Linux !) et Max Carrier redéfinissent le champ des possibles comment l?utilisation d?Arduino aide les étudiants à acquérir des compétences futures Bien s?équiper pour mieux travailler l?importance de la robotique dans l?enseignement LoRa fiabilise l?IdO la carte Portenta Machine control en détail rétro-gaming avec Arduboy réduire l?utilisation de l?eau sur les pistes d?équitationun IdO pour surveiller en permanence les niveaux d?humidité et de température du sol le projet Panettonesystème de gestion et de maintien d?un ferment au levain Supporting Arduino Resellers Space Invaders avec Arduino création artistique dans l?environnement Arduinodes idées inspirantes d?artistes et de designers Arduino Product Catalogue L?avenir de l?Arduino
€ 10,95
-

Elektor Publishing Control Engineering with Fuzzy Logic
Practical Applications and Project with Arduino, ESP32, and RP2040 Immerse yourself in the fascinating world of control engineering with Arduino and ESP32! This book offers you a practical introduction to classic and modern control methods, including PID controllers, fuzzy logic, and sliding-mode controllers. In the first part, you will learn the basics of the popular Arduino controllers, such as the Arduino Uno and the ESP32, as well as the integration of sensors for temperature and pH measurement (NTC, PT100, PT1000, and pH sensor). You will learn how to use these sensors in various projects and how to visualize data on a Nextion TFT display. The course continues with an introduction to actuators such as MOSFET switches, H-bridges, and solid-state relays, which are used to control motors and actuators. You will learn to analyze and model controlled systems, including PT1 and PT2 control. The book focuses on the implementation of fuzzy and PID controllers for controlling temperature and DC motors. Both the Arduino Uno and the ESP32 are used. The sliding-mode controller is also introduced. In the second-to-last chapter, you will explore the basics of neural networks and learn how machine learning can be used on an Arduino. In the last chapter, there is a practical example of a fuzzy controller for feeding electricity into the household grid. This book is the perfect choice for engineers, students, and electronics engineers who want to expand their projects with innovative control techniques.
€ 44,95
Members: € 40,46
-

Weller Weller WE1010 Digital Soldering Station (70 W)
High-quality soldering station with the most important tools and consumables, ideal for universal soldering applications. Features 1-Channel Power Unit, digital, 70 W Power unit, 1 channel with soldering iron WEP 70 and safety rest PH 70 70W solder iron with ergonomic handle and providing toolless tip change ESD safe station, iron and heat-resistant silicon cable for safe handling Using ET soldering tips Standby mode and auto setback conserves energy, protects equipment Password-protected to preserve settings Specifications Dimensions: 150 x 120 x 98 mm Weight: 1.4 kg Display: Digital LC Display Temperature range: Adjustable from 100°C - 450°C (200°F - 850°F) Voltage: 230 V Channels: 1 Temperature range (depends on tool) °C: 100-450 Temperature range (depends on tool) °F: 200-850 Temperature accuracy °C: Average tip temperature can be „offset“ to +/- 5°C at idle with no load Temperature accuracy °F: Average tip temperature can be „offset“ to +/- 9°F at idle with no load Temperature stability °C: ±6 Temperature stability °F: ±10 Heat-up time (ca) in seconds (50-350°C / 120-660°F): 28 sec. Heating output: 85 W
€ 157,60
-

Elektor Digital Home Automation and Electronics for Starters (E-book)
Projects with Arduino, ESPHome, Home Assistant, and Raspberry Pi & Co. This e-book contains various example projects, beginning with an introduction to electronics. It also explains how to install Home Assistant on a Raspberry Pi, how to use indoor climate sensors for temperature and humidity, how to implement the MQTT protocol and other interfaces, and how to use ESPHome to integrate sensors and actuators into Home Assistant. Numerous video tutorials complement the book. Fundamentals of electrical engineering The book begins with an introduction to electrical engineering. You will learn the basics of voltage, current, resistors, diodes and transistors. Arduino and microcontrollers A complete section is dedicated to the Arduino Uno. You will get to know the structure, write your first programs and work on practical examples. Home Assistant and automation You will learn how to set up Home Assistant on a Raspberry Pi and how to use automations, scenes and devices. In addition, Zigbee, MQTT and ESP-NOW – important technologies for home automation – will be discussed. ESP8266, ESP32 and ESP32-CAM The popular ESP microcontrollers are covered in detail. A theoretical introduction is followed by practical projects that show you how to get the most out of these devices. Sensors and actuators The book explains the functionality and application of numerous sensors such as temperature and humidity sensors, motion detectors and RFID readers. For actuators, stepper motors, e-ink displays, servo motors and much more are covered. There are practical application examples for all devices. ESPHome This chapter shows you how to integrate sensors and actuators into Home Assistant without any programming effort. You will be guided step by step through the setup with ESPHome. LEDs and lighting technology In this chapter, you will learn about different types of LEDs and how they can be used. The basics of lighting technology are also explained. Node-RED A whole chapter is dedicated to Node-RED. You will learn the basics of this powerful tool and be guided step by step through its setup and use. Integrated Circuits (ICs) In electronics, there are numerous ICs that make our lives easier. You will get to know the most important ones and apply your knowledge in practical projects. Professional programming Advanced topics such as the correct use of buttons, the use of interrupts and the use of an NTP server for time synchronisation are covered in detail in this chapter. Downloads GitHub
€ 59,95
Best Price
-
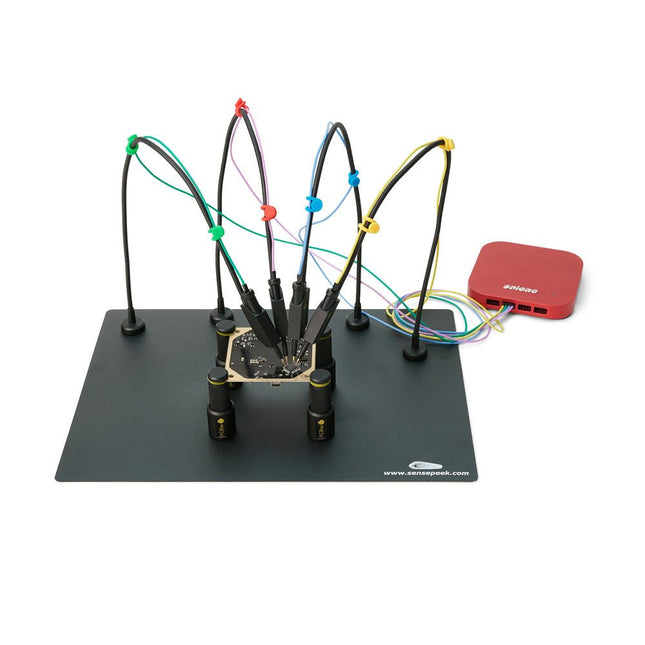
Sensepeek Sensepeek 6003 PCBite Kit incl. 4x SQ10 Probe and Test Wires
The SQ series of handsfree PCBite probes from Sensepeek are insulated, come with included color-coded cable holders and have a lower point of gravity making them even more stable compared with the original SP series of probes. All the loved features of handsfree measurement, exchangeable fine pitch spring tipped test needle and the minimalistic design is maintained to make traditional sized and handheld probes obsolete. Features All handsfree probes from Sensepeek makes instant measurements or long triggering sessions a breeze. No more soldering wires to connect your probe or complicated tools to setup, just positioning the probe needle on any test point or component in the signal path and release. Saves time and frustration during development, verification and repairs. The minimalist design and the spring-loaded test needle makes it possible to simultaneously measure on fine pitch components and nearby signals. Both length and weight of the SQ probes are perfectly balanced to be used with the included PCB holders and base plate which is a must for handsfree function. The probe holder comes with a powerful magnet in the base, as for all PCBite probes and holders which makes the probe easy to place and reposition. The SQ series of probes can be used handheld without the probe holder as they have an insulated grip but their full potential is used when measuring handsfree. One side of the included baseplate is matte and the other is mirror polished. The mirror polished surface makes it easy to see components on the circuit board underside. For added protection during measurement the included insulation cover can be mounted on one of the surfaces. Included 4x PCBite PCB holders 1x Set of yellow insulation washers for the PCB holders 1x Large Base plate (A4) 1x Insulation cover for the base plate (A4) 1x Micro fiber cloth 4x SQ10 probes and pin tipped test needles (black) 2x Banana to dupont test wires (red/black) 5x Dupont to dupont test wires 1x Set of cable holders (4 colors) 4x Extra test needles Downloads User guide (PCBite kit) User guide (SQ10 probes)
€ 180,29
-
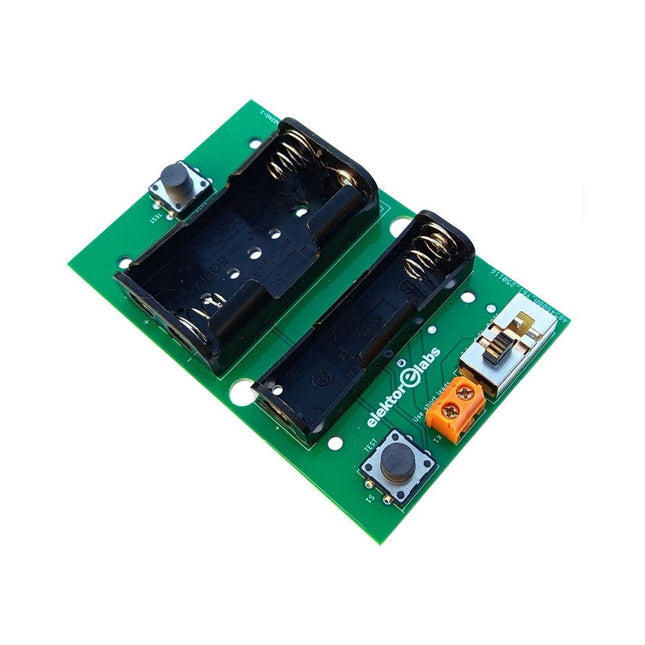
Elektor Labs Elektor Milliohmmeter Adapter
The Elektor Milliohmmeter Adapter uses the precision of a multimeter to measure very low resistance values. It is an adapter that converts a resistance into a voltage that can be measured with a standard multimeter. The Elektor Milliohmmeter Adapter can measure resistances below 1 mΩ using a 4-wire (Kelvin) method. It is useful for locating short circuits on printed circuit boards (PCB). The adapter features three measurement ranges – 1 mΩ, 10 mΩ, and 100 mΩ – selectable via a slide switch. It also includes onboard calibration resistors. The Elektor Milliohmmeter Adapter is powered by three 1.5 V AA batteries (not included). Specifications Measurement ranges 1 mΩ, 10 mΩ, 100 mΩ, 0.1% Power supply 3x 1.5 V AA batteries (not included) Dimensions 103 x 66 x 18 mm (compatible with Hammond 1593N-type enclosure, not included) Special feature On-board calibration resistors Downloads Documentation
€ 34,95
Members: € 31,46
-

Elektor Digital Elektor Janvier/Février 2022 (PDF)
COMMANDE DE MOTEURS : LES PONTS EN HIntroduction aux moteurs CC, pas à pas et sans balais L?ÉQUIPE D?ELEKTOR LABNotre approche, nos outils préférés et plus encore RASPBERRY PI COMME TÉLÉCOMMANDE KVMTest du logiciel Pi-KVM IQAUDIO CODEC ZEROCarte son au format Raspberry Pi Zero LE PROJET PIKVM ET SES ENSEIGNEMENTSEntretien avec Maxim Devaev VÉHICULE AUTONOME AVEC LIDAR 2DUn ESP32 Pico interprète les données du lidar LE RASPBERRY PI ZERO 2 W PASSE AU QUADRICOEUR NOTES DU FORUM MONDIAL DE L?ÉLECTRONIQUE ÉTHIQUE 2021 COMMANDE DE MONTEURLa commande des moteurs devient simple MOTEURS ÉLECTRIQUES DE GRANDE TAILLEPrincipes de base et informations utiles PRISE EN MAIN DU MICROCONTRÔLEUR ESP32-C3 RISC-V PROTÉGEZ-VOUS ET PROTÉGEZ LES AUTRES !Interrupteur général pour paillasse (DIY) CRÉATION D?INTERFACES GRAPHIQUES EN PYTHON ÈME 2Mon nom n?est pas Bond GAGNANTS DU CONCOURS FAST FORWARD 2021 DU SALON PRODUCTRONICA TESTEUR DE SERVO POLYVALENTVérification du comportement en l?absence de fiche technique MODBUS SANS FIL (PARTIE 2)Logiciel de la carte Modbus TCP sans fil VOYAGE DANS LES RÉSEAUX NEURONAUX (3E PARTIE)Les neurones pratiques DANS L?INTIMITÉ D?UN PROCESSEUR OPEN SOURCEExtrait : résultats des FPGA Lattice et Xilinx DÉMARRER EN ÉLECTRONIQUE... (10)Toujours la bobine, mais avec ses applications pratiques dans l?audio. PROJET 2.0Corrections, mises à jour et courriers des lecteurs DE LA COULEUR AUSONComment exploiter un capteur de couleurs avec l?I2C SOURCEMÈTRE BATTLAB-ONEMesurer et optimiser la durée de vie des batteries des appareils IdO TRACEUR DE FUITES À LA TERRE SIMPLEMesure de l?isolation du secteur PAUVRETÉ ET ÉLECTRONIQUEQuand le courant économique passe mal HEXADOKUcasse-tête pour elektorniciens
€ 10,95
-

Elektor Digital Elektor Novembre/Décembre 2021 (PDF)
TRAITEMENT D'IMAGES AVEC LE KIT JETSON NANO DE NVIDIA2e partie : reconnaissance d'images ELEKTOR JUMPSTARTER ? DU NOUVEAUCampagnes à venir TRACEUR GPS À CODE SOURCE OUVERTTraccar cartographie les déplacements de véhicules, sans recours à un serveur tiers du nuage TESTEUR MULTIFONCTION LCR-T7 DE JOY-ITTest de semi-conducteurs passifs, discrets et de télécommandes IR SYNTHÉTISEUR DE BRUITDu bruit à la musique avec le PRBSynth1 DÉMARRER EN ÉLECTRONIQUE?Easier than Imagined! ... Continuing with the Coil VOYAGE DANS LES RÉSEAUX NEURONAUX (2E PARTIE)Les neurones logiques PROBLÈMES DE SÉCURITÉ ? COMBATTEZ LE FEU PAR LE FEU !Extension à mémoire analogique, protégée par ampoule de flash, pour la boîte à témoin d?effraction KIT DU LCR-MÈTRE 2 MHZ D?ELEKTOR BALISES BLUETOOTH : LA PRATIQUEGéolocalisation intra muros C PROGRAMMING ON RASPBERRY PIExtrait : communiquer par Wi-Fi TEST DE PRÉCONFORMITÉ CEM POUR UN PROJET ALIMENTÉ EN COURANT CONTINUPartie 2 : le matériel et son utilisation PROPELLER 2 DE PARALLAX (5)La fonction de « broche intelligente » MODBUS SANS FIL (PARTIE 1)Matériel et programmation JUNIOR COMPUTEREn forme après 40 ans de sommeil CONSTRUIRE SON PROPRE ÉTALONNEUR DE HAUTE PRÉCISION?10 V à +10 V, 0 à 40 mA, 0,001 % ARDUINO NANO RP2040 CONNECT EN DÉTAILRaspberry Pi RP2040 + Wi-Fi + Bluetooth LE CORPS PHYSIQUE DE L?INTELLIGENCE ARTIFICIELLE PROJET 2.0corrections, mises à jour et courriers des lecteurs CRÉATION D?INTERFACES GRAPHIQUES EN PYTHON AVEC GUIZEROInstallez la bibliothèque Python guizero et créez vos propres interfaces graphiques. KIT DE MESURE DU CO2 POUR SALLE DE CLASSEMontage à base d?ESP8266, conçu par l?Université des Sciences Appliquées d'Aix-la-Chapelle MK484, RADIORÉTRO PO/GO...Toujours le plaisir de construire ! 60 ANS D?ELEKTORQue la lumière soit ! HEXADOKUThe Original Elektorized Sudoku
€ 10,95
-

Elektor Mars/Avril 2026 (FR)
Le téléchargement intégral de ce numéro est disponible pour nos membres GOLD et GREEN sur le site Elektor Magazine ! Pas encore membre ? Cliquez ici. programmation PIO sur le Raspberry Pi PicoNeuf instructions, de multiples possibilités l'IA en ligne de commandeDéveloppement, compilation et validation de projets embarqués depuis le terminal le Scrutiny DebuggerDéboguer, visualiser et tester du code C/C++ embarqué carte breakout Sigfox (1)Développement d’une BoB radio alimentation à faible bruit (2)Construction, assemblage et mise en œuvre pratique générateur de signaux simple basé sur le RP2040Signaux analogiques et numériques à la découverte du futur de la domotique avec Matter et l’IA EdgeLes dernières versions de Matter et l’essor de l’IA en périphérie de réseau (edge) donnent-ils enfin aux ingénieurs les outils nécessaires pour construire les maisons intelligentes et parfaitement intégrées promises aux utilisateurs ? capteurs de pression différentielleLa maintenance prédictive appliquée aux systèmes CVC la sécurité dès la conceptionPrincipes d’ingénierie pour limiter les défaillances la sécurité des systèmes embarqués n’est plus une option la CRA et la PQC redéfinissent les priorités de la sécurité embarquéePourquoi même les petites entreprises IoT et industrielles doivent prévoir une mise à niveau embedded world 2026Entretien avec Benedikt Weyerer, directeur d’embedded world prise en main du bus I3CUtilisation de matériel de ST et Microchip le projet BLEnkyPrototypage rapide d’applications Bluetooth Low Energy modulation de largeur d’impulsionDu thermostat tout ou rien à un signal analogique continu filtré audiotroniqueDes circuits audio agréables à l’écoute, à réaliser soi-même sur le vifLisez donc le manuel ! carte émetteur-récepteur audio ESP32 (4)Réglage des horloges et une option filaire 2026 : une odyssée de l’IAConséquences du vibe coding charge CC symétriqueCharge CC symétrique, statique ou dynamique comptage de visages avec MaixCAMUne méthode simple pour estimer la taille d’un public
€ 16,50
-
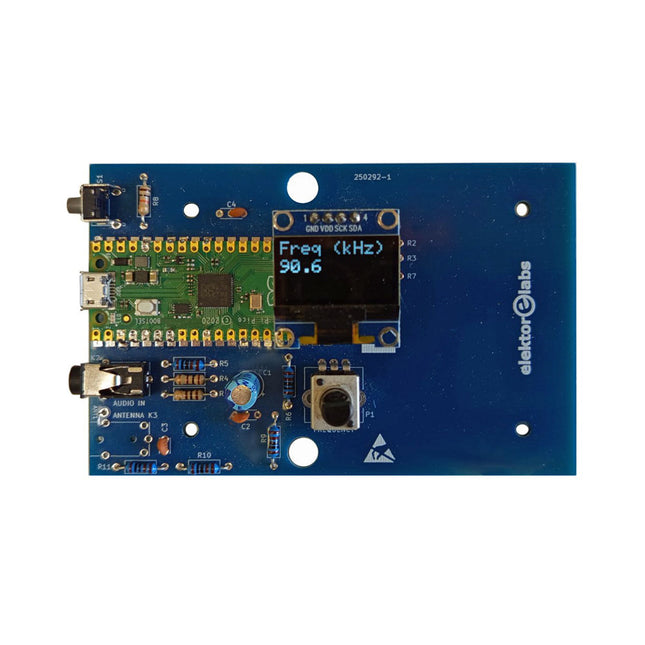
Elektor Labs Elektor AM Transmitter Kit
Build Your Own Vintage Radio Broadcaster The Elektor AM Transmitter Kit allows streaming audio to vintage AM radio receivers. Based on a Raspberry Pi Pico microcontroller module, the AM Transmitter can transmit on 32 frequencies in the AM band, from 500 kHz up to 1.6 MHz in 32 steps of approx. 35 kHz. The frequency is selected with a potentiometer and shown on a 0.96" OLED display. A pushbutton allows toggles the transmitting mode between On and Off. The range of the transmitter depends on the antenna. The onboard antenna provides a range of a few centimeters, requiring the AM Transmitter to be placed close to or inside the radio. An external loop antenna (not included) can be connected to increase the range. The Elektor AM Transmitter Kit comes as a kit of parts that you must solder to the board yourself. Features The board is compatible with a Hammond 1593N enclosure (not included).A 5 VDC power supply with micro-USB connector (e.g., an old phone charger) is needed to power the kit (not included). Current consumption is 100 mA. The Arduino software (requiring Earle Philhower’s RP2040 Boards Package) for the Elektor AM Transmitter Kit plus more information is available at the Elektor Labs page of this project. Component List Resistors R1, R4 = 100 Ω R2, R3, R8 = 10 kΩ R5, R6, R9, R10, R11 = 1 kΩ R7 = optional (not included) P1 = potentiometer 100 kΩ, linear Capacitors C1 = 22 µF 16V C2, C4 = 10 nF C3 = 150 pF Miscellaneous K1 = 4×1 pin socket K2, K3 = 3.5 mm socket Raspberry Pi Pico pushbutton, angle mount 0.96" monochrome I²C OLED display PCB 150292-1
€ 29,95
Best Price


