Raspberry Pi-based Eye Catcher
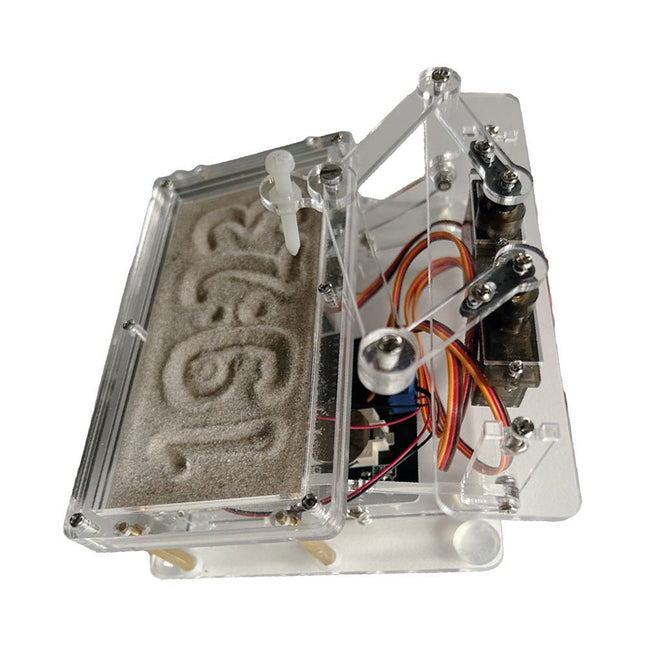
A standard sand clock just shows how time passes. In contrast, this Raspberry Pi Pico-controlled sand clock shows the exact time by “engraving” the four digits for hour and minute into the layer of sand. After an adjustable time the sand is flattened out by two vibration motors and everything begins all over again.
At the heart of the sand clock are two servo motors driving a writing pen through a pantograph mechanism. A third servo motor lifts the pen up and down. The sand container is equipped with two vibration motors to flatten the sand. The electronic part of the sand clock consists of a Raspberry Pi Pico and an RTC/driver board with a real-time clock, plus driver circuits for the servo motors.
A detailed construction manual is available for downloading.
Features
Dimensions: 135 x 110 x 80 mm
Build time: approx. 1.5 to 2 hours
Included
3x Precut acrylic sheets with all mechanical parts
3x Mini servo motors
2x Vibration motors
1x Raspberry Pi Pico
1x RTC/driver board with assembled parts
Nuts, bolts, spacers, and wires for the assembly
Fine-grained white sand
This bundle contains the popular Elektor Sand Clock for Raspberry Pi Pico and the new Elektor Laser Head Upgrade, offering even more options for displaying the time. Not only can you "engrave" the current time in sand, you can now alternatively write it on a glow-in-the-dark foil or create green drawings.
Contents of the bundle
Elektor Sand Clock for Raspberry Pi Pico (normal price: €50)
Elektor Laser Head Upgrade for Sand Clock (normal price: €35)
Elektor Sand Clock for Raspberry Pi (Raspberry Pi-based Eye Catcher)
A standard sand clock just shows how time passes. In contrast, this Raspberry Pi Pico-controlled sand clock shows the exact time by "engraving" the four digits for hour and minute into the layer of sand. After an adjustable time the sand is flattened out by two vibration motors and everything begins all over again.
At the heart of the sand clock are two servo motors driving a writing pen through a pantograph mechanism. A third servo motor lifts the pen up and down. The sand container is equipped with two vibration motors to flatten the sand. The electronic part of the sand clock consists of a Raspberry Pi Pico and an RTC/driver board with a real-time clock, plus driver circuits for the servo motors.
A detailed construction manual is available for downloading.
Features
Dimensions: 135 x 110 x 80 mm
Build time: approx. 1.5 to 2 hours
Included
3x Precut acrylic sheets with all mechanical parts
3x Mini servo motors
2x Vibration motors
1x Raspberry Pi Pico
1x RTC/driver board with assembled parts
Nuts, bolts, spacers, and wires for the assembly
Fine-grained white sand
Elektor Laser Head Upgrade for Sand Clock
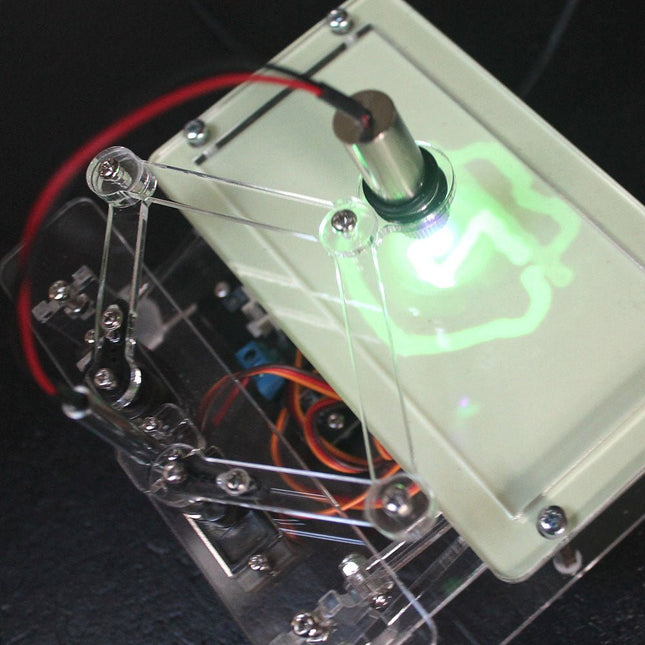
The new Elektor Laser Head transforms the Sand Clock into a clock that writes the time on glow-in-the-dark film instead of sand. In addition to displaying the time, it can also be used to create ephemeral drawings. The 5 mW laser pointer, with a wavelength of 405 nm, produces bright green drawings on the glow-in-the-dark film. For best results, use the kit in a dimly lit room. Warning: Never look directly into the laser beam!
The kit includes all the necessary components, but soldering three wires is required.
Note: This kit is also compatible with the original Arduino-based Sand Clock from 2017. For more details, see Elektor Magazine 1-2/2017 and Elektor Magazine 1-2/2018.
The Elektor Laser Head transforms the Elektor Sand Clock into a clock that writes the time on glow-in-the-dark film instead of sand. In addition to displaying the time, it can also be used to create ephemeral drawings. The 5 mW laser pointer, with a wavelength of 405 nm, produces bright green drawings on the glow-in-the-dark film. For best results, use the kit in a dimly lit room. Warning: Never look directly into the laser beam!
The kit includes all the necessary components, but soldering three wires is required.
Note: This kit is also compatible with the original Arduino-based Sand Clock from 2017. For more details, see Elektor Magazine 1-2/2017 and Elektor Magazine 1-2/2018.
52 Volumes on USB – Now incl. Volume 2025!
NEW: For articles from the year 2000 onwards, there is now a separate download option for additional materials such as PCB layouts, Gerber files, and software!
This USB stick (64 GB) is loaded with all the Elektor magazine English editions (as PDFs) from 1974 to 2025. Elektor engineers, authors, and editors aim to inspire you to master electronics and computer technology by presenting professionally designed circuits that are easy to build.
We also cover the latest developments in electronics and information technology. With the Elektor Archive on a USB stick, you can browse our previous English editions at your convenience and learn about MCU-based projects, robotics, electronics testing, embedded programming, analog techniques, and much more.
All the Elektor magazine editions are stored as PDFs on a 32-GB USB stick (USB 3.0). The 10,000+ articles have been classified by date of publication (month/year), and a comprehensive index enables you to search the entire USB stick. Subject areas include:
Audio & video
Computers & microcontrollers
Radio, hobby & modelling
Home & garden
Power supplies & batteries
Test & measurement
Software
And everything else that doesn’t fit in one of these categories.
Elektor GPT
Elektor GPT is an AI-powered tool that helps users navigate through the decades-long Elektor archive. Using advanced search algorithms and natural language processing, Elektor GPT quickly finds articles, projects, and other resources from the archive.
Specifications
Storage
64 GB
Interfaces
1x USB-A1x USB-C
System requirements
PC with Adobe Reader 7.0 or higher
Web browser
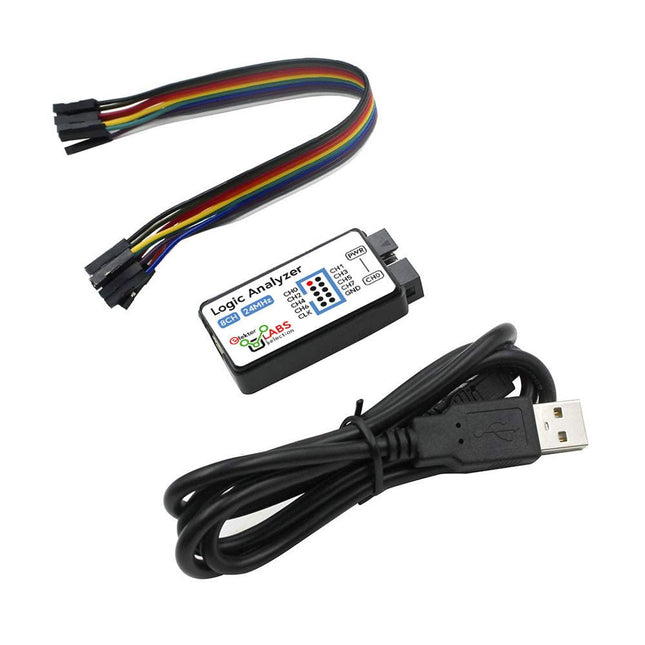
This USB Logic Analyzer is an 8-channel logic analyzer with each input dual purposed for analog data recording. It is perfect for debugging and analyzing signals like I²C, UART, SPI, CAN and 1-Wire. It operates by sampling a digital input connected to a device under test (DUT) at a high sample rate. The connection to the PC is via USB.
Specifications
Channels
8 digital channels
Maximum sampling rate
24 MHz
Maximum input voltage
0~5 V
Operating temperature
0~70°C
Input impedance
1 MΩ || 10 pF
Supported protocols
I²C, SPI, UART, CAN, 1-Wire, etc.
PC connection
USB
Dimensions
55 x 28 x 14 mm
Included
USB Logic Analyzer (8-ch, 24 MHz)
USB Cable
Jumper Wire Ribbon Cable
Downloads
Software
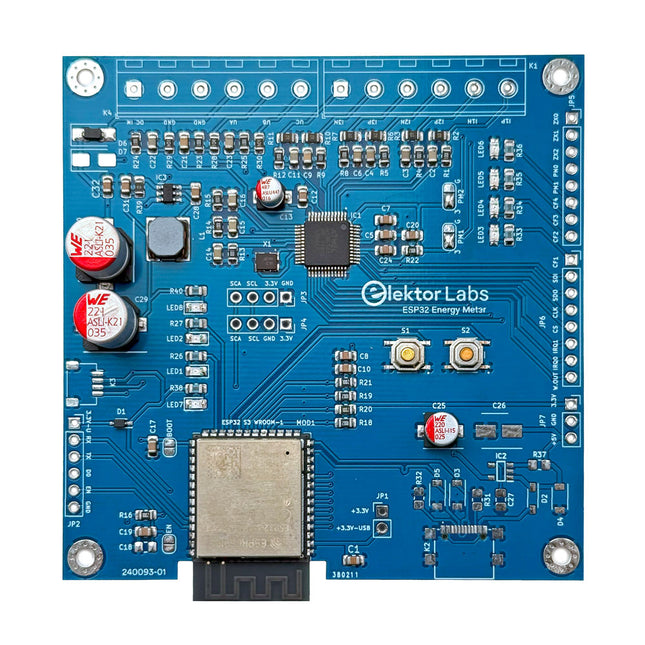
The Elektor ESP32 Energy Meter is a device designed for real-time energy monitoring and smart home integration. Powered by the ESP32-S3 microcontroller, it offers robust performance with modular and scalable features.
The device uses a 110/230 VAC to 12 VAC step-down transformer for voltage sampling, ensuring galvanic isolation and safety. Its compact PCB layout includes screw-type terminal blocks for secure connections, a Qwiic connector for additional sensors, and a programming header for direct ESP32-S3 configuration. The energy meter is compatible with single-phase and three-phase systems, making it adaptable for various applications.
The energy meter is simple to set up and integrates with Home Assistant, offering real-time monitoring, historical analytics, and automation capabilities. It provides accurate measurements of voltage, current, and power, making it a valuable tool for energy management in homes and businesses.
Features
Comprehensive Energy Monitoring: Get detailed insights into your energy usage for smarter management and cost savings.
Customizable Software: Tailor functionality to your needs by programming and integrating custom sensors.
Smart Home Ready: Compatible with ESPHome, Home Assistant, and MQTT for full Smart Home integration.
Safe & Flexible Design: Operates with a 110/230 VAC to 12 VAC step-down transformer and features a pre-assembled SMD board.
Quick Start: Includes one Current Transformer (CT) sensor and access to free setup resources.
Specifications
Microcontroller
ESP32-S3-WROOM-1-N8R2
Energy Metering IC
ATM90E32AS
Status Indicators
4x LEDs for power consumption indication2x Programmable LEDs for custom status notifications
User Input
2x Push buttons for user control
Display Output
I²C OLED display for real-time power consumption visualization
Input Voltage
12~16 VAC (via a step-down transformer 110/230 VAC to 12 VAC)
Clamp Current Sensor
YHDC SCT013-000 (100 A/50 mA) included
Smart Home Integration
ESPHome, Home Assistant, and MQTT for seamless connectivity
Connectivity
Header for programming, Qwiic for sensor expansion
Applications
Supports single-phase and three-phase energy monitoring systems
Dimensions
79.5 x 79.5 mm
Included
1x Partly assembled board (SMDs are pre-mounted)
2x Screw terminal block connectors (not mounted)
1x YHDC SCT013-000 current transformer
Required
Power transformer not included
Downloads
Datasheet (ESP32-S3-WROOM-1)
Datasheet (ATM90E32AS)
Datasheet (SCT013-000)
Frequently Asked Questions (FAQ)
From Prototype to Finished Product
What started as an innovative project to create a reliable and user-friendly energy meter using the ESP32-S3 microcontroller has evolved into a robust product. Initially developed as an open-source project, the ESP32 Energy Meter aimed to provide precise energy monitoring, smart home integration and more. Through meticulous hardware and firmware development, the energy meter now stands as a compact, versatile solution for energy management.
Elektor GREEN and GOLD members can download their digital edition here.
Not a member yet? Click here.
USB Measurement AdapterTesting Current and Signal Quality of USB Ports
4...20 mA Current Output for Arduino UnoA Reliable, EMI-Insensitive Current Loop Interface
Vacuum Cleaner Automatic ControlKeep Your Tools’ Work Area Clean
DDS Generator with ATtiny
Opamp-Tester V2New PCB – Now Also Suitable for SMDs
550-mW “Lamp” Audio AmplifierGet the Warm Sound of Vacuum Tubes With Ease
Fuse GuardMonitoring a Fuse with a Flashing LED
HQ RIAA PreamplifierGet the Most Out of Your Vinyl Records!
Turntable Speed CalibratorAn Arduino-Based 100–120 Hz Strobe Light Generator
Elektor Classics: video buffer/repeater
Infrared Remote-Controlled DimmerControl Your Halogen or LED Floor Lamp Effortlessly and With Style
How to Use switch…case on Strings in C++/Arduino IDE
Magnet FinderWith a Simple Hall-Effect Sensor
Raspberry Pi Smart Power ButtonA Solution for Raspberry Pi Up to Model 4
Essential Maker TipsProfessional Insights for Everyday Making
Practical Projects with the 555 TimerDC Motor Control and Fast Reaction Challenges
Basic AC-Load-On MonitorSave Energy with a Simple Device
Power Banks in ParallelA Three-Day Continuous Power Solution
VFO Up to 15 MHzAn Implementation With Raspberry Pi Pico
Violin Tuner with ATtiny202
Elektor Classics: video amplifier for B/W television sets
Capacitance Meter20 pF to 600 nF
Quasi-Analog Clockwork Mk IITwo LED Rings for Hours and Minutes
You Can Do Anything You Want(with the Arduino Ecosystem at Your Side)
Neon Lamp Dice
Elektor Classics: RTTY calibrator indicator
Inspiring Hardware Designs for Your ESPs
Elektor Classics: variable 3 A power supply
RGB LEDs with Integrated Control CircuitLight with Precision: ICLEDs Set Standards
Experiment: Towards a Mixed-Signal Theremin?Blending Modern Time-of-Flight Sensors With the Timeless XR2206 Analog Generator
ESP32 Audio Transceiver Board (Part 1)SD Card WAV File Player Demo
Infographics: Circuits and Circuit Design 2025
Small Audio MixerA Simple and Versatile Scalable Design
Smart Staircase Light TimerSave More Money on the Energy Bill!
Smarten Up Your ShuttersControlling Velux Hardware With an ESP32 and MQTT
Solid-State Foot WarmerEnergy-Efficient Comfort
Is the M5Stamp Fly Quadcopter the Next Tello?
Boosting Wi-Fi Range of the ESP32-C3 SuperMiniA Simple and Effective Antenna Mod
ZD-8968 Hot-Air Soldering StationA Budget-Friendly Workhorse or Just Hot Air?
Parking Sensor TesterFinding Defects in the PDC System of a Car
Build Your Own Vintage Radio Broadcaster
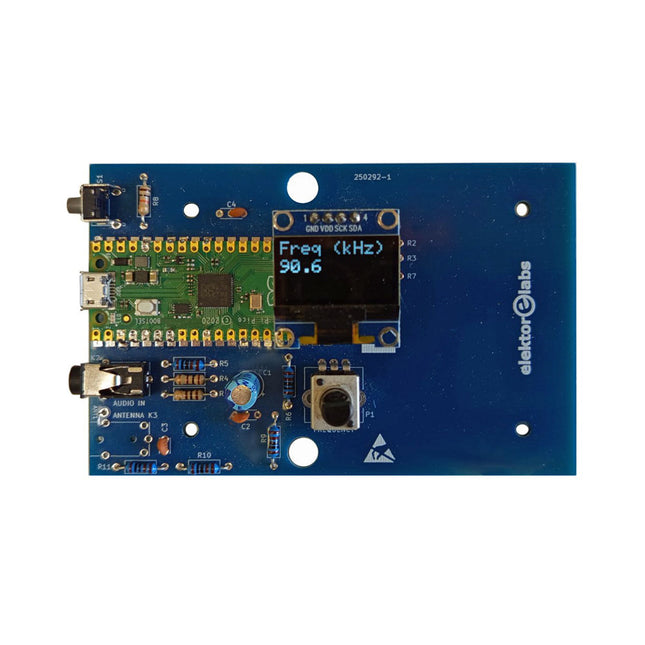
The Elektor AM Transmitter Kit allows streaming audio to vintage AM radio receivers. Based on a Raspberry Pi Pico microcontroller module, the AM Transmitter can transmit on 32 frequencies in the AM band, from 500 kHz up to 1.6 MHz in 32 steps of approx. 35 kHz.
The frequency is selected with a potentiometer and shown on a 0.96" OLED display. A pushbutton allows toggles the transmitting mode between On and Off. The range of the transmitter depends on the antenna. The onboard antenna provides a range of a few centimeters, requiring the AM Transmitter to be placed close to or inside the radio. An external loop antenna (not included) can be connected to increase the range.
The Elektor AM Transmitter Kit comes as a kit of parts that you must solder to the board yourself.
Features
The board is compatible with a Hammond 1593N enclosure (not included).A 5 VDC power supply with micro-USB connector (e.g., an old phone charger) is needed to power the kit (not included). Current consumption is 100 mA.
The Arduino software (requiring Earle Philhower’s RP2040 Boards Package) for the Elektor AM Transmitter Kit plus more information is available at the Elektor Labs page of this project.
Component List
Resistors
R1, R4 = 100 Ω
R2, R3, R8 = 10 kΩ
R5, R6, R9, R10, R11 = 1 kΩ
R7 = optional (not included)
P1 = potentiometer 100 kΩ, linear
Capacitors
C1 = 22 µF 16V
C2, C4 = 10 nF
C3 = 150 pF
Miscellaneous
K1 = 4×1 pin socket
K2, K3 = 3.5 mm socket
Raspberry Pi Pico
pushbutton, angle mount
0.96" monochrome I²C OLED display
PCB 150292-1
Vision and Mission Elektor believes that innovations in electronics will lead to a better world. Elektor is a multi-faceted platform in the applied electronics industry that unites hundreds of thousands engineers, programmers and developers in a worldwide community of knowledge and expertise. Since its founding in 1960, Elektor has been dedicated...
Read more
,
by Lobna Belarbi
Kickstart Your Electronics Journey with Elektor’s Learning Collection
Whether you're new to electronics or aiming to level up your embedded skills, Elektor’s Learning Collection delivers expert-curated kits, courses, and hands-on bundles. The first...