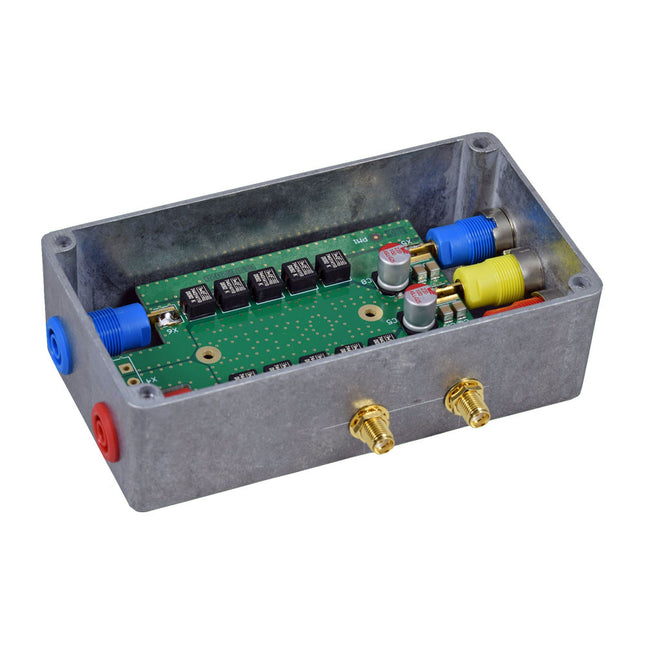
Measuring conducted emission is the simplest and most affordable method of getting some indication of whether a design can meet EMI/EMC requirements. A Line Impedance Stabilization Network (LISN) is an indispensable part of an EMC pre-compliance test setup. In cooperation with Würth Elektronik, Elektor has developed a 5 µH, 50 Ω Dual DC LISN that supports voltages up to 60 V and currents up to 10 A. The instrument measures RF interferences on both channels (the power supply) by means of 5-μH blocking inductances. The internal 10-dB attenuation network – one in each channel – contains a 3rd-order high-pass filter with a cutoff frequency of 9 kHz to protect the input of instruments like a spectrum analyzer from potentially harmful DC voltages or low frequencies coming from the EUT (Equipment Under Test). Specifications RF path Channels 2 (with clamping diodes) Bandwidth 150 kHz – 200 MHz Inductance 5 μH || 50 Ω Internal attenuation 10 dB Connectors SMA DC path Max. current < 10 ADC
Max. voltage < 60 VDC
DC resistance < 2 x 70 mΩ PCB size 94.2 x 57.4 mm Connectors 4-mm banana Hammond enclosure Type 1590N Dimensions 121 x 66 x 40 mm Included 1x 4-layer PCB with all SMT parts fitted 1x pre-drilled enclosure with ready-printed front panel layout 5x gold-plated, insulated, 4-mm banana sockets, rated for 24 A, 1 kV 1x Hammond enclosure 1590N1, Aluminum (Die-Cast Alloy) More Info Project on Elektor Labs: Dual DC LISN for EMC pre-compliance testing Elektor 9-10/2021: EMC Pre-Compliance Test for Your DC-Powered Project (Part 1) Elektor 11-12/2021: EMC Pre-Compliance Test for Your DC-Powered Project (Part 2)
When you experiment with the Raspberry Pi on a regular basis and you connect a variety of external hardware to the GPIO port via the header you may well have caused some damage in the past. The Raspberry Pi Buffer Board is there to prevent this! The board is compatible with Raspberry Pi Zero, 3, 4, 5 and 400.
All 26 GPIOs are buffered with bi-directional voltage translators to protect the Raspberry Pi when experimenting with new circuits. The PCB is intended to be inserted in the back of Raspberry Pi< 400. The connector to connect to the Raspberry Pi is a right angled 40-way receptacle (2x20). The PCB is only a fraction wider. A 40-way flat cable with appropriate 2x20 headers can be connected to the buffer output header to experiment for instance with a circuit on a breadboard or PCB.
The circuit uses four TXS0108E ICs by Texas Instruments. The PCB can also be put upright on a Raspberry Pi 3 or newer.
Downloads
Schematics
Layout
3K5 Noteworthy Designs (1975-2023) This USB archive stick contains over 3500 noteworthy circuits from all areas of electronics (audio & video, computers & microcontrollers, radio, hobby & modelling, home & garden, power supplies & batteries, test & measurement) published in Elektor Magazine since 1975. You can use the article search function to find specific content in the full text. The results are always shown as preformatted PDF documents. Adobe Reader may be used to browse articles as well as find individual words and expressions using the program’s integrated Search functions.
Elektor GREEN and GOLD members can download their digital edition here.
Not a member yet? Click here.
Arduino Portenta Machine Control and Arduino Portenta H7A CAN-to-MQTT Gateway Demo Project
Unboxing the Elektor LCR Meter with David Cuartielles
MicroPython Enters the World of Arduino
Connected Projects, SimplifiedDive Into the Arduino Cloud
Introduction to TinyMLBig Is Not Always Better
Arduino K-Way
Writing Arduino Sketches Just Got Better
Get to Know Arduino
Getting Started with the Portenta X8Manage Software Securely with Containers
Build, Deploy, and Maintain Scalable, Secure ApplicationsWith Arduino Portenta X8 Featuring NXP’s i.MX 8M Mini Applications Processor and EdgeLock SE050 Secure Element
How I Automated My HomeArduino CEO Fabio Violante Shares Solutions
Altair 8800 SimulatorHardware Simulation of a Vintage Computer
MS-DOS on the Portenta H7Run Old-School Software on Contemporary Hardware
Grow It YourselfA Digitally Controlled, Single-Box Solution for Indoor Farming
Save the Planet With Home Automation?MQTT on the Arduino Nano RP2040 Connect
Go Professional with Arduino Pro
Smart Ovens Take a Leap Into the Future
Tagvance Builds Safer Construction Sites with Arduino
Santagostino Breathes Easywith Remote Monitoring that Leverages AI for Predictive Maintenance
Security Flies High with RIoT Secure’s MKR-Based Solution
Open-Source Brings a New Generation of Water Management to the World
SensoDetect Deforestation with Sound Analysis
The Mozzi Arduino Library for Sound SynthesisInsights from Tim Barrass
The New Portenta X8 (with Linux!) and Max Carrier Redefine What’s Possible
How Using Arduino Helps Students Build Future Skills
Must-Haves for Your Electronics Workspace
The Importance of Robotics in Education
Dependable IoT Based Upon LoRa
Unboxing the Portenta Machine Control
8-Bit Gaming with Arduboy
Reducing Water Usage at Horseback Riding TracksAn IoT to Constantly Monitor Soil Humidity and Temperature Levels
The Panettone ProjectA sourdough starter management and maintenance system
Supporting Arduino Resellers
Space Invaders with Arduino
Art with ArduinoInspiring Insights from Artists and Designers
Arduino Product Catalogue
The Future of Arduino
Jan Didden created Linear Audio in 2010 and published 14 Volumes between 2010 and 2017. Each 200-page Volume contains on average 10 articles by expert authors in the field of audio, acoustics, and instrumentation. Whether you are interested in tube amplifiers, solid-state equipment, loudspeaker design, capacitor and resistor distortion or distortion measurement, you are certain to find helpful advice and interesting discussions. From beginner to advanced level, for the audio professional or the serious hobbyist, this ExpertCollection will advance your understanding and offer new perspectives on common issues. Bonus material included with this collection is a 5-part YouTube series on negative feedback as applied to audio by renowned author Jan Didden, and nine additional landmark audio articles and presentations. If you are seriously interested in audio, acoustics, and instrumentation, you can’t afford to miss this! The published material is indexed and fully searchable and will provide an almost limitless resource for many years to come. You can read about Linear Audio’s authors, and the Table of Contents of each Volume, at linearaudio.net.
Some Highlights from the contents Surround-sound decoder Compact amp Sampling rate converter Battery powered preamplifier Titan 2000 amplifier Crescendo Millennium amplifier Audio-DAC/ADC IR-S/PDFI receiver and transmitter High-End Power Amp Hi-fi Wireless Headset Paraphase Tone Control and more… Using Adobe Reader you are able to browse and search the articles on your computer, as well as print texts, circuit diagrams and PCB layouts.
Make your project dreams come true: an odometer for the hamster wheel, a fully automatic control of your ant farm with web interface, or the Sandwich-O-Mat – a machine that toasts and grills sandwiches of your choice. With the Arduino and the DIY or Maker movement, not only did entry into microcontroller programming become child's play, but a second development also took place: Resourceful developers brought small boards – so-called shields or modules – to the market, which greatly simplified the use of additional hardware. The small modules contain all the important electronic parts to be connected to the microcontroller with a few plug-in cables, eliminating the need for a fiddly and time-consuming assembly on the plug-in board. In addition, it is also possible to handle tiny components that do not have any connecting legs (so-called SMDs). Projects Discussed Arduino seeks connection BMP and introduction to libraries, I²C Learn I/O basics with the multi-purpose shield I²C LCD adapter and DOT matrix displays LCD keypad shield Level converter W5100: Internet connection I/O expansion shield Relays and solid-state relays The multi-function shield: A universal control unit Connecting an SD card reader via SPI Keys and 7-segment displays 16-bit ADC MCP4725 DAC 16-way PWM servo driver MP3 player GPS data logger using an SD card Touch sensor Joystick SHT31: Temperature and humidity VEML6070 UV-A sensor VL53L0X time-of-flight Ultrasonic distance meter MAX7219-based LED DOT matrix display DS3231 RTC Port expander MCP23017 433 MHz radio MPU-650 gyroscope ADXL345 accelerometer WS2812 RGB LEDs Power supply MQ-xx gas sensors CO2 gas sensor ACS712 current sensor INA219 current sensor L298 motor driver MFRC522 RFID 28BYJ-48 stepper motor TMC2209 silent step stick X9C10x digital potentiometer ST7735 in a color TFT display e-Paper display Bluetooth Geiger counter SIM800L GSM module I²C multiplexer Controller Area Network
Whatever the methods or even then financial means you have to make your circuits work, the power supply should rank high if not Number One in your considerations. The design block simply called “power supply” is hugely underrated both in electronics creation and repair. Yet, the “PSU” has enormous diversity and comes in wildly differing guises like AC/DC, generator, battery (rechargeable or not), PV panel, benchtop, linear or switch-mode, to mention but a few. The output ranges are also staggering like nano-amps to kiloamps and the same for voltages.This special covers the features and design aspects of power supplies.ContentsBasics
Battery ManagementWhat to be aware of when using (Lithium) batteries.
Fixed-Voltage Power Supply using Linear RegulatorsThe best result right after batteries.
Light Energy HarvestingA small solar panel is used in an energy harvesting project to manage and charge four AAA cells.
Mains Powered Adapter DesignBasic circuits and tips for transformers, rectification, filtering and stabilization.
LM317 Soft StartThe high inrush current pulse should be avoided.
Controllable RectifiersSome suggestions to keep the power loss in the linear regulator as low as possible.
Components
Worksheet: The LM117 / LM217 / LM317 Voltage Regulators
SupercapsLow voltage but lots of current… or not?
Reviews
JOY-iT RD6006 Benchtop Power Supply Kit
Siglent SDL1020X Programmable DC Electronic Load
Projects
Balcony Power PlantDIY solar balcony = speedy payback!
DIY LiPo Supercharger KitFrom handcrafted to mass market
Dual-Anode MOSFET ThyristorFaster and less wasteful than the old SCR
Battery JuicerDo not throw away, squeeze!
High-Voltage Power Supply with Curve TracerGenerate voltages up to 400 V and trace characteristics curves for valves and transistors
High Voltage Supply for RIAAFor RIAA tube preamps and other applications.
MicroSupplyA lab power supply for connected devices
Phantom Power Supply using Switched CapacitorsVoltage tripler using three ICs
The SMPS800RE Switch-Mode Supply for the Elektor Fortissimo-100Reliable, light and affordable
Soft Start for PSUBe nice to your power supply – and its load
UniLab 20-30 V, 3 A compact switch-mode lab power supply
Tips
Soft Start for Step-Down Switching Regulators
Low Loss Current Limit
Powerbank Surprise
A Virtual Ground
Battery Maintainer
Battery Pack Discharger
Connecting Voltage Regulators in Parallel
Contents Projects
PicoVoiceVoice alienation and sound effects with the Raspberry Pi Pico Navigation with Vibration Feedback POV Display Pulse Width Modulation (PWM) with the Raspberry Pi Pico Wi-Fi with the Raspberry Pi Pico
'Hello World' from the Raspberry Pi Pico and RP2040A look at the Raspberry Pi Foundation’s first microcontroller Simple On-Off Temperature Controller with Raspberry Pi HAT
Multitasking with the Raspberry PiShowcase: a traffic lights controller
The Raspberry Pi Ruler GadgetFun with a time-of-flight sensor
Raspberry Pi Buffer Board (Mk. 1)Never blow up the I/O again
FM radio with RDSA top HAT project for the Raspberry Pi
LoRa with the Raspberry Pi PicoFun with MicroPython! Tutorials Qt for the Raspberry Pi
Raspberry Pi Pico Programmingwith MicroPython and Thonny
Raspberry Pi Full StackRPi and RF24 at the heart of a sensor network Raspberry Pi Bash Command Cheat Sheet Community
Java on the Raspberry PiAn interview with Frank Delporte Reviews Introducing the New Raspberry Pi Pico W, H, and WH
Secure Boot Solution for Raspberry PiRetrofit security at a reasonable price Review: SmartPi – Smart Meter Extension for Raspberry Pi
Review: The Enviro+ Raspberry Pi HATMeasuring environmental data with Raspberry Pi and the HAT Enviro+
Review: Meet the Raspberry Pi 4All new but still good?
Raspberry Pi Gets a Fast 3.5' Touch DisplayMore power at no extra charge Book Launch: Raspberry Pi for Radio Amateurs
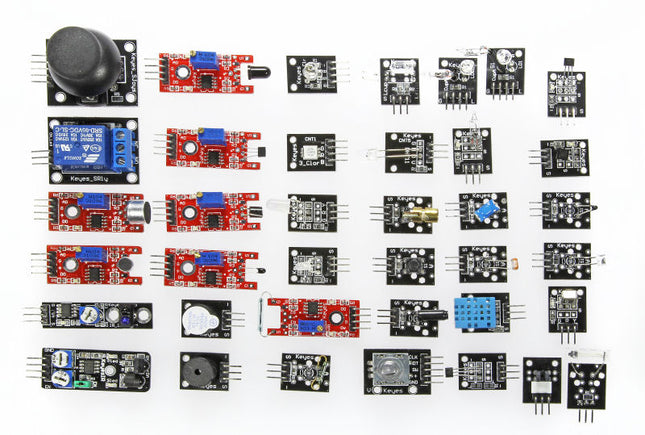
Kit Contents 1x Joystick 1x Relay 1x Big Sound 1x Small Sound 1x Tracking 1x Avoidance 1x Flame 1x Linear Hall Sensor 1x Touch 1x Digital Temperature 1x Buzzer 1x Passive Buzzer 1x RGB LED 1x SMD RGB 1x Two Color (5 mm) 1x Mini Two Color (3 mm) 1x Reed Switch 1x Mini Reed Switch 1x Heartbeat 1x 7 Color Flash 1x Laser Emitter 1x PCB mounted push button 1x Shock, a rolling-ball type Tilt Switch 1x Rotary Encoders 1x Rolling ball Tilt Switch 1x Photoresistor 1x Temp and Humidity 1x Analog Hall 1x Hall Magnetic 1x DS18B20 Temp 1x Analog Temp 1x IR Emission 1x IR Receiver 1x Tap Module 1x Light Blocking Please note: For security reasons the Mercury Tilt Switch and Light Cup are no longer available in current sensor boxes. Downloads Manual
Whatever the methods or even then financial means you have to make your circuits work, the power supply should rank high if not Number One in your considerations. The design block simply called “power supply” is hugely underrated both in electronics creation and repair. Yet, the “PSU” has enormous diversity and comes in wildly differing guises like AC/DC, generator, battery (rechargeable or not), PV panel, benchtop, linear or switch-mode, to mention but a few. The output ranges are also staggering like nano-amps to kiloamps and the same for voltages.This special covers the features and design aspects of power supplies.ContentsBasics
Battery ManagementWhat to be aware of when using (Lithium) batteries.
Fixed-Voltage Power Supply using Linear RegulatorsThe best result right after batteries.
Light Energy HarvestingA small solar panel is used in an energy harvesting project to manage and charge four AAA cells.
Mains Powered Adapter DesignBasic circuits and tips for transformers, rectification, filtering and stabilization.
LM317 Soft StartThe high inrush current pulse should be avoided.
Controllable RectifiersSome suggestions to keep the power loss in the linear regulator as low as possible.
Components
Worksheet: The LM117 / LM217 / LM317 Voltage Regulators
SupercapsLow voltage but lots of current… or not?
Reviews
JOY-iT RD6006 Benchtop Power Supply Kit
Siglent SDL1020X Programmable DC Electronic Load
Projects
Balcony Power PlantDIY solar balcony = speedy payback!
DIY LiPo Supercharger KitFrom handcrafted to mass market
Dual-Anode MOSFET ThyristorFaster and less wasteful than the old SCR
Battery JuicerDo not throw away, squeeze!
High-Voltage Power Supply with Curve TracerGenerate voltages up to 400 V and trace characteristics curves for valves and transistors
High Voltage Supply for RIAAFor RIAA tube preamps and other applications.
MicroSupplyA lab power supply for connected devices
Phantom Power Supply using Switched CapacitorsVoltage tripler using three ICs
The SMPS800RE Switch-Mode Supply for the Elektor Fortissimo-100Reliable, light and affordable
Soft Start for PSUBe nice to your power supply – and its load
UniLab 20-30 V, 3 A compact switch-mode lab power supply
Tips
Soft Start for Step-Down Switching Regulators
Low Loss Current Limit
Powerbank Surprise
A Virtual Ground
Battery Maintainer
Battery Pack Discharger
Connecting Voltage Regulators in Parallel
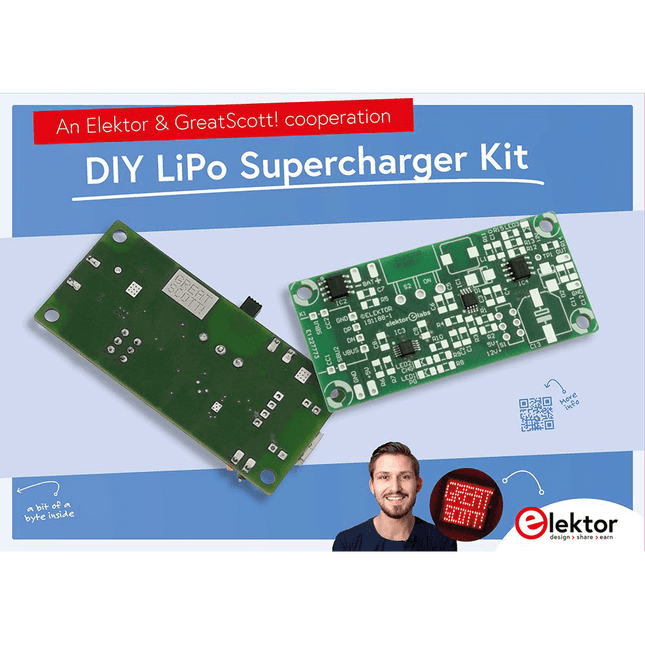
This DIY LiPo Supercharger/Booster (developed the electronics engineer/YouTuber GreatScott! and produced by Elektor) can charge a single-cell LiPo battery and protect it against the effects of overvoltage, overload, and short-circuits. Additionally, it can boost the battery voltage to 5 V or 12 V. The boosted output voltage is protected by an ‘eFuse’ IC outputting 1.52 A at 5 V or 0.76 A at 12 V maximum.The charger part of the circuit needs a +5 V power supply which can be connected through USB-C, or simply two wires soldered to pads on the PCB.In addition, other connections can be soldered to pads on the PCB or by using single pinheaders.Included
1x Mainboard pre-assembled with the 4 ICs
15x Resistors
3x LEDs
13x Capacitors
2x Switches
1x USB-C on a breakout board
2x Diodes
Please note: Battery is not included.The board uses a DC/DC Converter, an IC charger, and an e Fuse from Texas Instruments. The battery protection IC is from Xysemi and provides under-voltage lockout, over current protection, and reverse battery protection.The board is connected to the power and recharges the batteries via a USB-C connection.Specifications
Battery
Single-cell lithium-ion or lithium-polymer battery
Input Voltage
+5 V / 2 A max.
Output Voltage
5 V / 1.52 A12 V / 0.76 A
LiPo Protection
XB8089D
Overcharge Detection
4.250 V
Overcharge Release
4.10 V
Overdischarge Detection
2.50 V
Overdischarge Release
3 V
Overcurrent Detection
10.0 A
Thermal Shutdown
Auto-retry
Enable/Undervoltage Lockout
Rising: 1.2 V (typ.)Falling: 1.1 V (typ.)
More than 200 power supply designs for home construction This USB Stick contains over 200 different power supply circuits from the volumes 2001-2022 of Elektor. The article search feature allows you to search full-text content. The results are always displayed as pre-formatted PDF documents. Highlights Cuk Converter Automatic Battery Switchover Battery Voltage LED Digital Benchtop Power Supply Lithium-Ion Charger Solar Cell Charger Electronic Fuse High Voltage Regulator Power Supply for USB Devices Step-up Converter for LEDs Battery Management and much more... On the Stick you will also find a folder with additional material such as PCB layouts, Gerber files and software.
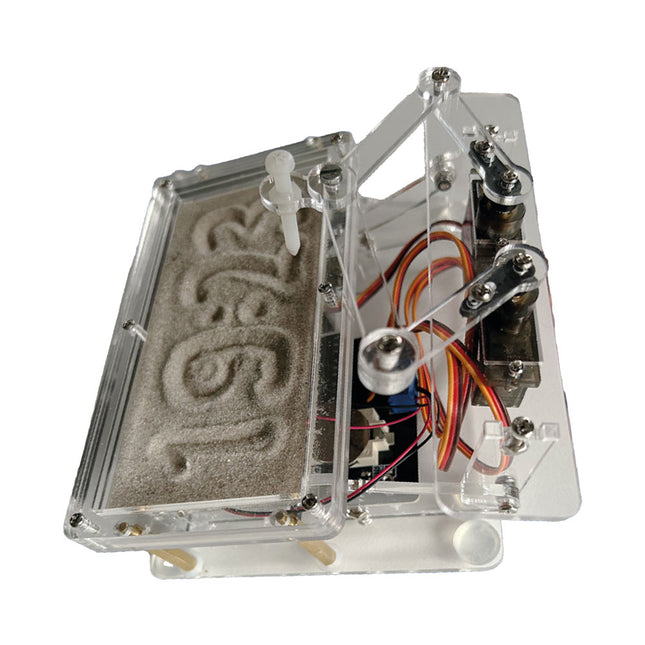
Raspberry Pi-based Eye Catcher
A standard sand clock just shows how time passes. In contrast, this Raspberry Pi Pico-controlled sand clock shows the exact time by “engraving” the four digits for hour and minute into the layer of sand. After an adjustable time the sand is flattened out by two vibration motors and everything begins all over again.
At the heart of the sand clock are two servo motors driving a writing pen through a pantograph mechanism. A third servo motor lifts the pen up and down. The sand container is equipped with two vibration motors to flatten the sand. The electronic part of the sand clock consists of a Raspberry Pi Pico and an RTC/driver board with a real-time clock, plus driver circuits for the servo motors.
A detailed construction manual is available for downloading.
Features
Dimensions: 135 x 110 x 80 mm
Build time: 1.5 to 2 hours approx.
Included
3x Precut acrylic sheets with all mechanical parts
3x Mini servo motors
2x Vibration motors
1x Raspberry Pi Pico
1x RTC/driver board with assembled parts
Nuts, bolts, spacers, and wires for the assembly
Fine-grained white sand
This board is a newer version of the Elektor SDR Reloaded, the difference is that on this new version with two PLL outputs and two LF-outputs, which are accessible via additional connectors on the board (not included in the kit). This allows the user to use this Arduino shield as a signal generator, SW transmitter or even transceiver. Specifications Operating Voltage 5 V and 3.3 V from Arduino Frequency Range 150 kHz to 30 MHz Sensitivity 1 µV Overall Gain 40 dB Maximum signal level at antenna 10 mV Dynamic Range 80 dB Please note: The module doesn't come pre-soldered. Links Elektor SDR Shield 2.0 (1) Elektor SDR Shield 2.0 (2) Elektor SDR Shield 2.0 (3)
Elektor GREEN en GOLD leden kunnen deze uitgave hier downloaden.Nog geen lid? Klik hier om een lidmaatschap af te sluiten.Meer dan 50 schakelingen & projecten
US-sirene
Twee draai-encoders op één analoge ingang
Digitale 220VAC-dimmer met Arduino
Stroombron voor LED’s
Vier schakelaars detecteren met één pin
Kleine aan/uit-schakelaar met accucontrole
Desinfectie-dispenser voor zelfbouw
Eenvoudig elektronisch orgel
Simpele stereoversterker
Audiogestuurde schakelaar
Gebalanceerd/ongebalanceerd-converter
Extern netfilter
Knoploze garagedeurbediening
DI-box voor smartphone
Pret met een looplicht
Eenknops-thyristorbesturing
Quasi-analoge belichtingstimer voor de donkere kamer
Schakelingen bij de Hackster.io-community
Analoge zonnebad-timer
Weer een eendraads LCD-interface
Simpele PWM-generator met AVR ATtiny13
Een tweede leven voor batterijen
Aanraakschakelaar voor LED-verlichting
Tester voor LED’s en DIP-schakelaars
IR-afstandsbedieningstester
Tester voor vermogens-halfgeleiders
SPI voor WS2812(B)-LED’s
Meten van vermogens-zelfinducties
Eén stekker voor Raspberry Pi en Audio DAC
Doe-het-zelf meetklem voor de LCR-meter
Arduino-ampèremeter
Tweevinger-orgel
Ruisarme ADC-kalibrator
DC/DC-boostconverter
Twee potmeters op één digitale ingang
Akoestische nabijheidssensor
Batterijloze radiatorsensor
Speurneus voor draadloze camera’s en microfoons
Timer voor auto-binnenverlichting
Kaarssimulator
Digitale keukentimer
Milliohm-meter
Warmwatervertrager
Eenvoudige lader voor twee (of meer) 18650-cellen
Mini-frequentiereferentie
Zuinige IR-schakelaar
Hergebruik de telefoonlader van je auto
Microfoon-voorversterker voor Arduino
EMI-filters voor zelfbouw
Elektronische dobbelsteen zonder MCU
Vingercondensator
Zelfladende flits-LED
Ook in deze editie
KiCad 6 – vijf interessante nieuwe functies
Retrotronica – de Elektor SC/MP-computer
Interview – kunst maken met elektriciteit
Mijn eerste print – spring in het diepe... met KiCad
Met slimme software de hardware minimaliseren
Elektor Infographics – feiten en cijfers
Nieuwe componenten van Analog
Optimalisering van de signaalintegriteit – Industry 4.0 vereist vlekkeloos werkende interfaces7
Hexadoku – puzzelen voor elektronici
Although the Arduino isn’t a novelty any longer, there are still many beginners who want to try programming and development with a microcontroller, and to them, it is all new. All beginnings can be difficult, though they should be light and enjoyable. You do not need much or expensive equipment for the examples. The circuits are built on a small breadboard, and, if necessary, connected to an Arduino Uno, which you can program on a Windows PC. You will find clear examples of how to build all circuits, ensuring easy and error-free reproduction. Projects Discussed Current & Voltage – How it all began Arduino Hardware Arduino Programming The Electrical Circuit Measuring with the Multimeter Circuit Diagrams and Breadboards Creating Circuit Diagrams Breadboard Views with Fritzing Online Circuit Simulation Indispensable: Resistors (Part 1) Hands-on with Resistors (Part 2) Variable Resistors Diodes: One-way Street for Current The Transistor Switch Electromagnetism Relays and Motors op-amps: Operational Amplifiers Capacitors The NE555 Timer PWM and Analogue Values with Arduino 7-Segment Temperature Display Introduction to Soldering and LCDs
Make your project dreams come true: an odometer for the hamster wheel, a fully automatic control of your ant farm with web interface, or the Sandwich-O-Mat – a machine that toasts and grills sandwiches of your choice. With the Arduino and the DIY or Maker movement, not only did entry into microcontroller programming become child's play, but a second development also took place: Resourceful developers brought small boards – so-called shields or modules – to the market, which greatly simplified the use of additional hardware. The small modules contain all the important electronic parts to be connected to the microcontroller with a few plug-in cables, eliminating the need for a fiddly and time-consuming assembly on the plug-in board. In addition, it is also possible to handle tiny components that do not have any connecting legs (so-called SMDs). Projects Discussed Arduino seeks connection BMP and introduction to libraries, I²C Learn I/O basics with the multi-purpose shield I²C LCD adapter and DOT matrix displays LCD keypad shield Level converter W5100: Internet connection I/O expansion shield Relays and solid-state relays The multi-function shield: A universal control unit Connecting an SD card reader via SPI Keys and 7-segment displays 16-bit ADC MCP4725 DAC 16-way PWM servo driver MP3 player GPS data logger using an SD card Touch sensor Joystick SHT31: Temperature and humidity VEML6070 UV-A sensor VL53L0X time-of-flight Ultrasonic distance meter MAX7219-based LED DOT matrix display DS3231 RTC Port expander MCP23017 433 MHz radio MPU-650 gyroscope ADXL345 accelerometer WS2812 RGB LEDs Power supply MQ-xx gas sensors CO2 gas sensor ACS712 current sensor INA219 current sensor L298 motor driver MFRC522 RFID 28BYJ-48 stepper motor TMC2209 silent step stick X9C10x digital potentiometer ST7735 in a color TFT display e-Paper display Bluetooth Geiger counter SIM800L GSM module I²C multiplexer Controller Area Network
Although the Arduino isn’t a novelty any longer, there are still many beginners who want to try programming and development with a microcontroller, and to them, it is all new. All beginnings can be difficult, though they should be light and enjoyable. You do not need much or expensive equipment for the examples. The circuits are built on a small breadboard, and, if necessary, connected to an Arduino Uno, which you can program on a Windows PC. You will find clear examples of how to build all circuits, ensuring easy and error-free reproduction. Projects Discussed Current & Voltage – How it all began Arduino Hardware Arduino Programming The Electrical Circuit Measuring with the Multimeter Circuit Diagrams and Breadboards Creating Circuit Diagrams Breadboard Views with Fritzing Online Circuit Simulation Indispensable: Resistors (Part 1) Hands-on with Resistors (Part 2) Variable Resistors Diodes: One-way Street for Current The Transistor Switch Electromagnetism Relays and Motors op-amps: Operational Amplifiers Capacitors The NE555 Timer PWM and Analogue Values with Arduino 7-Segment Temperature Display Introduction to Soldering and LCDs
Ultrasensitive wideband magnetic/electromagnetic field detector This ultra sensitive wideband “E-smog” detector adds two senses to help you track down noise that’s normally inaudible. TAPIR also makes a great project to build since the enclosure is the PCB proper. TAPIR detects electric as well as magnetic fields at high frequencies. The PCB is ingenuously designed to double as a shielded case. Each of the two antennas that can be connected to TAPIR is optimized for one type of field. Magnetic fields are detected with a ferrite-cored coil, and electric fields with a rod antenna, which is easily constructed from a length of stiff wire. Using TAPIR is dead easy. Connect the headphones, the selected antenna and switch on. Move the antenna around any suspect area and you’ll hear different types of noise and noise levels with each electrical device, depending on the type and frequency of the emitted field. Features Ultrasensitive Wideband 'E-smog' Detector PCB Doubles as Project Housing Tried & Tested by Elektor Labs Educational & Geeky Project Easy to solder SMD Parts Online Illustrated Construction Manual Included Printed Circuit Board All Components Antenna and Headphones
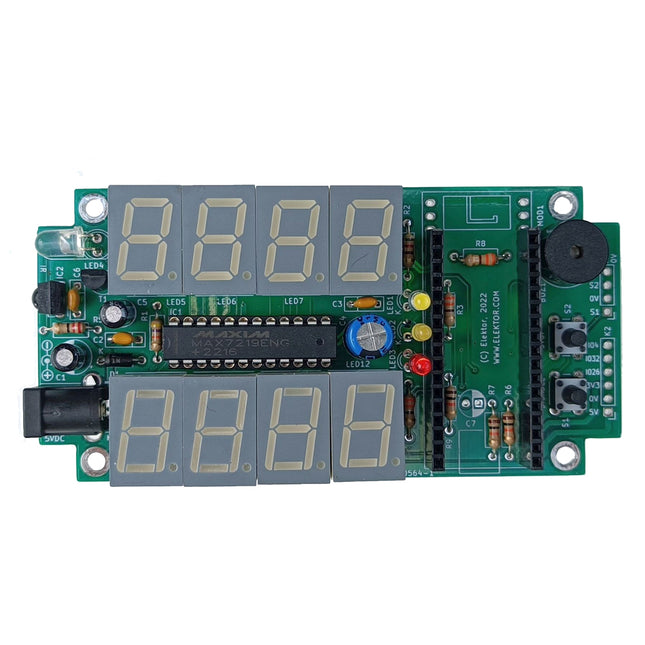
ESP32-based Alarm Clock connects to Timeserver and controls Radio & TV Cloc is an easy to build alarm clock without SMT parts. It has a double 7-segment retro display with variable brightness. One display shows the current time, the other the alarm time. Cloc connects to a Wi-Fi network, so it can access a timeserver somewhere on the planet. It can connect using DHCP or with a fixed IP address. An optional DS3231-based battery-backed real-time clock (RTC) module (not included in the kit) can be added to keep time in case of network problems. The built-in web server shows the time, allows setting the alarms and lets you adjust the clock’s parameters. The optimized graphical HTML interface works on most standard browsers and handheld devices. Specifications Based on an ESP32-Pico-Kit. Two independent 7-segment displays for the time of day and the alarm time. The time is set automatically by connecting to an online timeserver. Alarm time for each day of the week. Alarm output: buzzer and infrared code for e.g. radio, hi-fi system or TV. Two push-buttons for interacting with the device. Integrated web server for remote configuration via Wi-Fi. All settings are saved in EEPROM. Open-source software written for Arduino. Over-the-Air (OTA) mode allows updating the firmware remotely. Optional DS3231-based real-time clock (RTC) module (not included). Included PCB All components ESP32-Pico-Kit V4 (valued at €20) Hammond IR Red Translucent PC Enclosure (valued at €15) Links Cloc – Alarm Clock 2.0
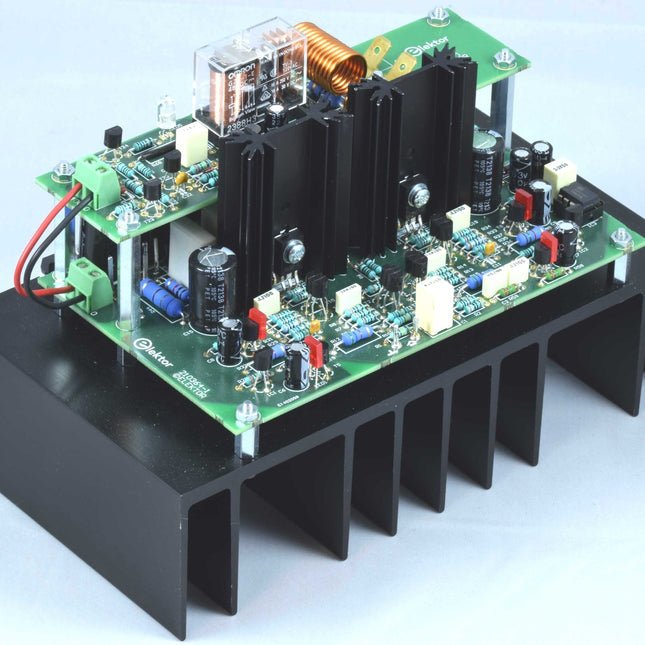
Celebrated Elektor audio design specialist Ton Giesberts has once again released a phenomenal design for a high-end audio power amplifier, the Elektor Fortissimo-100. Once again, the results of the amplifier on the test bench challenged Elektor’s high-spec Audio Precision test gear close to its noise floor. The specifications, ease of construction, and the overall stability of the Fortissimo-100 are deemed so good that Elektor are offering the project as a kit of parts for assembly at home, using plain tools. The kit contains each and every part to build one Fortissimo-100 mono block, including a set of high-quality PCBs, the heatsink, and other mechanical parts like standoffs and ceramic isolation washers for the power transistors. Again, all parts are through-hole. A detailed, step-by-step assembly guide (downloadable PDF) should enable every audio lover with the ability to work accurately and sensibly, to assemble the mono block and ravish at the sound quality. Two mono blocks are required to build a Fortissimo-100 stereo amplifier, plus a symmetrical 40-V, stabilized power supply per amplifier. Don’t use a single power supply for two amplifiers! The supply is not included in the kit, but a suggested source is given in the description for the project, so readers can opt for their personal desires. Specifications Input Sensitivity 1.076 V (94 W/8 Ω, THD = 0.1%, B = 22 kHz) Input Impedance 10 kΩ Sine-wave Power 94 W (8 Ω, THD = 0.1%) 181 W (4 Ω, THD = 0.1%) Bandwidth 3.3 Hz – 237 kHz (–3 dB, 1 W/8 Ω) Open-loop Bandwidth ≈ 20 kHz Open-loop Gain ≈ 140000 (8 Ω load) Slew Rate 45 V/μs Signal-to-Noise Ratio 103 dB (B = 22 Hz – 22 kHz linear) Harmonic Distortion Plus Noise 0.0008% (1 kHz, 50 W, 8 Ω, B = 80 kHz)0.002% (20 kHz, 50 W, 8 Ω, B = 80 kHz)0.0042% (20 kHz, 100 W, 4 Ω, B = 80 kHz) Intermodulation Distortion(50 Hz : 7 kHz = 4 : 1) 0.0015% (50 W, 8 Ω)0.0041% (100 W, 4 Ω) Included Two PCBs: amplifier PCB and protection PCB All parts, including heatsinks Construction Manual – Downloadable PDF
Elektor Jumpstarter This product is the result of a successful campaign on our electronics project support platform Elektor Jumpstarter. Readers and interested parties can submit their product ideas and, together with the Elektor development team, a finished product can be brought to market after extensive consideration and many tests. Note that these are always small series production runs, so the products are considered 'Elektor Collector Items'.
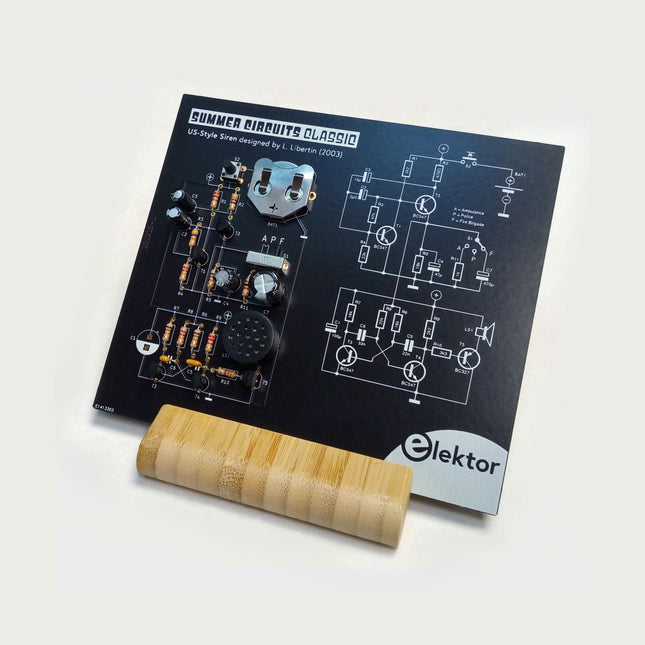
A great way to explain the workings of an electronic circuit is to position the discrete parts on the board exactly as in the schematic. Press the button and this 'Elektor Classic' responds with 1 of 3 siren sounds: police, ambulance, or fire brigade. The kit is composed of through-hole parts only and includes a wooden desktop stand. A full explanation of the circuit operation appears on the back of the circuit board. Features Realistic Sound from Onboard Speaker Unique PCB Layout Equals Schematic Elektor Heritage Circuit Symbols Tried & Tested by Elektor Labs Educational & Geeky Project Through-Hole Parts Only Included Printed Circuit Board All Components Wooden Desktop Stand
6 Elektor decennia (jaren '60, '70, '80, '90, '2000 en '2010) op USB-stick Deze USB-stick (32 GB, USB 3.0) bevat de complete jaargangen 1961-2023 (alle nummers) van het elektronica-vakblad Elektor. Elektor wil mensen inspireren om zich elektronica en computertechniek eigen te maken door het presenteren van nabouwvriendelijke, professioneel ontworpen schakelingen op alle terreinen van de elektronica: Audio & Video Basiskennis Computer & apparatuur Hobby & modelbouw Hoogfrequent Huis & tuin Meten & testen Microcontrollers Stroomvoorziening Al dat andere dat niet zo gemakkelijk in een van deze categorieën kan worden ondergebracht. De meer dan 10.000 afzonderlijke artikelen zijn chronologisch op publicatiedatum (maand/jaar) geordend. Systeemeisen Computer geschikt voor Adobe Reader vanaf versie 7 Webbrowser
Elektor products are not kits like the others. Elektor circuits are sometimes quite complex. They are designed so that their assembly presents as few problems as might reasonably be expected. If the kits developed by Elektor are not particularly difficult to build, it is precisely because they are designed from A to Z to be replicated at home by many readers with equally varying levels and skills in electronics.